 ## Troubleshooting
Here's how to solve some common problems when working with the CLI.
## Troubleshooting
Here's how to solve some common problems when working with the CLI.
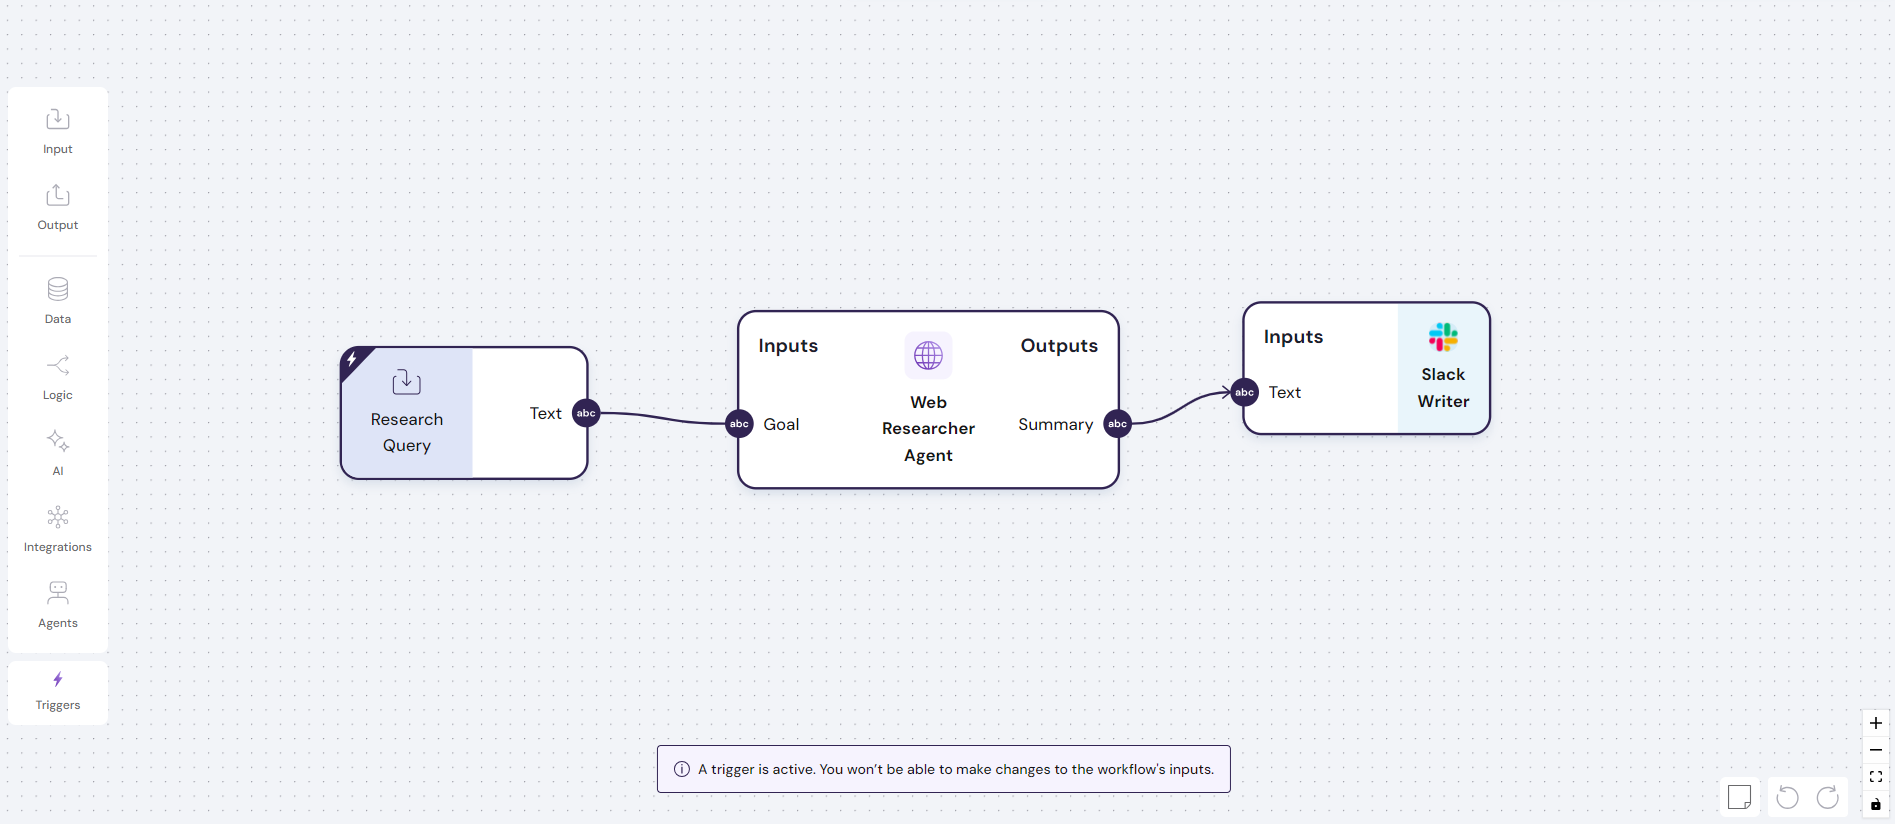
 Secondly, the web researcher agent should be connected to a `Slack Writer` to return the output to the correct Slack channel.
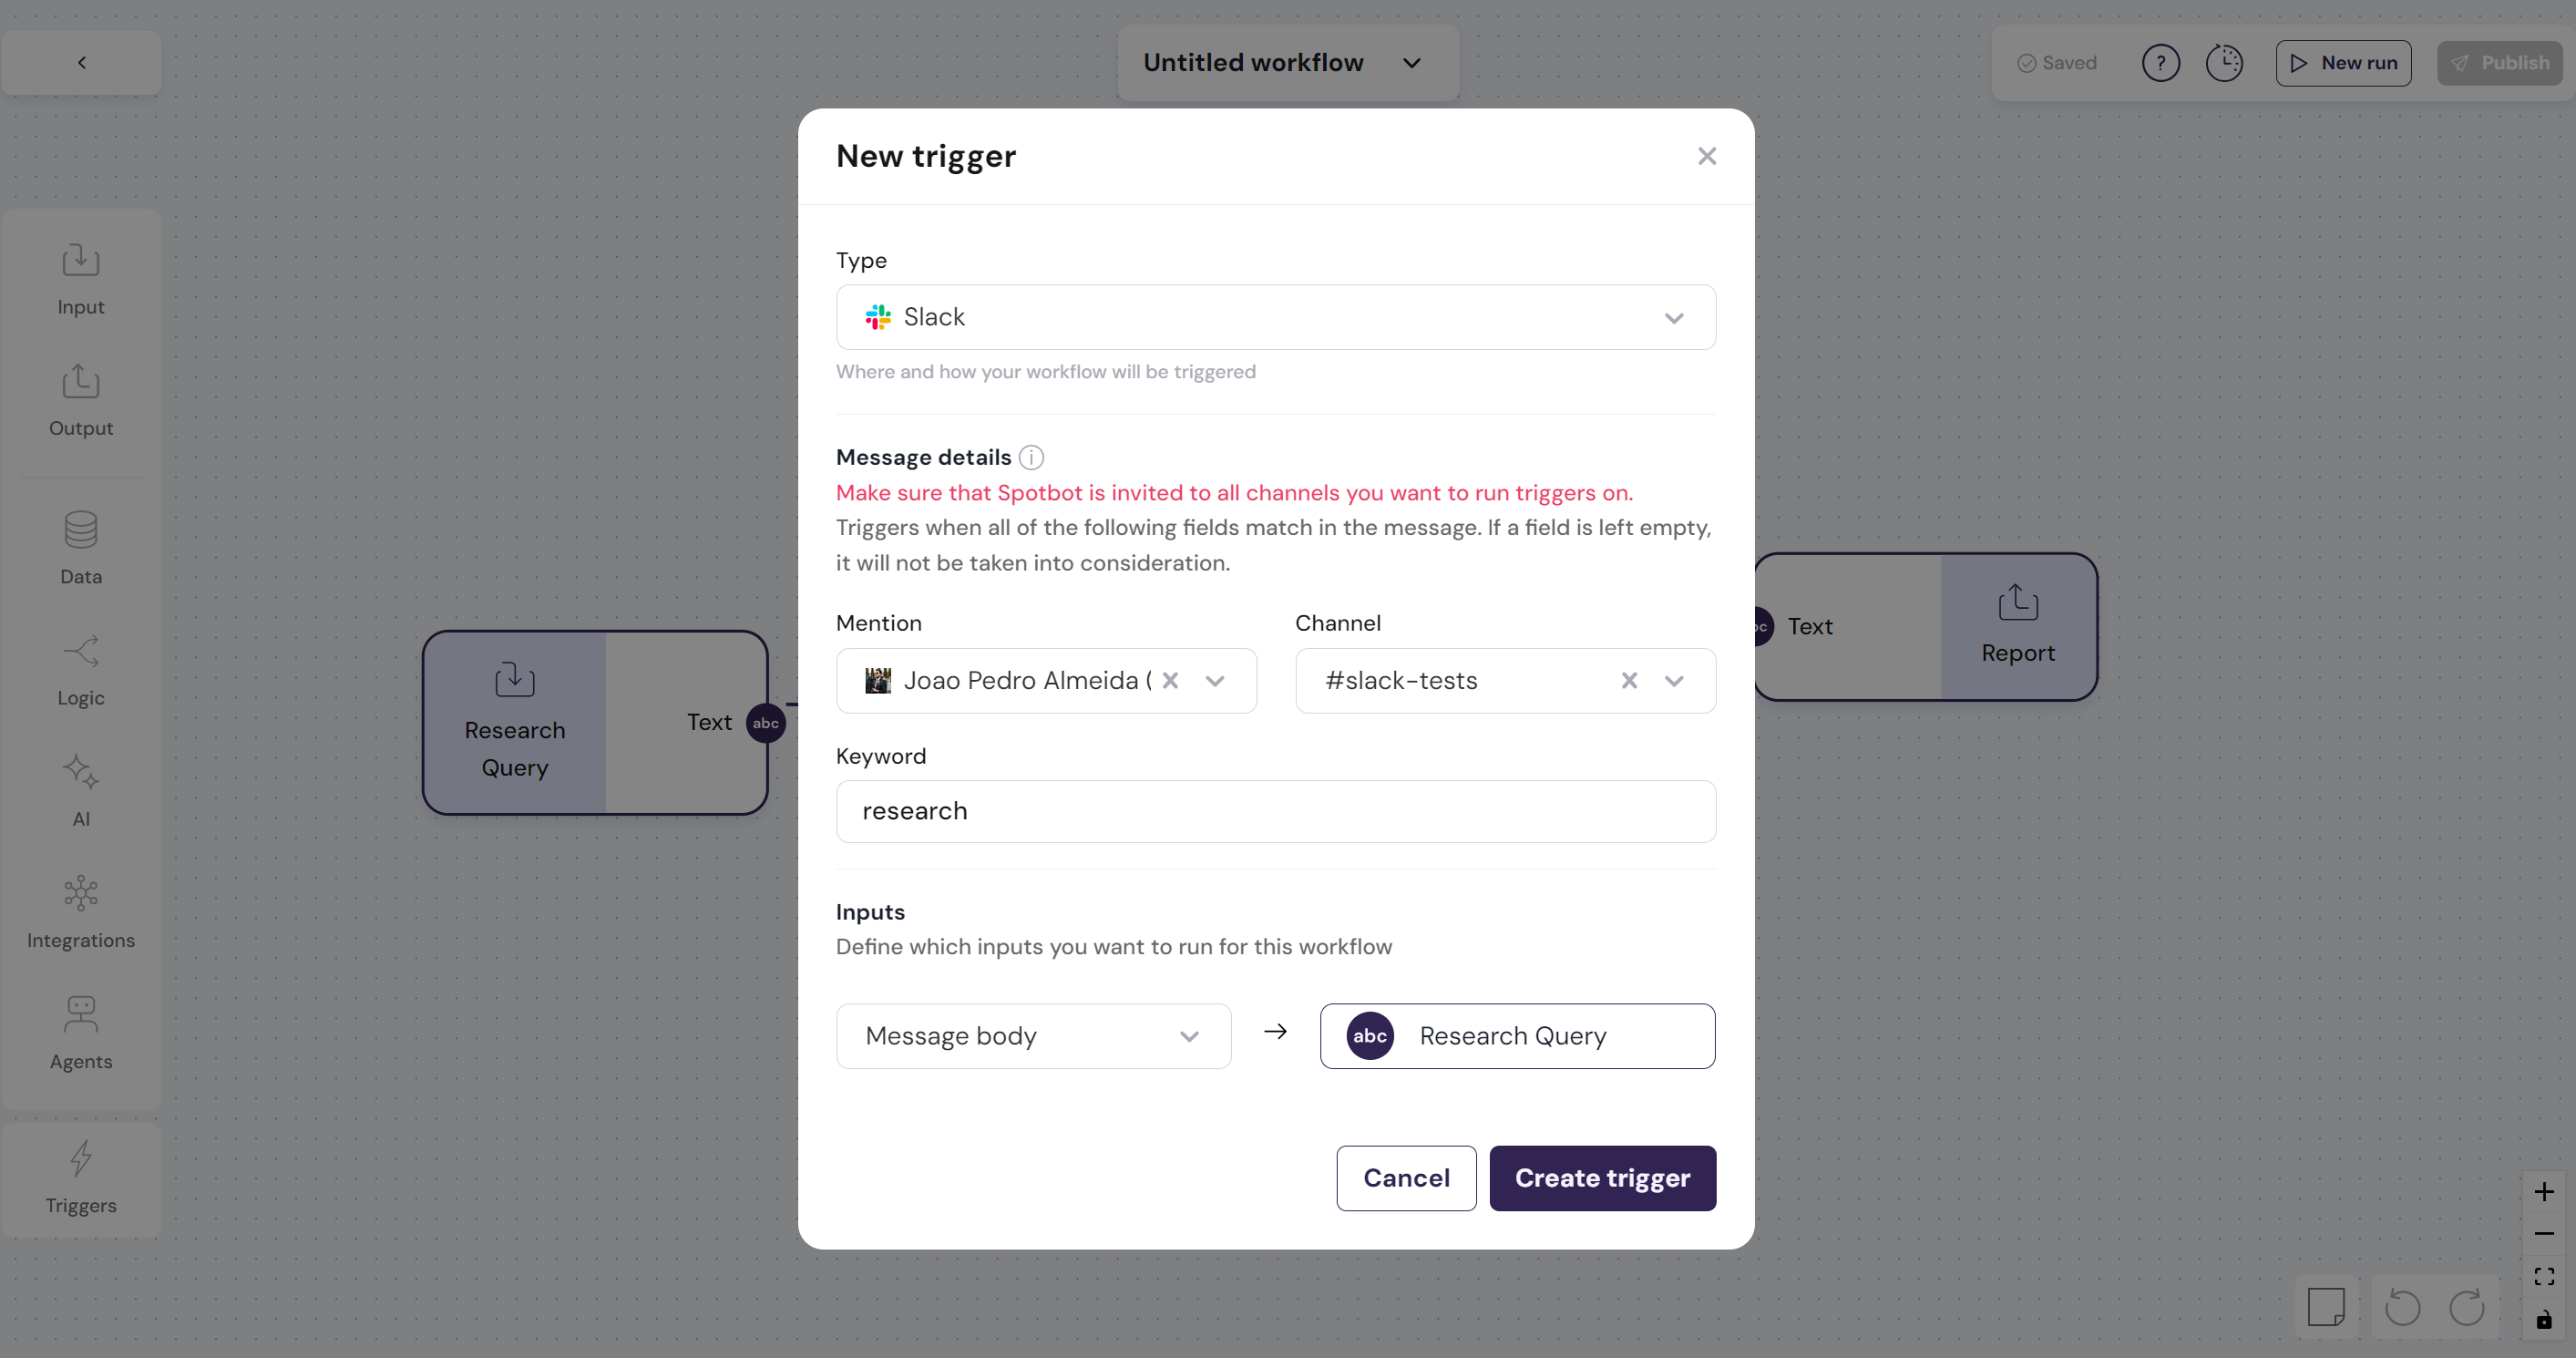
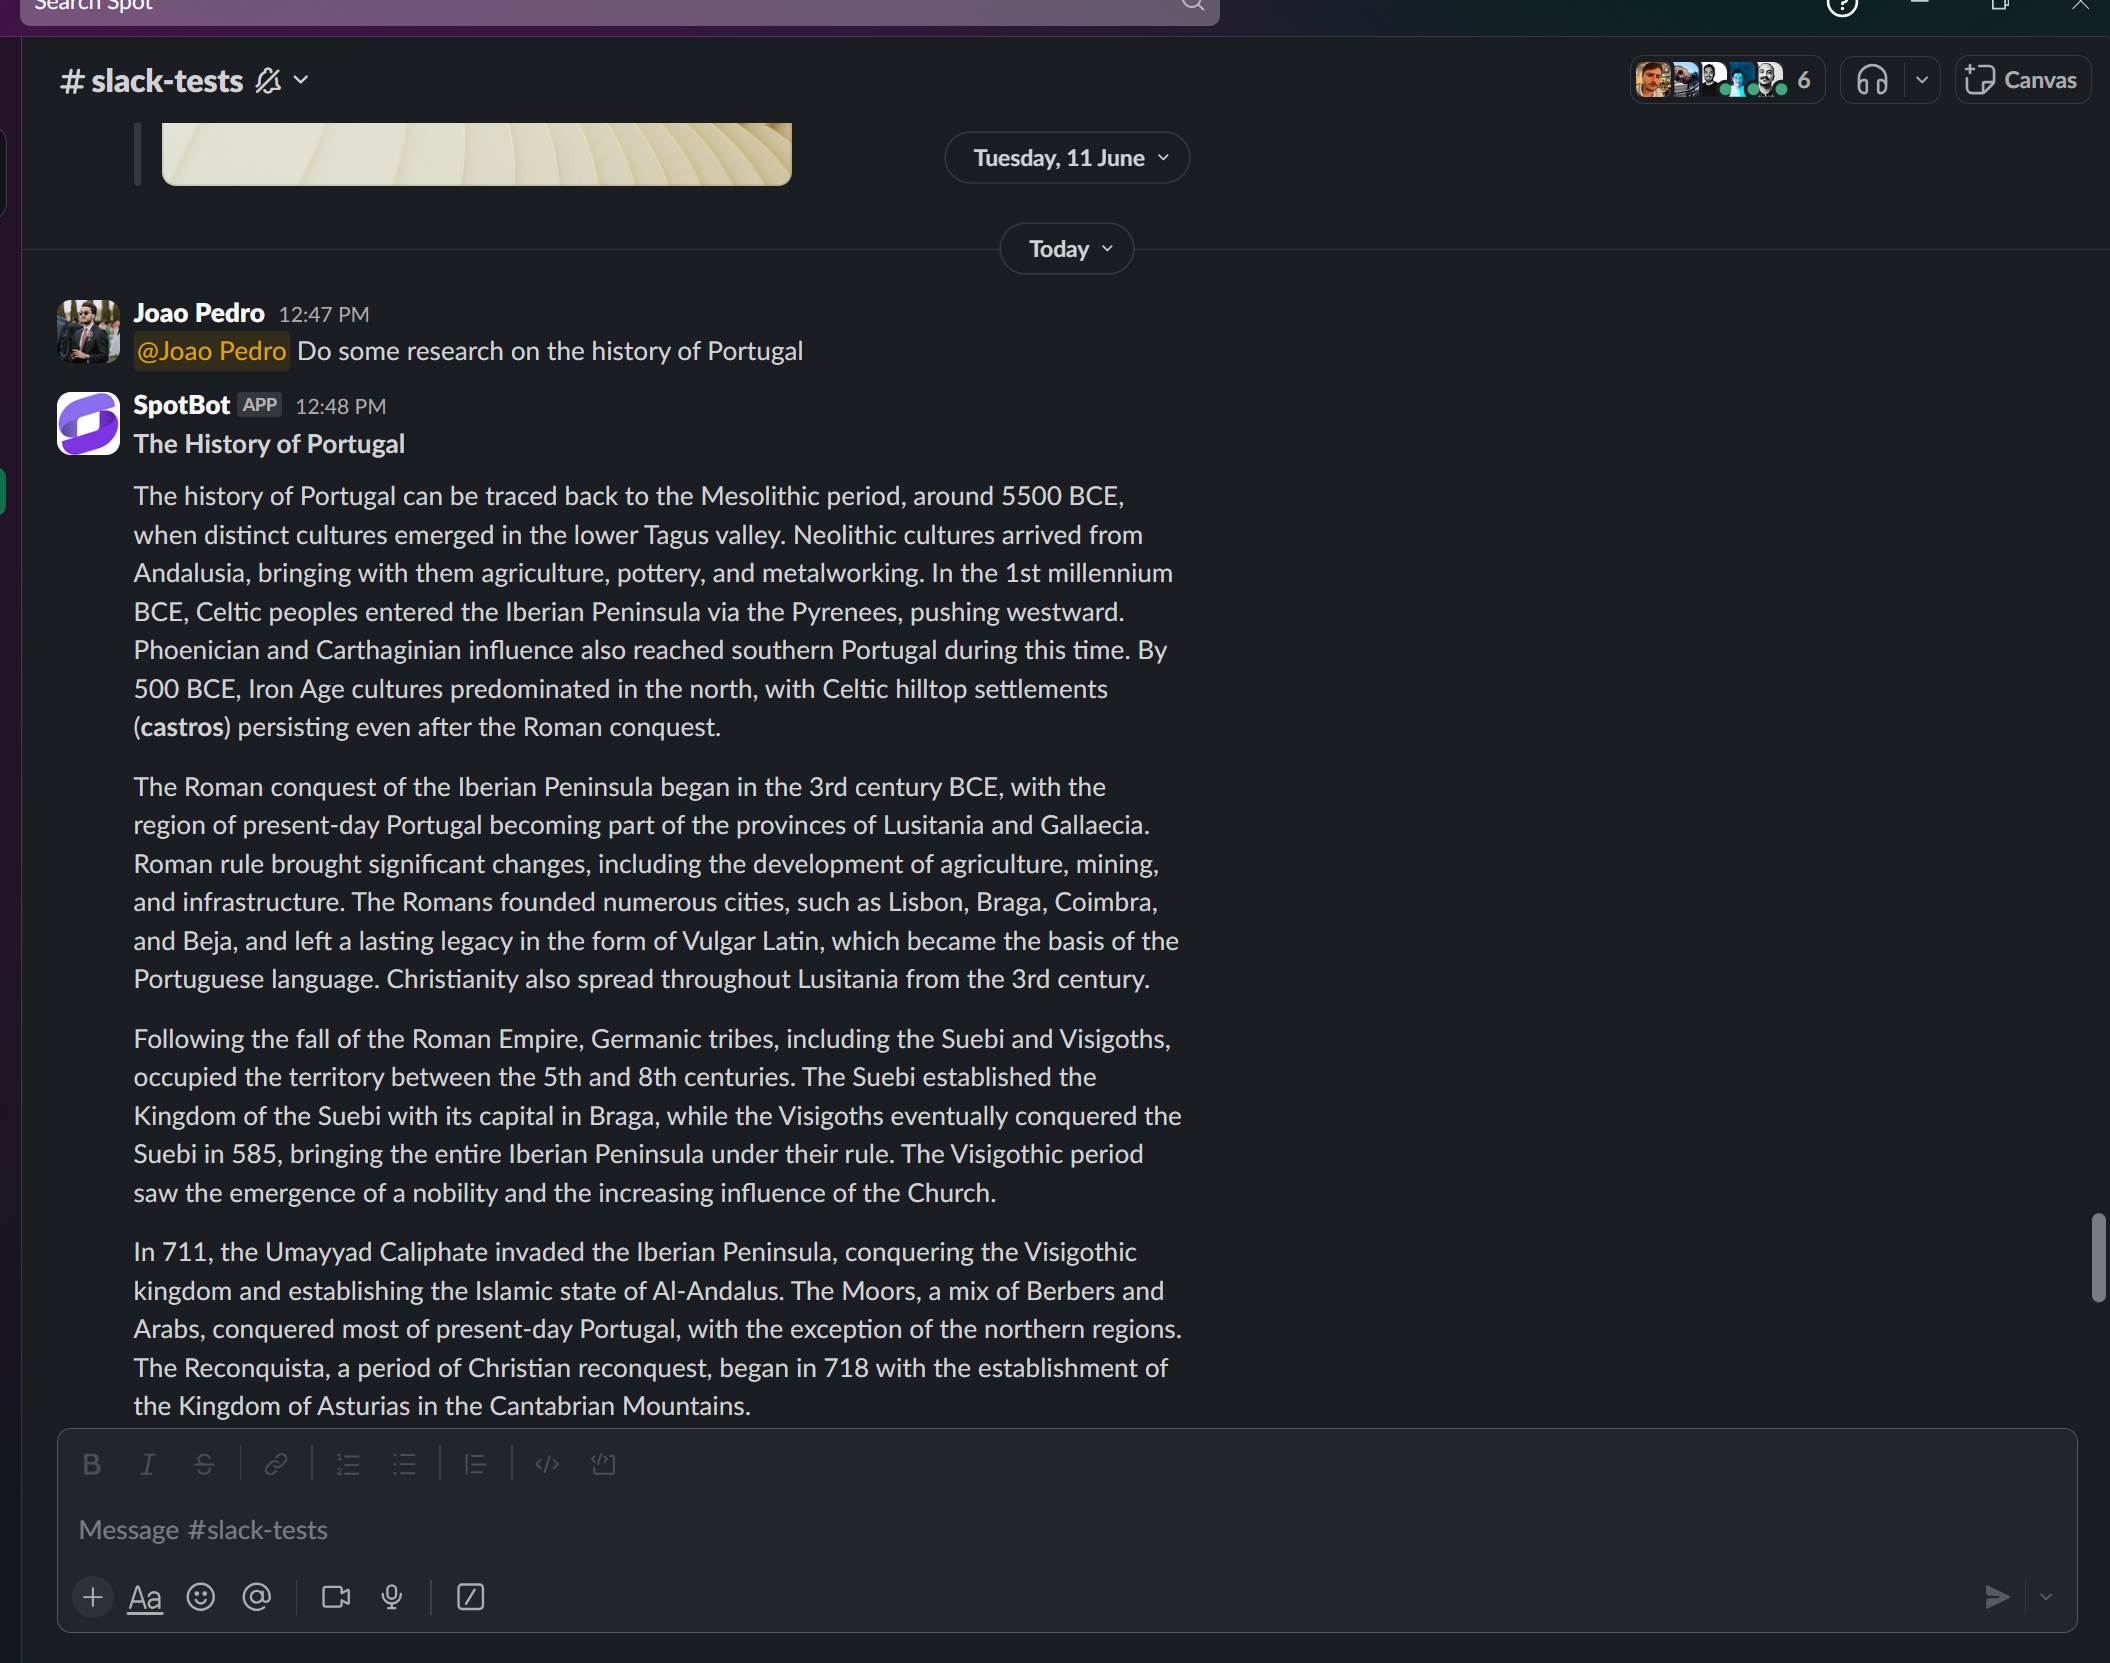
 And finally, the trigger can be actioned directly on your Slack, as shown in the example below.
 \n=== Documentation/Triggers/Gmail.mdx ===
---
title: "Gmail"
Description: "This trigger allows users to start a workflow from a given email received on Gmail."
---
A `Gmail trigger` interface allows users to run workflows seamlessly when an email is sent.
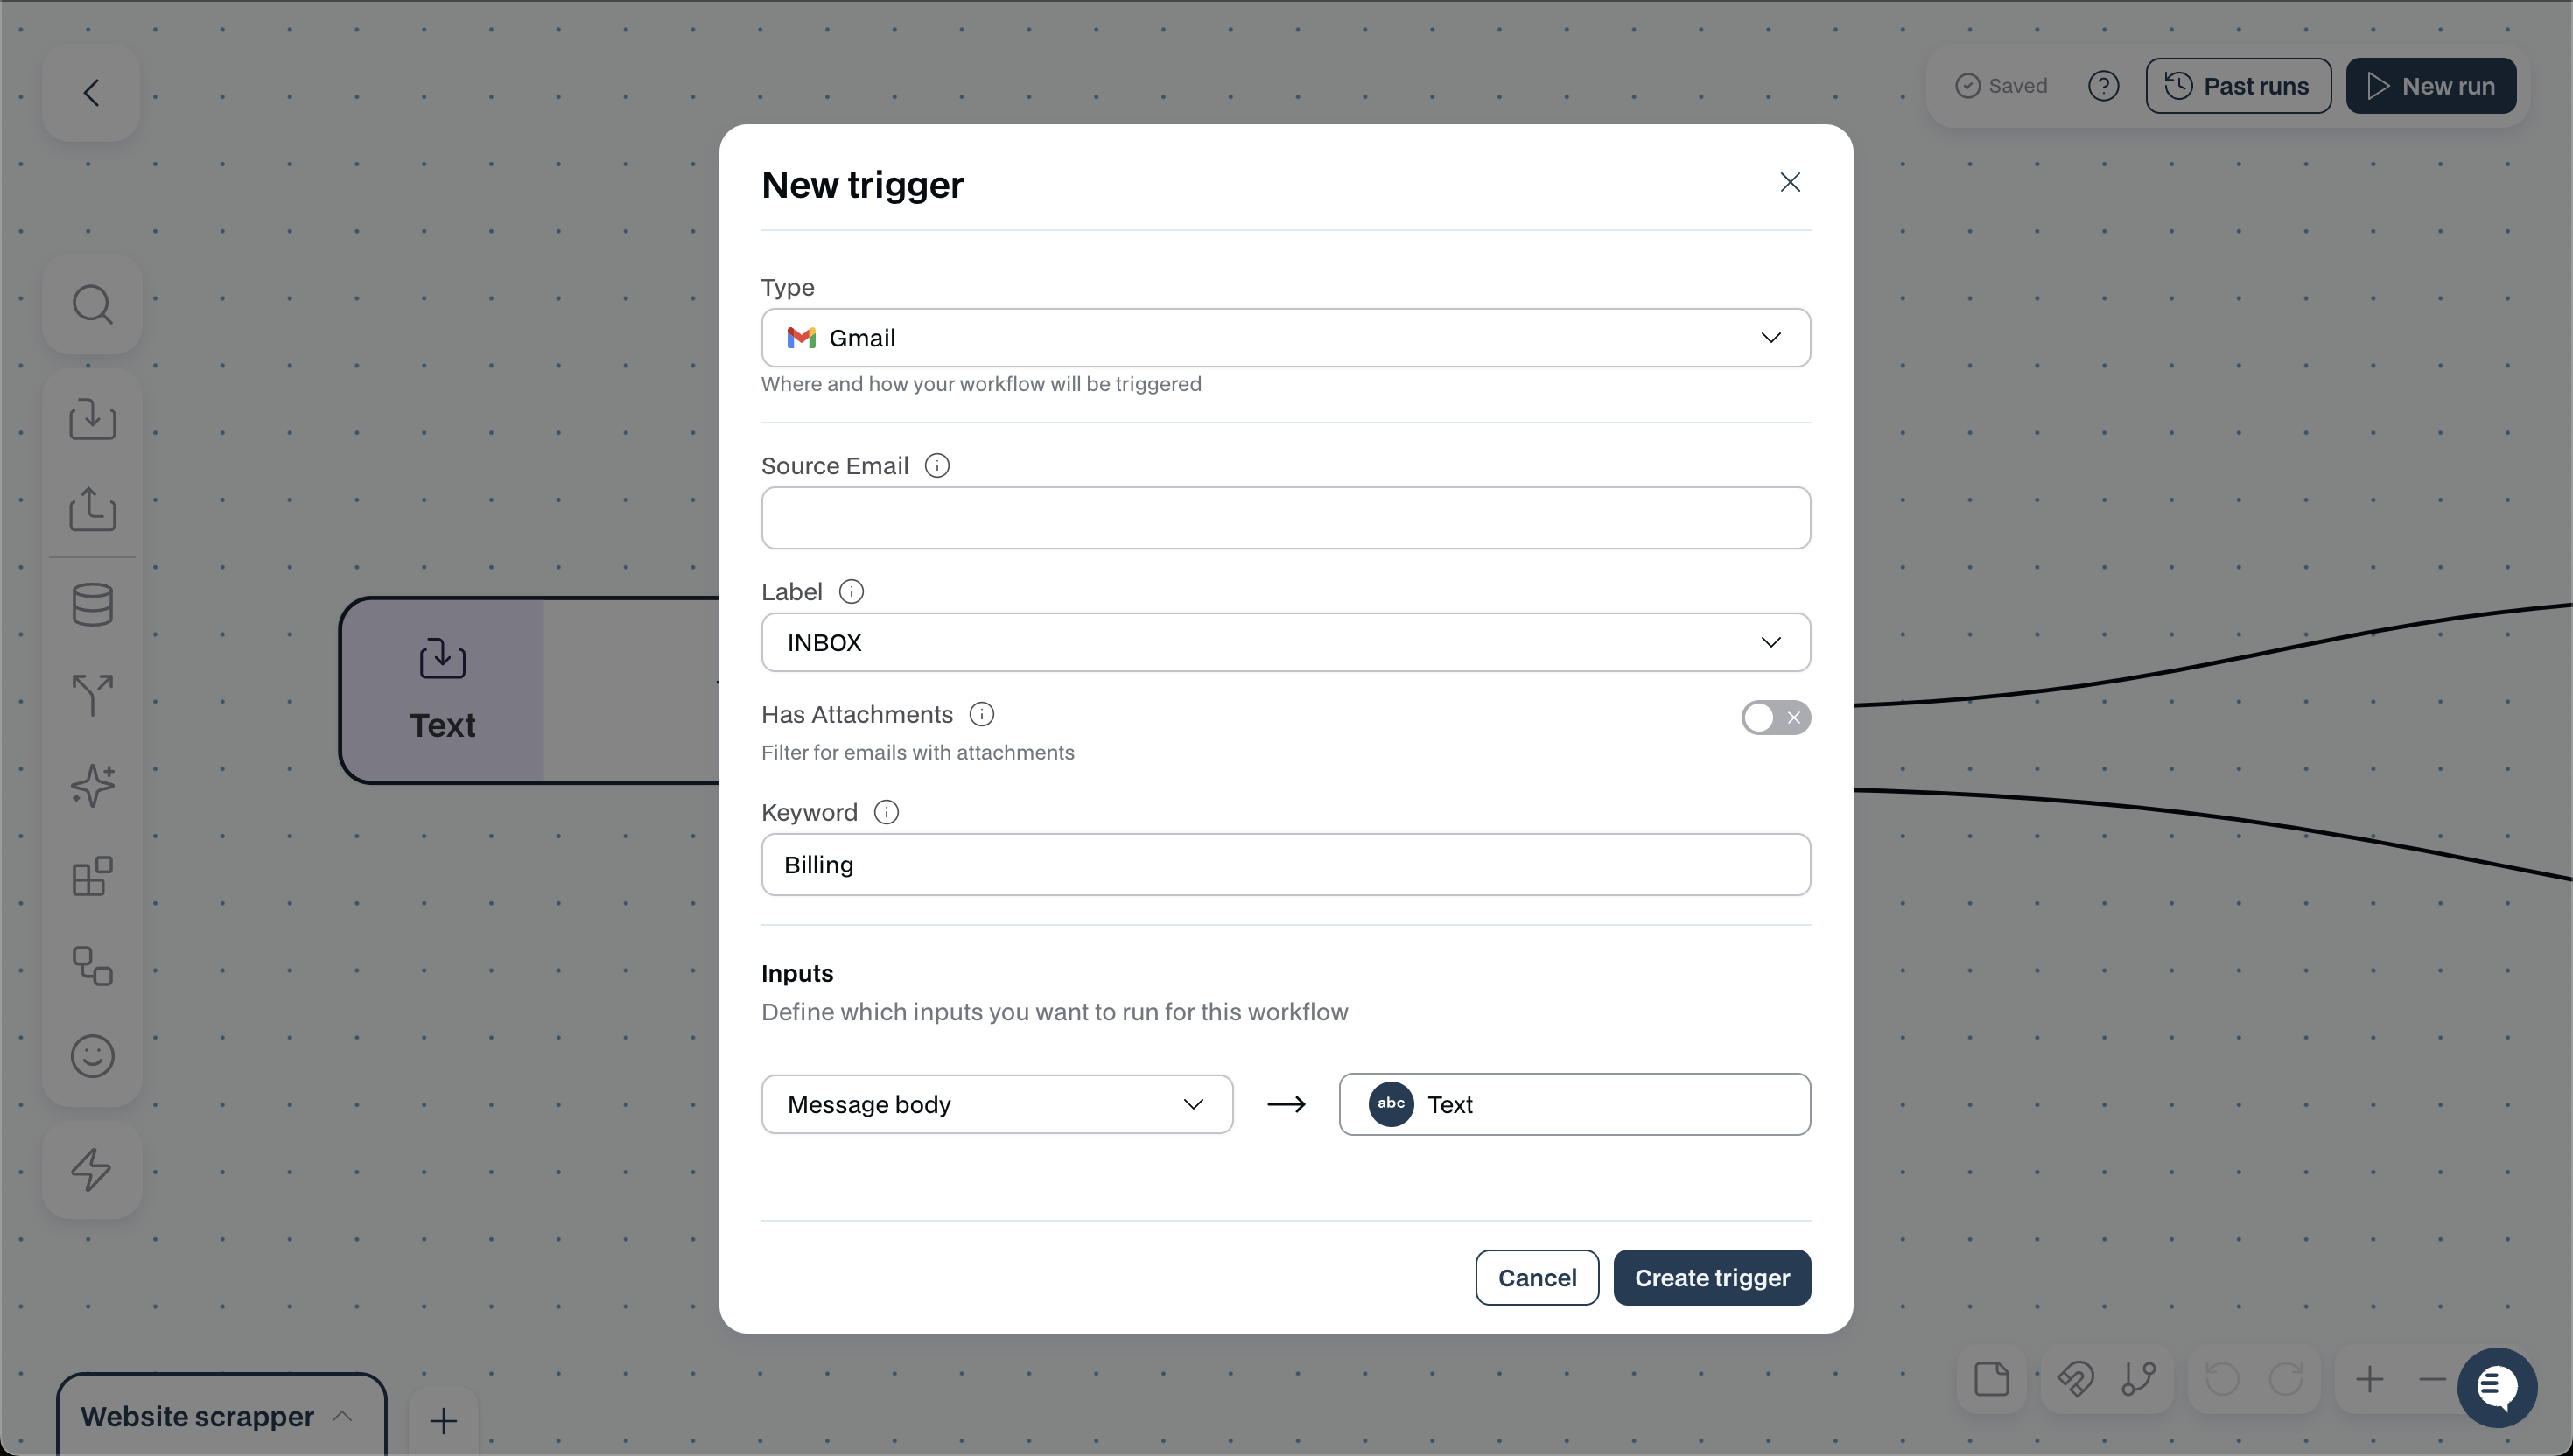
The `Gmail trigger` function has the following configs and inputs:
- **Source Email**: Specific emails for this trigger to work with. If you want it to trigger with all emails, keep it empty.
- **Label**: Specify the label and folder from which you want emails to be read from
- **Keyword**: Define a Keyword that, once mentioned in an email, will trigger the workflow
- **Inputs**: Define the input component of the email that should be passed onto the workflow
Take, for example, this trigger set to run everytime an email from INBOX has the keyword Billing.
\n=== Documentation/Triggers/Gmail.mdx ===
---
title: "Gmail"
Description: "This trigger allows users to start a workflow from a given email received on Gmail."
---
A `Gmail trigger` interface allows users to run workflows seamlessly when an email is sent.
The `Gmail trigger` function has the following configs and inputs:
- **Source Email**: Specific emails for this trigger to work with. If you want it to trigger with all emails, keep it empty.
- **Label**: Specify the label and folder from which you want emails to be read from
- **Keyword**: Define a Keyword that, once mentioned in an email, will trigger the workflow
- **Inputs**: Define the input component of the email that should be passed onto the workflow
Take, for example, this trigger set to run everytime an email from INBOX has the keyword Billing.
 \n=== Documentation/Triggers/Clock.mdx ===
---
title: "Schedule"
Description: "This trigger allows users to start a workflow at a given time of the day, month, and week."
---
A `Schedule trigger` interface allows users to run workflows seamlessly at any time of the day, week, and month.
**You can use this feature to run a workflow automatically during the night so that you can have the work done in the morning**
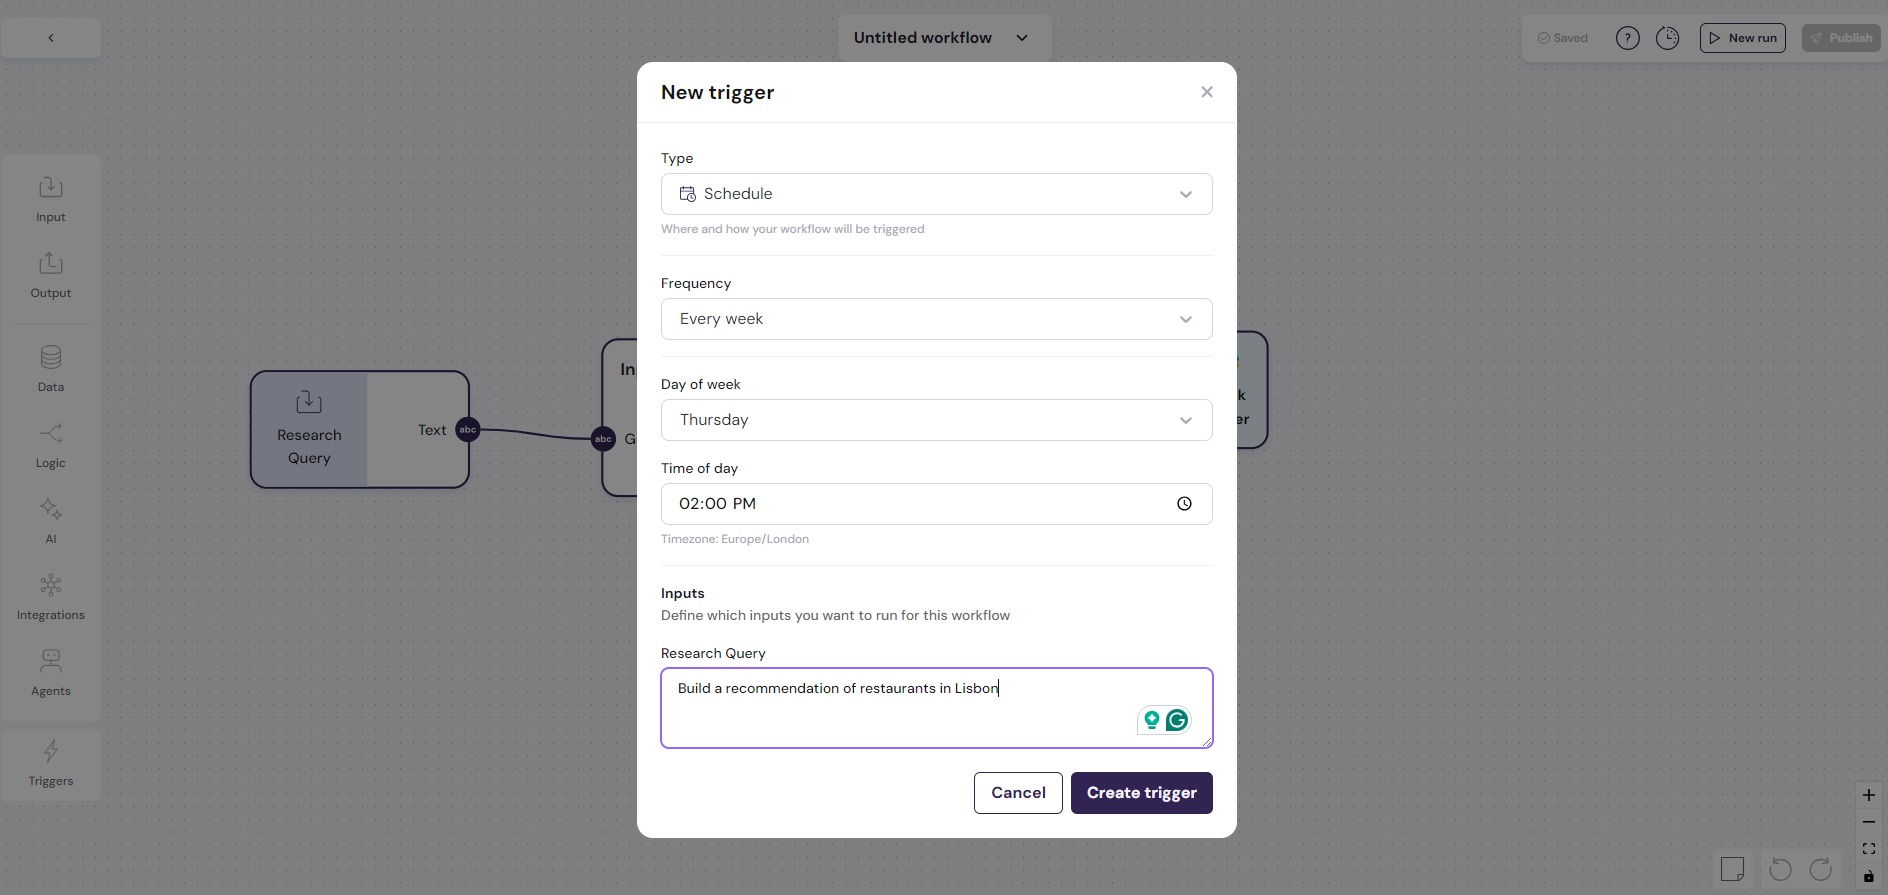
The `Schedule Trigger` function has the following configs and inputs:
- **Frequency**: Specify the frequency of the trigger on an hour, daily, weekly, and monthly cadence
- **Time Specification**: Define the exact time at which the workflow should run
- **Inputs**: Define the input that should trigger the workflow
Take, for example, this trigger set to run every Thursday at 2 pm.
\n=== Documentation/Triggers/Clock.mdx ===
---
title: "Schedule"
Description: "This trigger allows users to start a workflow at a given time of the day, month, and week."
---
A `Schedule trigger` interface allows users to run workflows seamlessly at any time of the day, week, and month.
**You can use this feature to run a workflow automatically during the night so that you can have the work done in the morning**
The `Schedule Trigger` function has the following configs and inputs:
- **Frequency**: Specify the frequency of the trigger on an hour, daily, weekly, and monthly cadence
- **Time Specification**: Define the exact time at which the workflow should run
- **Inputs**: Define the input that should trigger the workflow
Take, for example, this trigger set to run every Thursday at 2 pm.
 \n=== Documentation/Data Modules/Scrape Web Page.mdx ===
---
title: "Read Webpage"
description: "Reads the text present in a URL"
---
The `Read Webpage` module is a data module that can extract the text from a specific URL.
This module has multiple configurations that can enhance its capabilities.
- **Depth of sub-links**: The number of sub-links that will be read in each webpage. Note that the deeper, the more time it's going to take to run.
- **Scroll the Webpage**: When enabled, the model can smartly scroll the webpage to find more information. (Important for sites, that don't load completely and require the user to scroll)
- **Advanced Options**:
- **Continue on Error**: If enabled, in case the scraping fails, the output value of Text will contain the value `
\n=== Documentation/Data Modules/Scrape Web Page.mdx ===
---
title: "Read Webpage"
description: "Reads the text present in a URL"
---
The `Read Webpage` module is a data module that can extract the text from a specific URL.
This module has multiple configurations that can enhance its capabilities.
- **Depth of sub-links**: The number of sub-links that will be read in each webpage. Note that the deeper, the more time it's going to take to run.
- **Scroll the Webpage**: When enabled, the model can smartly scroll the webpage to find more information. (Important for sites, that don't load completely and require the user to scroll)
- **Advanced Options**:
- **Continue on Error**: If enabled, in case the scraping fails, the output value of Text will contain the value `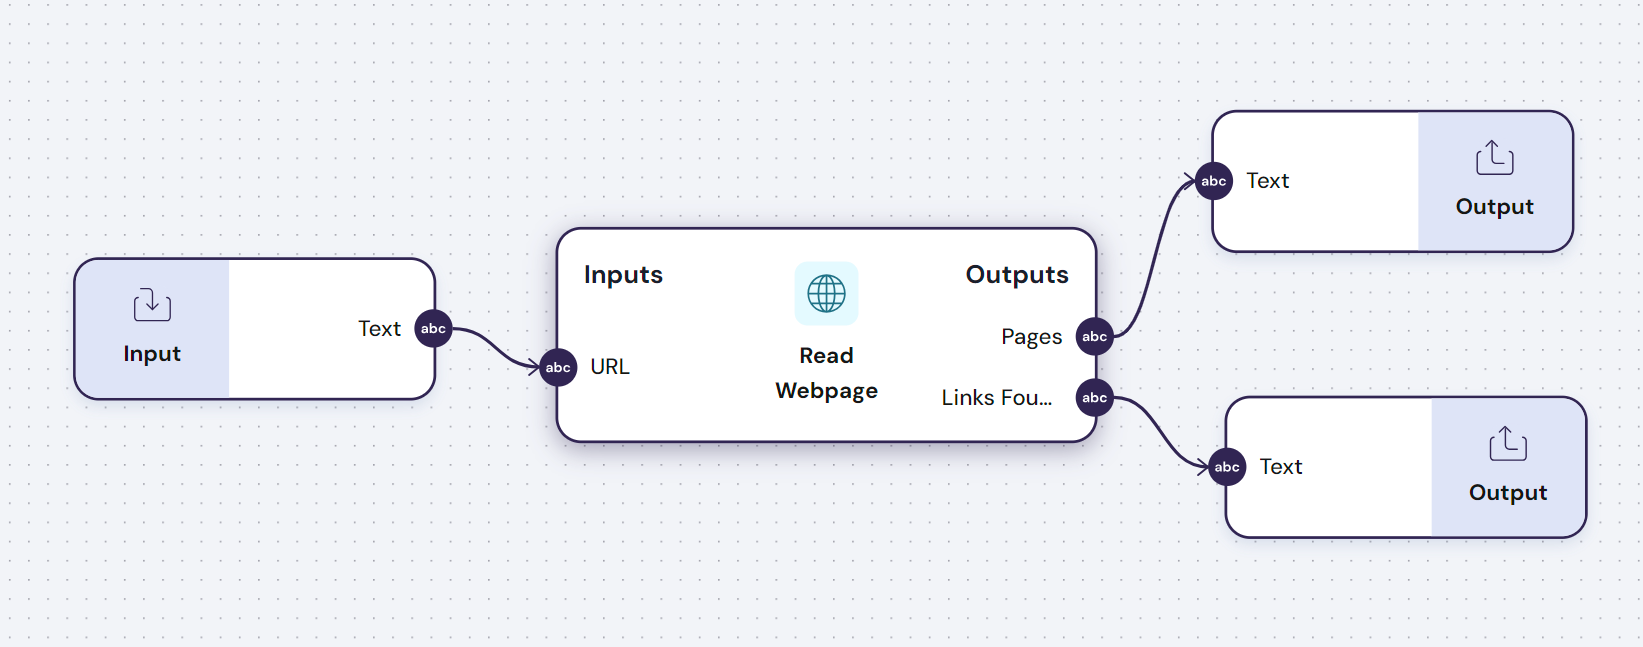 \n=== Documentation/Data Modules/List Website Entries.mdx ===
---
title: "List Website Entries"
description: "This module enables you to conduct web searches on demand"
---
The `List Website Entries` module enables effortless extraction of data from any website with listings. Whether you're looking to compile all the houses from a real estate site or gather every product from an online marketplace, this node allows you to easily capture and manipulate that data.
**You can use this module to provide live contextual information from different sources to an AI model.**
This module has multiple configurations that can enhance its capabilities.
- **Extract as list**: If enabled, outputs the search results as a list instead of a single value.
- **Extract as**: Options are Markdown or JSON.
- **Navigate pages**: Attempt to navigate pages if the webpage being read has pagination. Picture a website that has product listings and they continue in other pages.
- **Advanced Options**:
- **Continue on Error**: If enabled, in case the scraping fails, the output value of Text will contain the value `
\n=== Documentation/Data Modules/List Website Entries.mdx ===
---
title: "List Website Entries"
description: "This module enables you to conduct web searches on demand"
---
The `List Website Entries` module enables effortless extraction of data from any website with listings. Whether you're looking to compile all the houses from a real estate site or gather every product from an online marketplace, this node allows you to easily capture and manipulate that data.
**You can use this module to provide live contextual information from different sources to an AI model.**
This module has multiple configurations that can enhance its capabilities.
- **Extract as list**: If enabled, outputs the search results as a list instead of a single value.
- **Extract as**: Options are Markdown or JSON.
- **Navigate pages**: Attempt to navigate pages if the webpage being read has pagination. Picture a website that has product listings and they continue in other pages.
- **Advanced Options**:
- **Continue on Error**: If enabled, in case the scraping fails, the output value of Text will contain the value `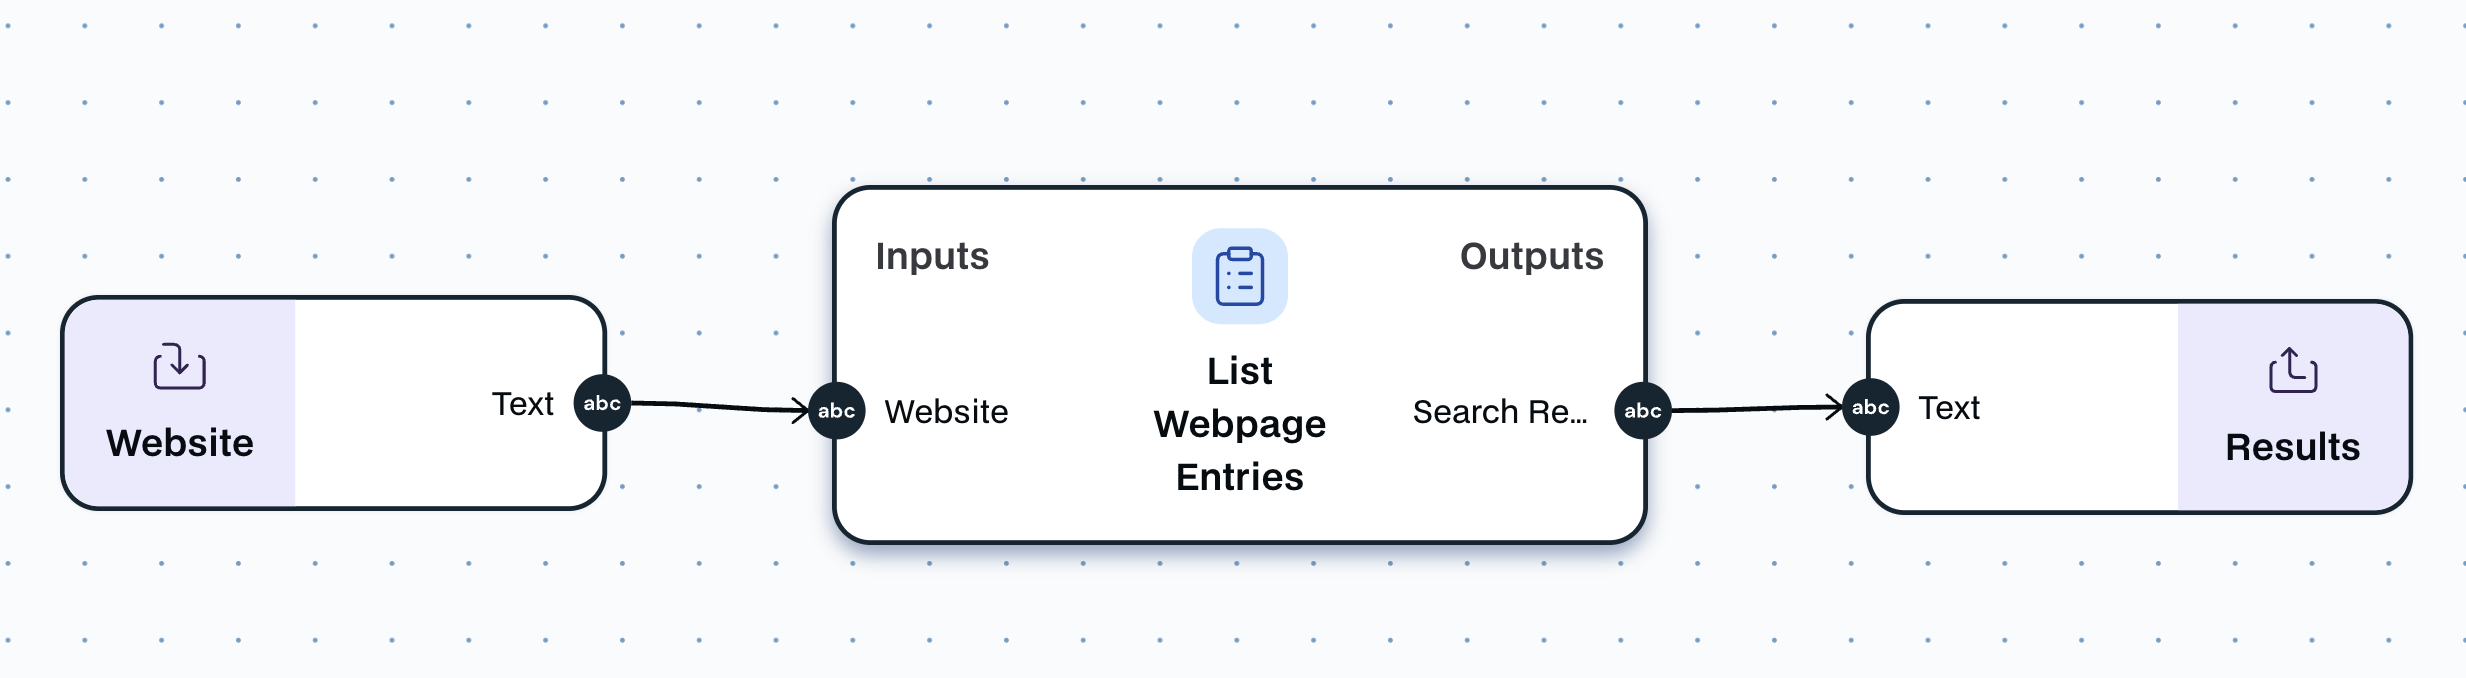 \n=== Documentation/Data Modules/Use Search Engine.mdx ===
---
title: "Use Search Engine"
description: "This module enables you to conduct web searches on demand"
---
The `Use Search Engine` module allows you to conduct web searches on demand, find flights, hotels, and much more. It functions just like Google, allowing you to enrich your tools with relevant information effortlessly.
**You can use this module to provide live contextual information from different sources to an AI model.**
This module has multiple configurations that can enhance its capabilities.
- **Type of search**: This allows the type of search to be selected.
- `Web Search` is a traditional google search.
- `Flights` finds flights on google flights.
- `Hotels` finds Hotels on google hotels.
- `Shopping` finds products on google shopping.
- `Locations` finds locations on google maps.
- `Science Articles` finds research papers on google scholar.
- `Images` finds images on google images.
- **Number of retrieved results**: Choose the number of search results to process. Keep in mind that selecting a higher number will increase the time it takes to complete the workflow. The results will be extracted in the order they appear in the search.
- **Output as List**: If enabled, returns the result as a list of items
- **Output as JSON**: If enabled, returns the result as a raw JSON result instead of a formatted markdown
- **Advanced Options**:
- **Continue on Error**: If enabled, in case the scraping fails, the output value of Text will contain the value `
\n=== Documentation/Data Modules/Use Search Engine.mdx ===
---
title: "Use Search Engine"
description: "This module enables you to conduct web searches on demand"
---
The `Use Search Engine` module allows you to conduct web searches on demand, find flights, hotels, and much more. It functions just like Google, allowing you to enrich your tools with relevant information effortlessly.
**You can use this module to provide live contextual information from different sources to an AI model.**
This module has multiple configurations that can enhance its capabilities.
- **Type of search**: This allows the type of search to be selected.
- `Web Search` is a traditional google search.
- `Flights` finds flights on google flights.
- `Hotels` finds Hotels on google hotels.
- `Shopping` finds products on google shopping.
- `Locations` finds locations on google maps.
- `Science Articles` finds research papers on google scholar.
- `Images` finds images on google images.
- **Number of retrieved results**: Choose the number of search results to process. Keep in mind that selecting a higher number will increase the time it takes to complete the workflow. The results will be extracted in the order they appear in the search.
- **Output as List**: If enabled, returns the result as a list of items
- **Output as JSON**: If enabled, returns the result as a raw JSON result instead of a formatted markdown
- **Advanced Options**:
- **Continue on Error**: If enabled, in case the scraping fails, the output value of Text will contain the value `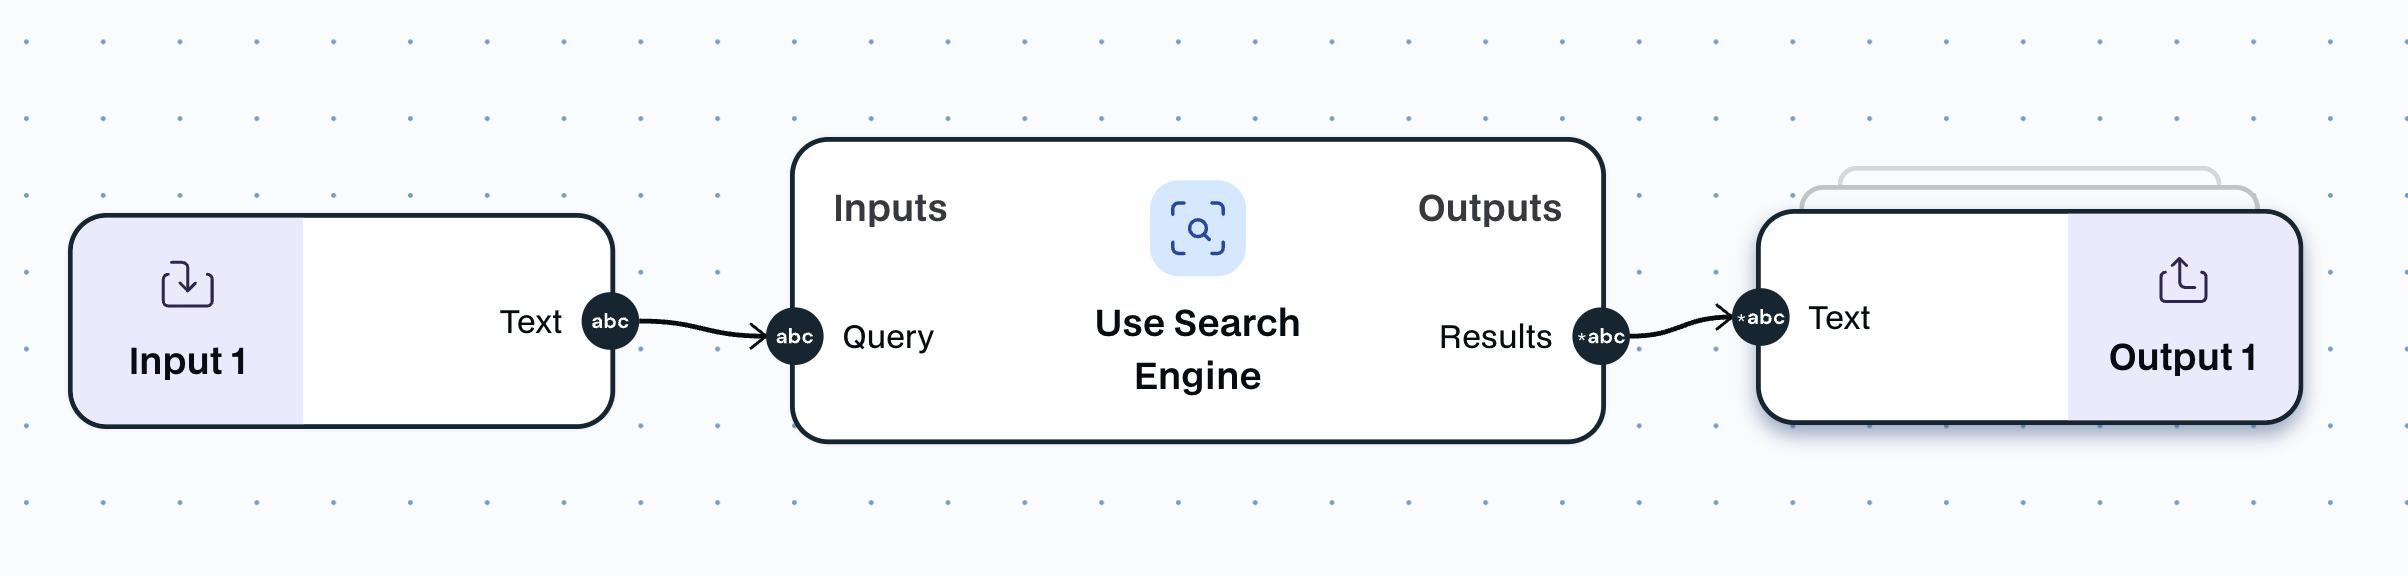 \n=== Documentation/Data Modules/File to Text.mdx ===
---
title: "Document to Text"
description: "Reads a document format input and extracts its textual content."
---
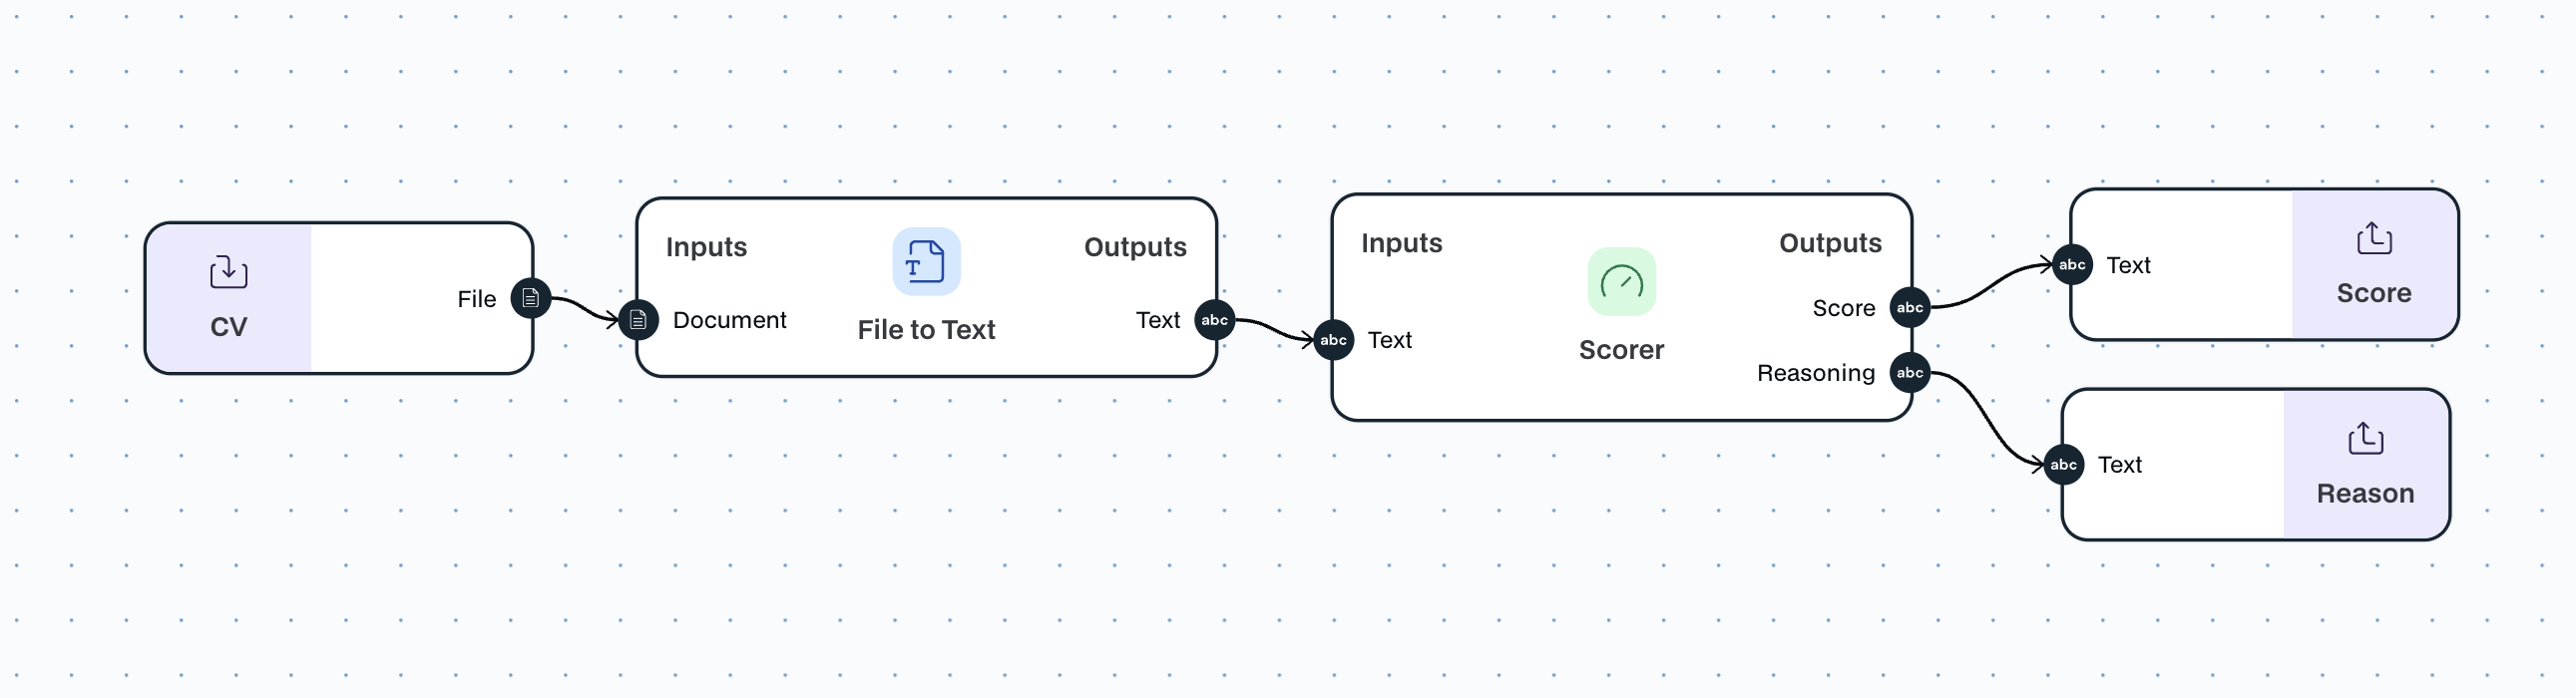
The `Document to Text` module is a data module that can read a document and extract all its textual content.
You can use this module to transform any document of `PDF`, `DOCX`, `TXT` into text.
The `Document to Text` module has **one input** and **one output**:
- **Input**:
- One input of type `Document`
- **Output**:
- `X` number of Text outputs
\n=== Documentation/Data Modules/File to Text.mdx ===
---
title: "Document to Text"
description: "Reads a document format input and extracts its textual content."
---
The `Document to Text` module is a data module that can read a document and extract all its textual content.
You can use this module to transform any document of `PDF`, `DOCX`, `TXT` into text.
The `Document to Text` module has **one input** and **one output**:
- **Input**:
- One input of type `Document`
- **Output**:
- `X` number of Text outputs
 \n=== Documentation/Data Modules/Generate File.mdx ===
---
title: "Text to Document"
description: "Create a text document containing the specified content."
---
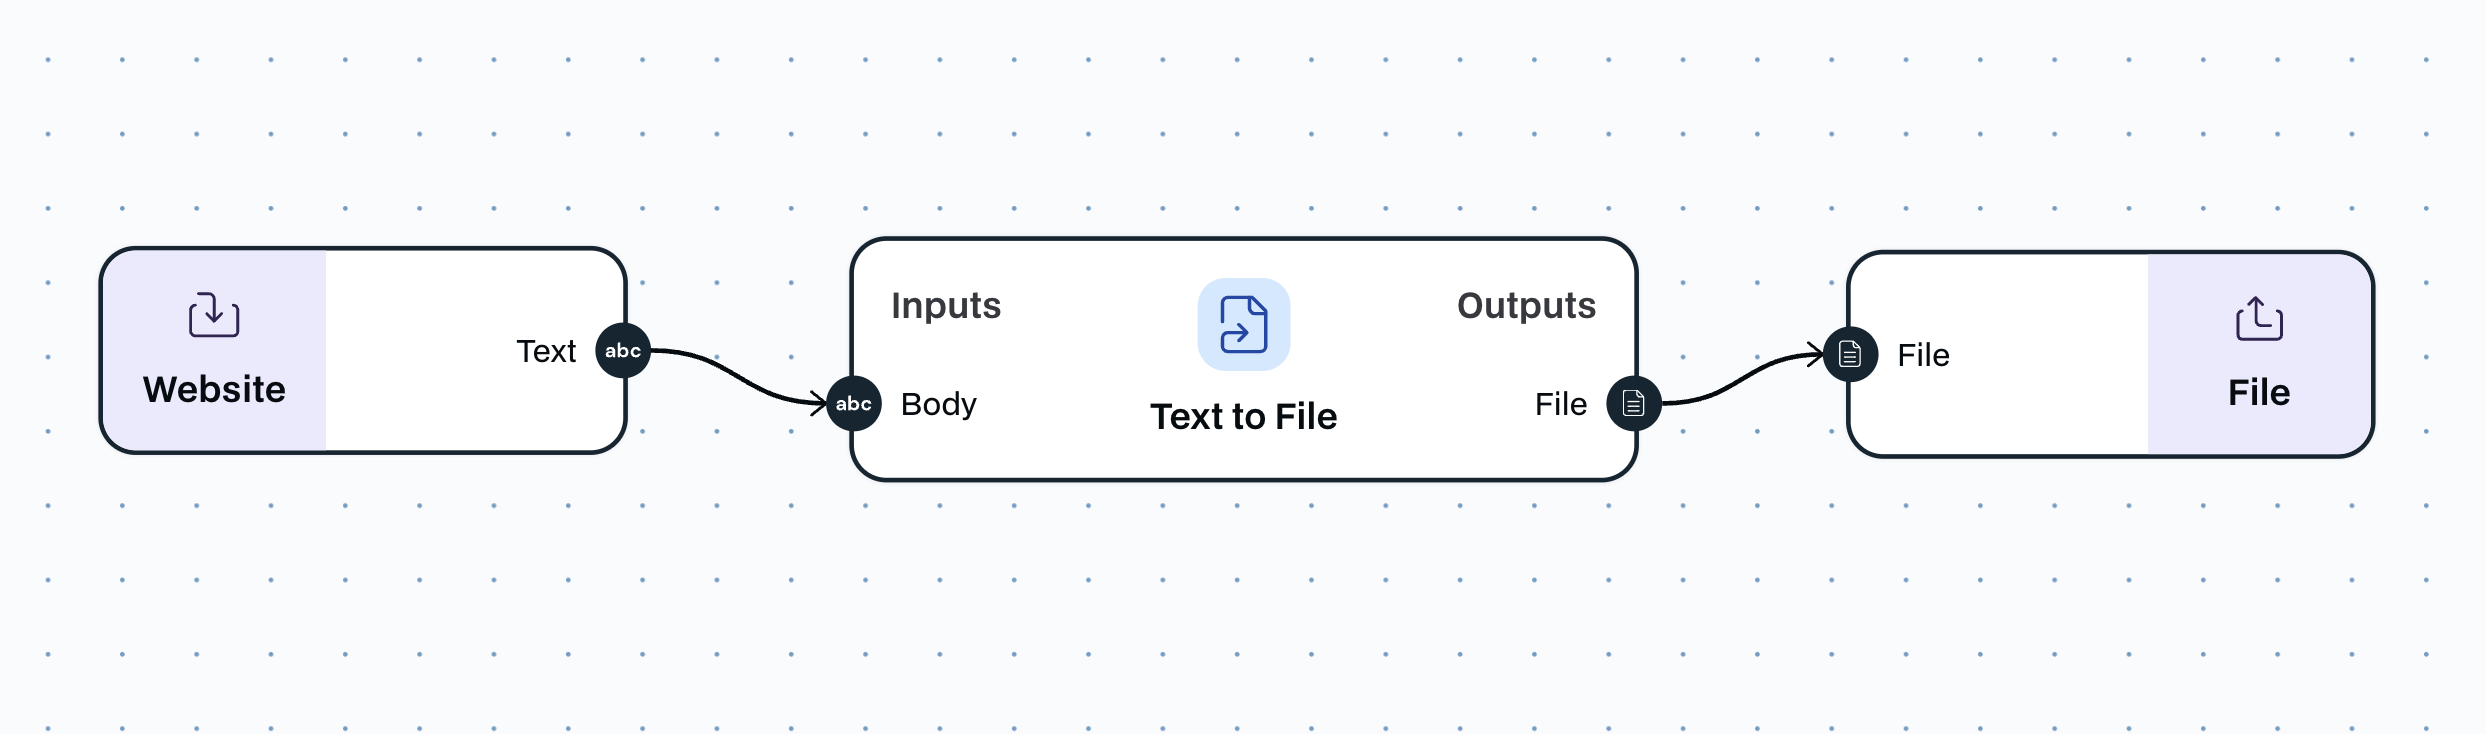
The `Text to Document` module is a data module that can convert text and images into a file. Currently there is no way to style this document.
The configurations of the module are the following:
- **File name**: Pick the name of the file you want to export.
- **File type**: Export on `txt` or `pdf`
- **File parts**: Pick the structure of the file you want to form
The `Text to Document` module has **variable inputs** and **one output**:
- **Input**:
- Inputs can be of type `text` and `image`; you can add them in any specific to structure the document as you see fit
- **Output**:
- `Document`, the output is of a file type in the specified format
\n=== Documentation/Data Modules/Generate File.mdx ===
---
title: "Text to Document"
description: "Create a text document containing the specified content."
---
The `Text to Document` module is a data module that can convert text and images into a file. Currently there is no way to style this document.
The configurations of the module are the following:
- **File name**: Pick the name of the file you want to export.
- **File type**: Export on `txt` or `pdf`
- **File parts**: Pick the structure of the file you want to form
The `Text to Document` module has **variable inputs** and **one output**:
- **Input**:
- Inputs can be of type `text` and `image`; you can add them in any specific to structure the document as you see fit
- **Output**:
- `Document`, the output is of a file type in the specified format
 \n=== Documentation/Data Modules/Run Code.mdx ===
---
title: "Run Code"
description: "Run custom code with the provided inputs"
---
The `Run Code` is a data node that can read a run a piece of code with as many inputs as you want.
In the configuration of the node you have:
- **Language**:
- Currently only supports Python. Reach out if you want to use any other languages.
- **Packages**:
- What packages you want to be available
- **Code**:
- The provided input and output is already filled in. Edit the code in between.
The `Run Code` module has **one input** and **one output**:
- **Input**:
- One input of type `Text`
- **Output**:
- `Text`, the output is the text inside the document you provided
\n=== Documentation/Data Modules/Run Code.mdx ===
---
title: "Run Code"
description: "Run custom code with the provided inputs"
---
The `Run Code` is a data node that can read a run a piece of code with as many inputs as you want.
In the configuration of the node you have:
- **Language**:
- Currently only supports Python. Reach out if you want to use any other languages.
- **Packages**:
- What packages you want to be available
- **Code**:
- The provided input and output is already filled in. Edit the code in between.
The `Run Code` module has **one input** and **one output**:
- **Input**:
- One input of type `Text`
- **Output**:
- `Text`, the output is the text inside the document you provided
 \n=== Documentation/YFT.mdx ===
---
title: 'Your First Tutorial'
description: 'Start using AI to automate your life in just 5 minutes'
---
This page will guide you through some basic video tutorials to help you start with Noxus workflow builder.
## Tutorial 1, Basic Concepts: Combining Text, AI Agent and AI-Model Collaboration
## Tutorial 2, Basic Concepts: Using Integrations
## Tutorial 3: Building a legal expert agent
\n=== Documentation/Integration Modules/TelegramW.mdx ===
---
title: "Telegram Writer"
description: "Automatically sends messages or news to a Telegram chat or group you choose, keeping everyone updated."
---
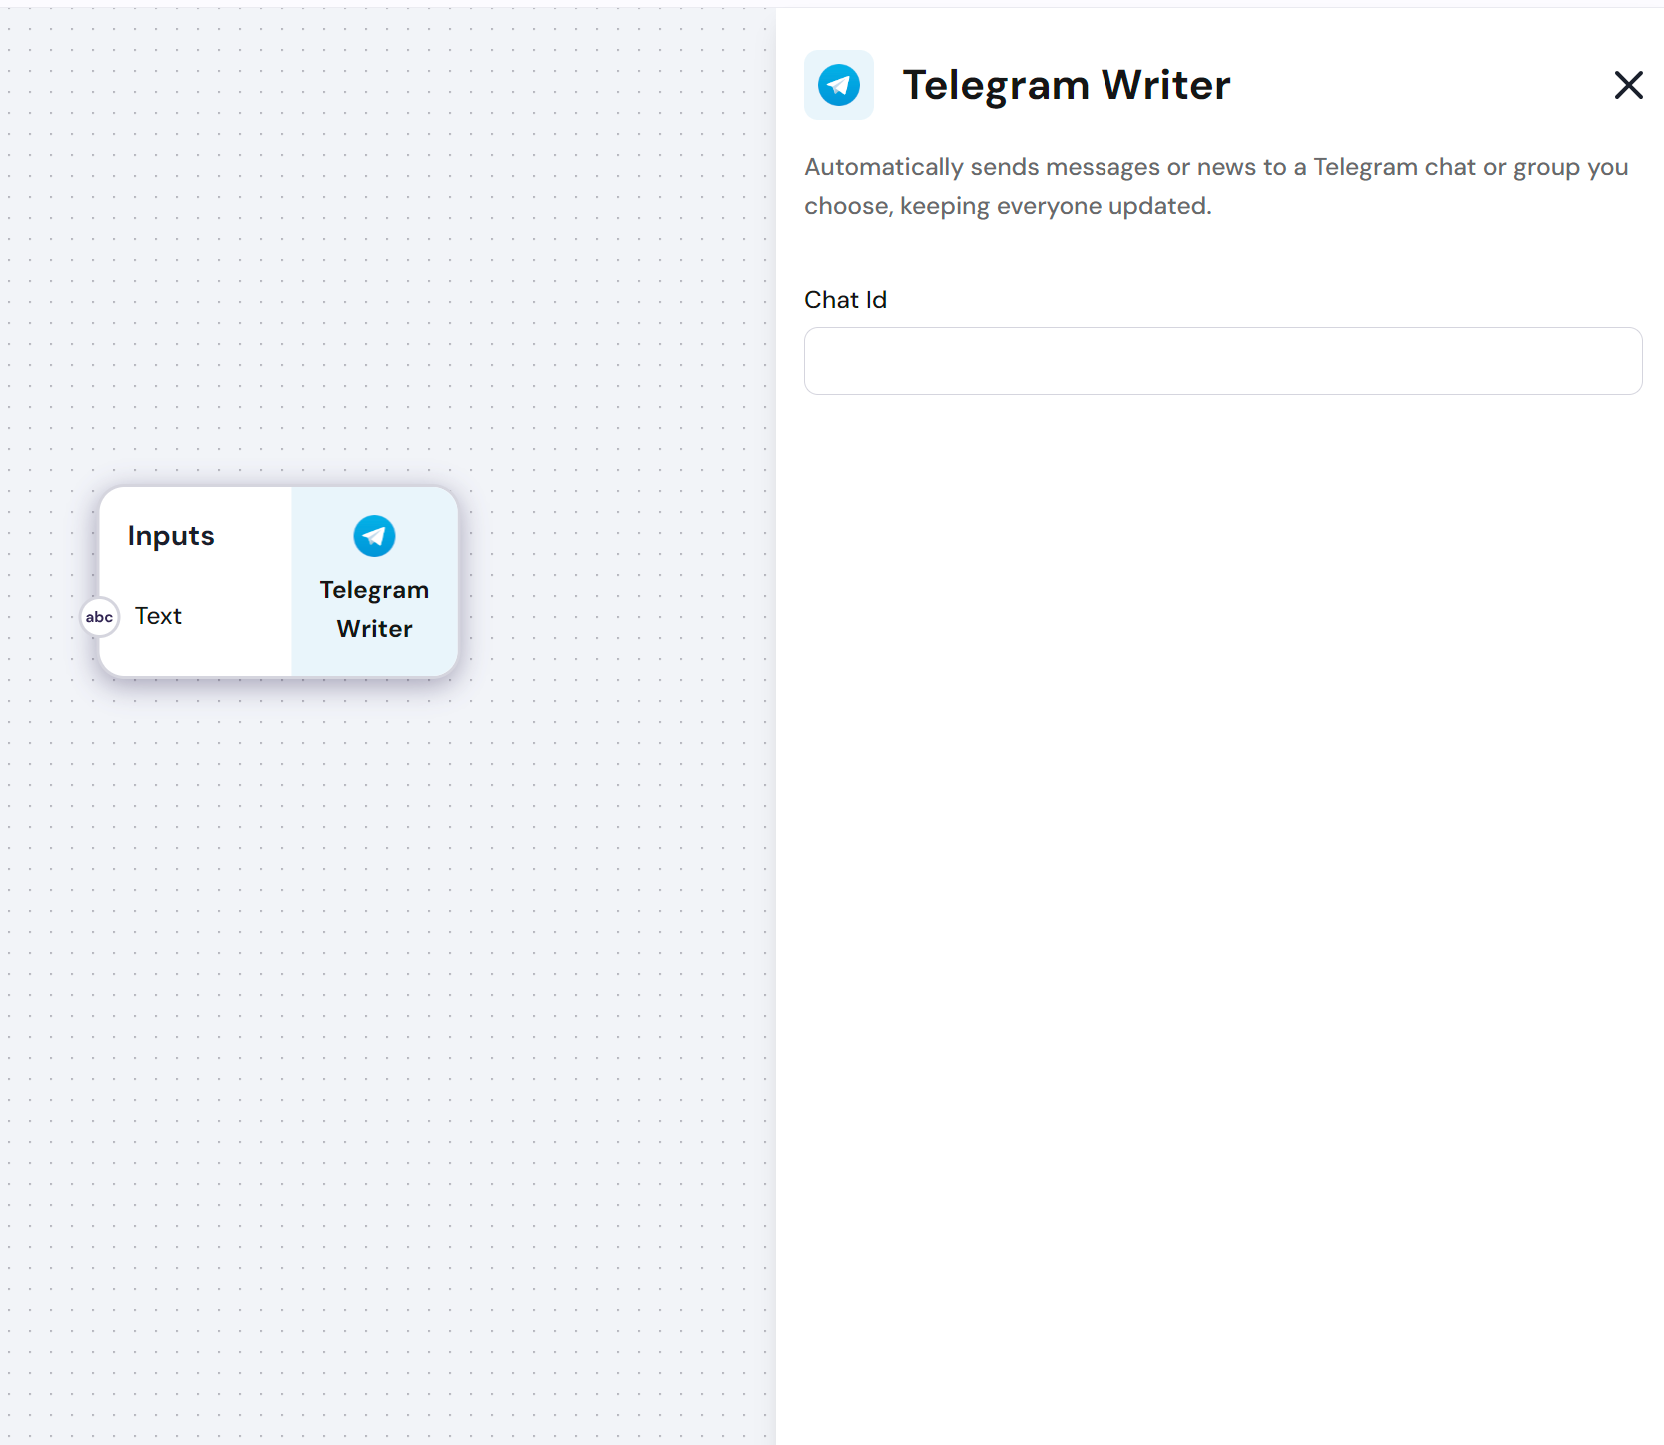
> **This Module requires that you connect your API key in the `Linked accounts` page. Go to Settings to get this done.**
The `Telegram Writer` module allows you to finalize a workflow with a message to telegram.
**This is a particularly more complex node to implement, we refer to telegram's documentation on how to get the chat ID and API keys: [Telegram Docs](https://core.telegram.org/) **
The `Telegram Writer` module has **one input**:
- **Input**: the `text` you want to send to a chat or group
- **Config**: `chat id` of the group or chat
\n=== Documentation/YFT.mdx ===
---
title: 'Your First Tutorial'
description: 'Start using AI to automate your life in just 5 minutes'
---
This page will guide you through some basic video tutorials to help you start with Noxus workflow builder.
## Tutorial 1, Basic Concepts: Combining Text, AI Agent and AI-Model Collaboration
## Tutorial 2, Basic Concepts: Using Integrations
## Tutorial 3: Building a legal expert agent
\n=== Documentation/Integration Modules/TelegramW.mdx ===
---
title: "Telegram Writer"
description: "Automatically sends messages or news to a Telegram chat or group you choose, keeping everyone updated."
---
> **This Module requires that you connect your API key in the `Linked accounts` page. Go to Settings to get this done.**
The `Telegram Writer` module allows you to finalize a workflow with a message to telegram.
**This is a particularly more complex node to implement, we refer to telegram's documentation on how to get the chat ID and API keys: [Telegram Docs](https://core.telegram.org/) **
The `Telegram Writer` module has **one input**:
- **Input**: the `text` you want to send to a chat or group
- **Config**: `chat id` of the group or chat
 \n=== Documentation/Integration Modules/GReadProfile.mdx ===
---
title: "Github - Read Profile"
description: "Enter a GitHub URL to extract a profile summary or raw data"
---
> **This Module requires that you connect your account to the `Linked Accounts` page. Go to Settings to get this done.**
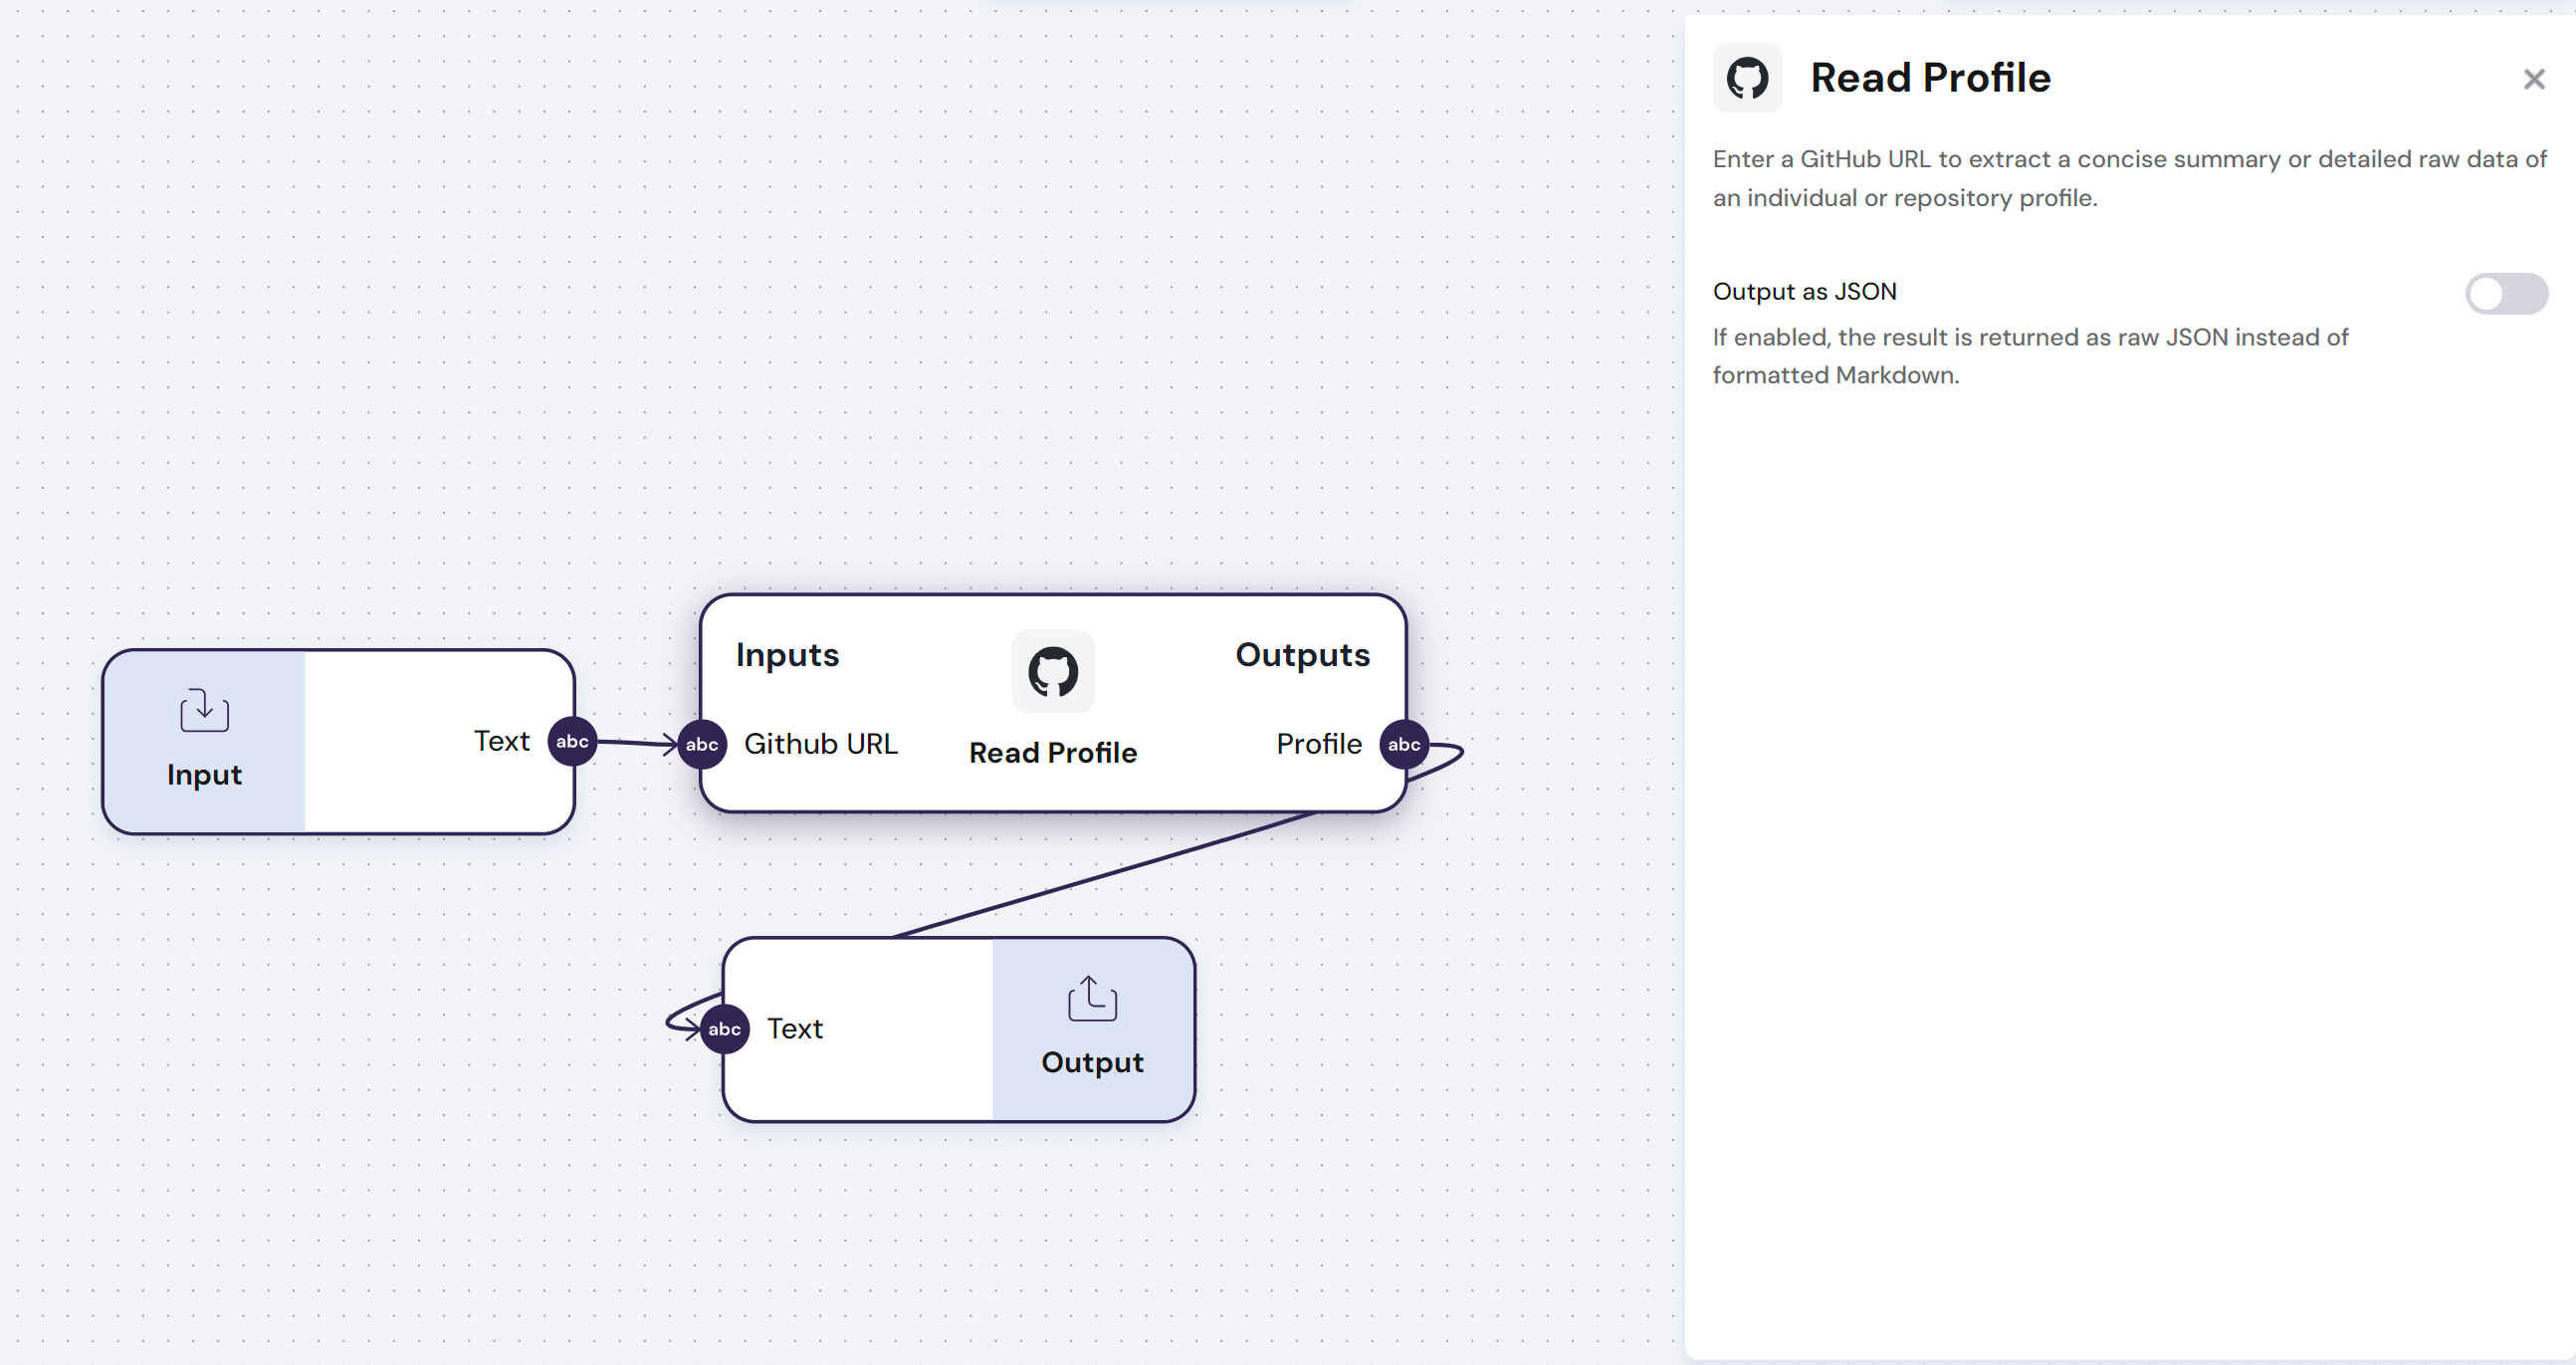
The `Github - Read Profile` module uses a Github URL to extract a concise summary or detailed raw data of an individual or company profile.
The `Github - Read Profile` module has **one input** and **one output**:
- **Input**:
- GitHub URL for the profile to be read
- **Output**:
- Complete profile with all the information extracted from Github
- **Config**:
- `Output as JSON` - If enabled, the result is returned as raw JSON instead of formatted Markdown.
Find below an example of how to use this module:
\n=== Documentation/Integration Modules/GReadProfile.mdx ===
---
title: "Github - Read Profile"
description: "Enter a GitHub URL to extract a profile summary or raw data"
---
> **This Module requires that you connect your account to the `Linked Accounts` page. Go to Settings to get this done.**
The `Github - Read Profile` module uses a Github URL to extract a concise summary or detailed raw data of an individual or company profile.
The `Github - Read Profile` module has **one input** and **one output**:
- **Input**:
- GitHub URL for the profile to be read
- **Output**:
- Complete profile with all the information extracted from Github
- **Config**:
- `Output as JSON` - If enabled, the result is returned as raw JSON instead of formatted Markdown.
Find below an example of how to use this module:
 \n=== Documentation/Integration Modules/TranscribeVideo.mdx ===
---
title: 'Youtube - Transcribe Video'
description: 'Transcribe any YouTube video'
---
>**This Module requires that you connect your account to the `Linked Accounts` page. Go to Settings to get this done.**
The `Youtube - Transcribe Video` module uses a Youtube video URL to extract a transcript of any given video.
The `Youtube - Transcribe Video` module has **one input** and **one output**:
- **Input**:
- Youtube video URL
- **Output**:
- Transcript of the video\n=== Documentation/Integration Modules/CReadEvents.mdx ===
---
title: "Calendly - Read Events"
description: "Given a specific time frame, retrieves existing events from Calendly"
---
> **This Module requires that you connect your account to the `Linked Accounts` page. Go to Settings to get this done.**
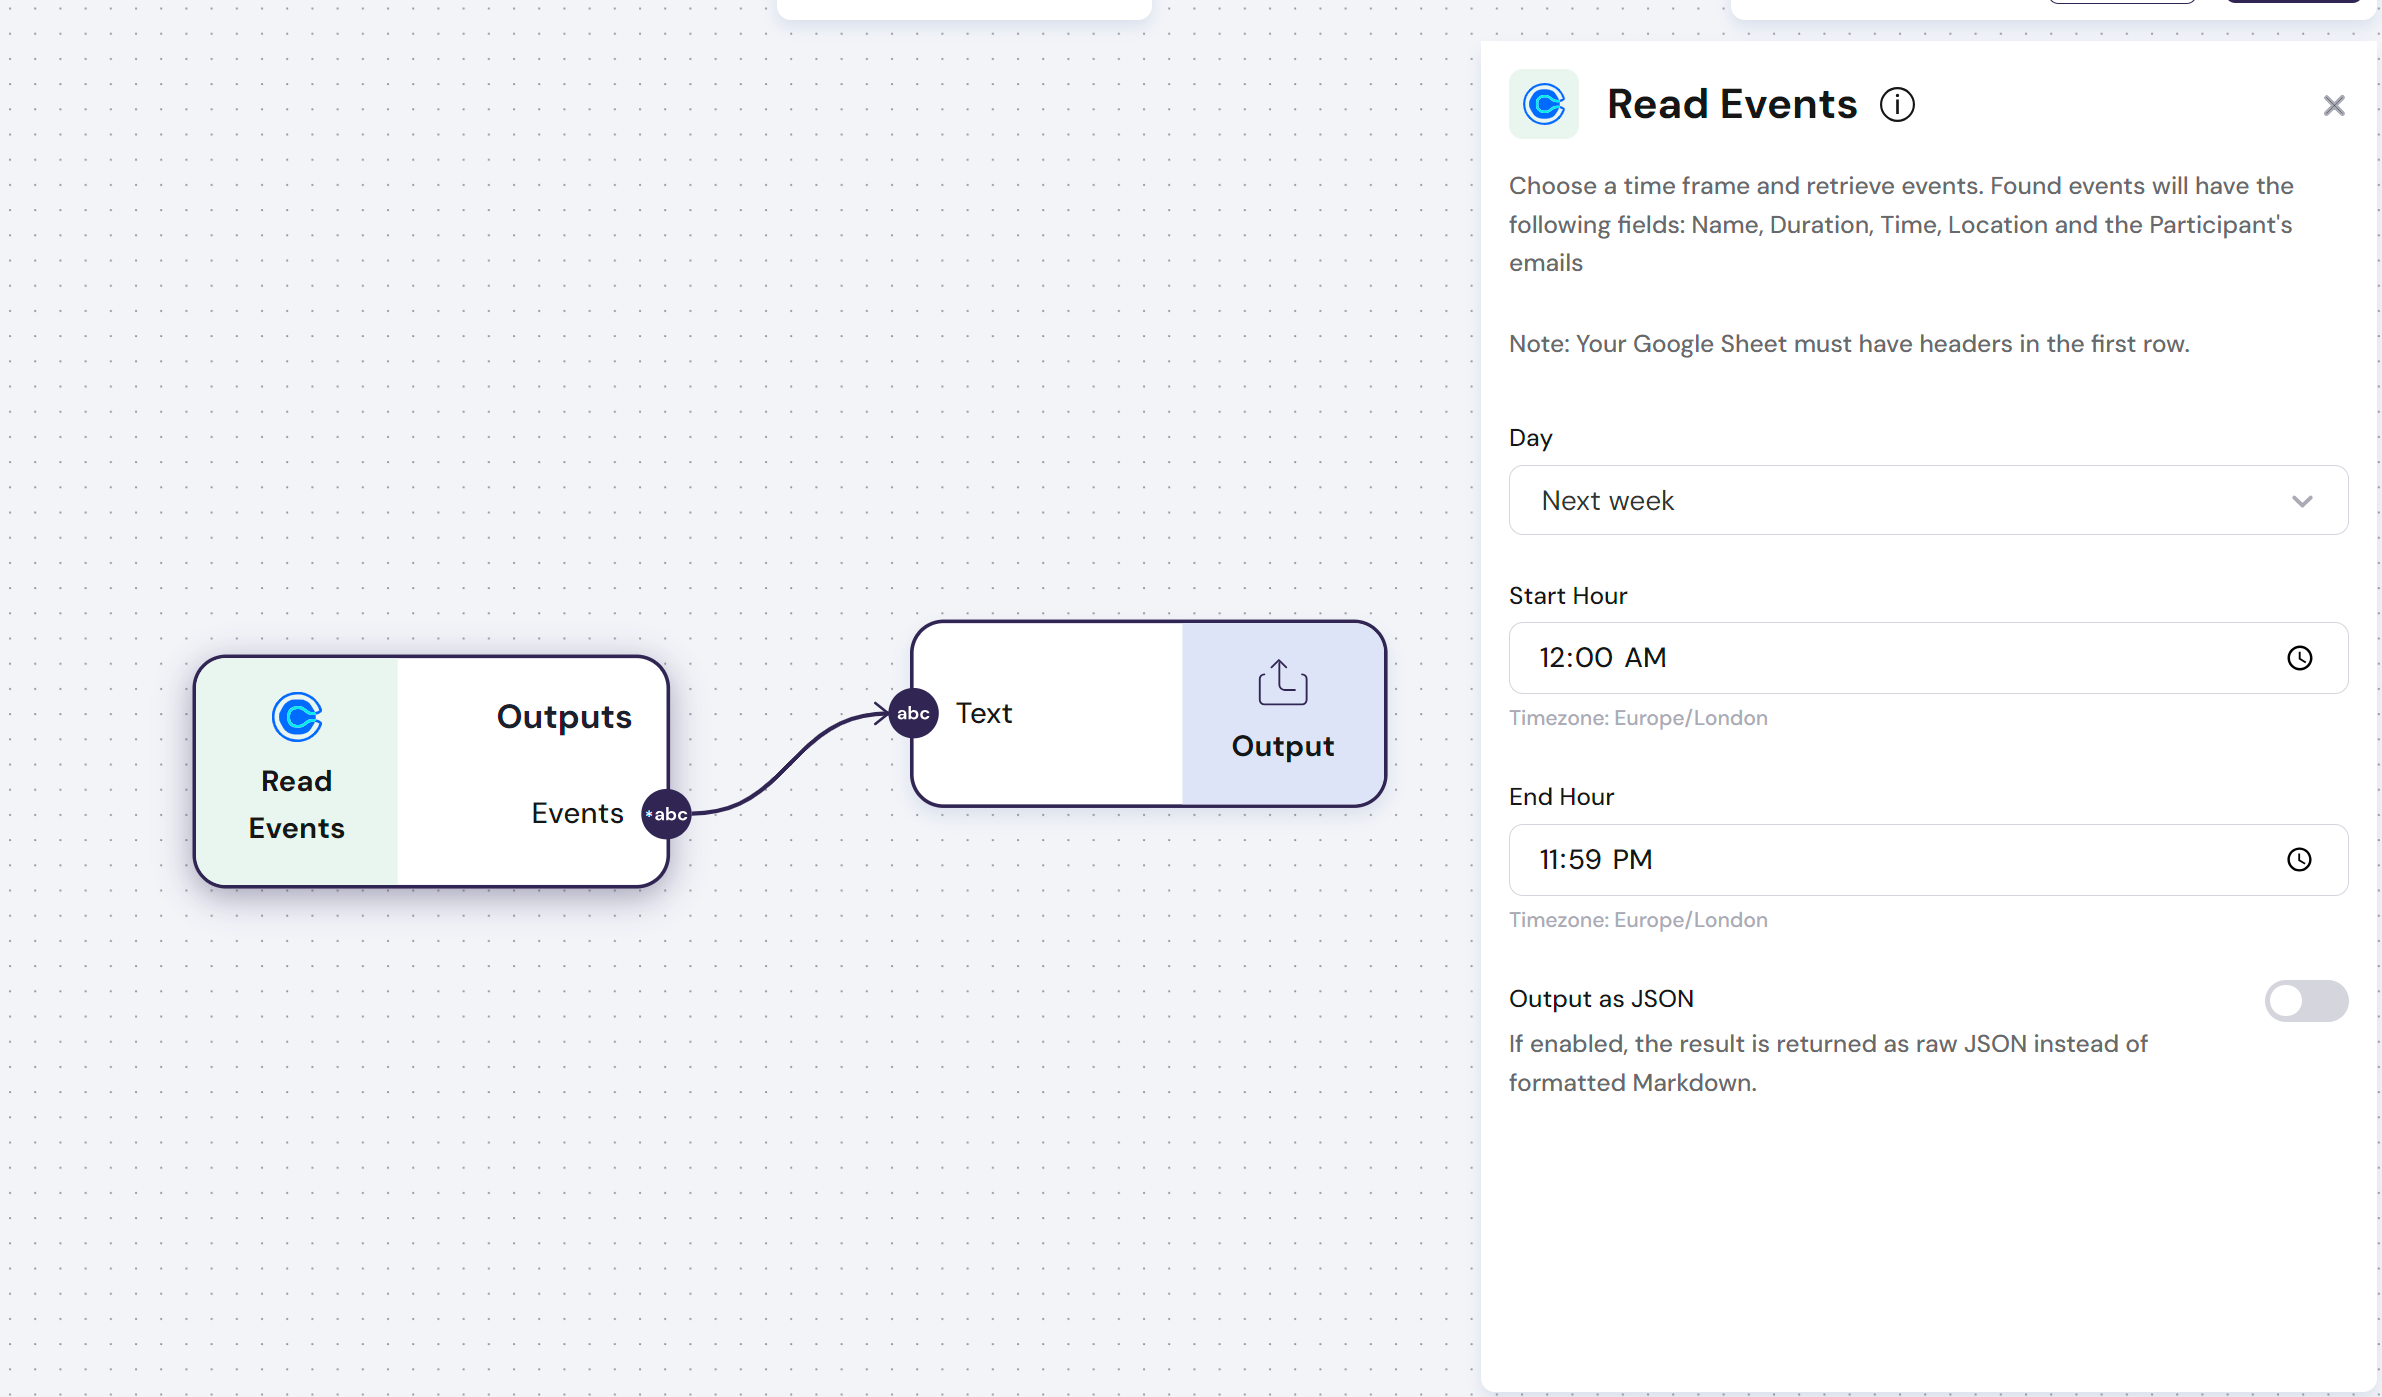
The `Calendly - Read Events` module retrieves events from Google Calendar. Found events will have the following fields: Name, Duration, Time, Location and the Participant's emails
The `Calendly - Read Events` module has **one output**:
- **Outputs**:
- Complete description of calendar events in text or JSON format, including Name, Duration, Time, Location and the Participant's emails
- **Config**:
- `Time Frame` - Define the Day, starting hour and ending hour that the module should extract events from.
- `Output as JSON` - If enabled, the result is returned as raw JSON instead of formatted Markdown.
Find below an example of how you can use the module to extract all the events from a week ahead:
\n=== Documentation/Integration Modules/TranscribeVideo.mdx ===
---
title: 'Youtube - Transcribe Video'
description: 'Transcribe any YouTube video'
---
>**This Module requires that you connect your account to the `Linked Accounts` page. Go to Settings to get this done.**
The `Youtube - Transcribe Video` module uses a Youtube video URL to extract a transcript of any given video.
The `Youtube - Transcribe Video` module has **one input** and **one output**:
- **Input**:
- Youtube video URL
- **Output**:
- Transcript of the video\n=== Documentation/Integration Modules/CReadEvents.mdx ===
---
title: "Calendly - Read Events"
description: "Given a specific time frame, retrieves existing events from Calendly"
---
> **This Module requires that you connect your account to the `Linked Accounts` page. Go to Settings to get this done.**
The `Calendly - Read Events` module retrieves events from Google Calendar. Found events will have the following fields: Name, Duration, Time, Location and the Participant's emails
The `Calendly - Read Events` module has **one output**:
- **Outputs**:
- Complete description of calendar events in text or JSON format, including Name, Duration, Time, Location and the Participant's emails
- **Config**:
- `Time Frame` - Define the Day, starting hour and ending hour that the module should extract events from.
- `Output as JSON` - If enabled, the result is returned as raw JSON instead of formatted Markdown.
Find below an example of how you can use the module to extract all the events from a week ahead:
 \n=== Documentation/Integration Modules/Read Events.mdx ===
---
title: "Google Calendar - Read Events"
description: "Given a specific time frame, retrieves existing events from Google Calendar"
---
> **This Module requires that you connect your account to the `Linked Accounts` page. Go to Settings to get this done.**
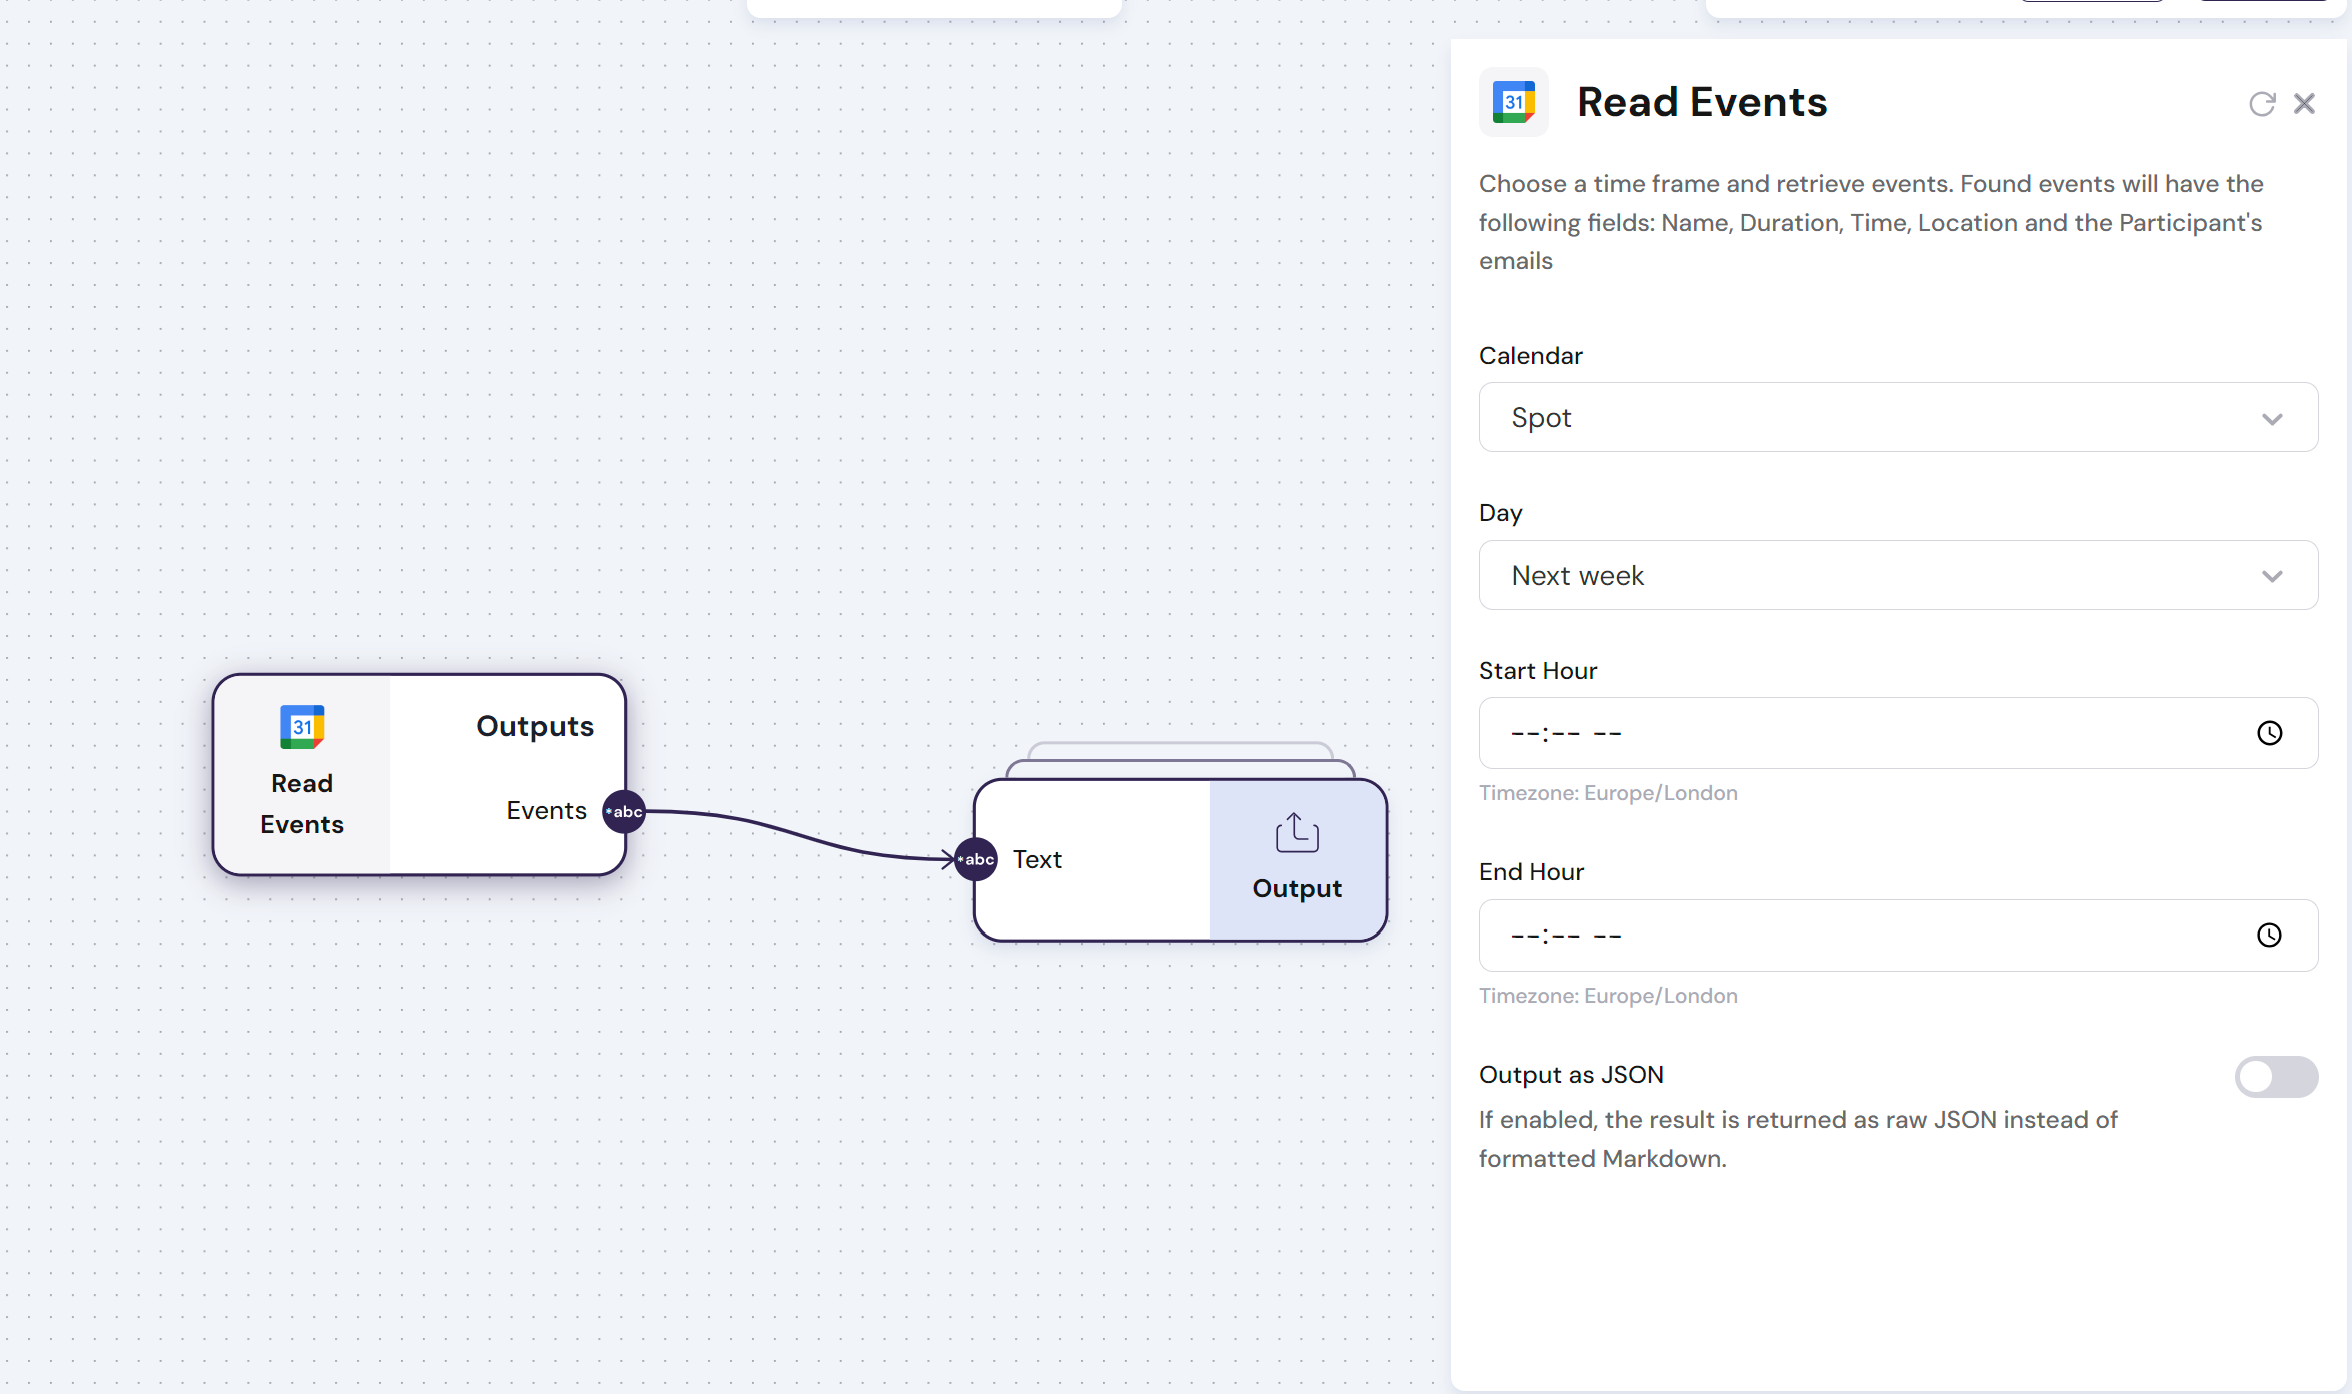
The `Google Calendar - Read Events` module retrieves events from Google Calendar. Found events will have the following fields: Name, Duration, Time, Location and the Participant's emails
The `Google Calendar - Read Events` module has **one output**:
- **Outputs**:
- Complete description of calendar events in text or JSON format, including Name, Duration, Time, Location and the Participant's emails
- **Config**:
- `Time Frame` - Define the Day, starting hour and ending hour that the module should extract events from.
Find below an example of how you can use the module to extract all the events from a week ahead:
\n=== Documentation/Integration Modules/Read Events.mdx ===
---
title: "Google Calendar - Read Events"
description: "Given a specific time frame, retrieves existing events from Google Calendar"
---
> **This Module requires that you connect your account to the `Linked Accounts` page. Go to Settings to get this done.**
The `Google Calendar - Read Events` module retrieves events from Google Calendar. Found events will have the following fields: Name, Duration, Time, Location and the Participant's emails
The `Google Calendar - Read Events` module has **one output**:
- **Outputs**:
- Complete description of calendar events in text or JSON format, including Name, Duration, Time, Location and the Participant's emails
- **Config**:
- `Time Frame` - Define the Day, starting hour and ending hour that the module should extract events from.
Find below an example of how you can use the module to extract all the events from a week ahead:
 \n=== Documentation/Integration Modules/IReadComments.mdx ===
---
title: "Instagram - Read Comments"
description: "Enter an Instagram Post URL to extract its comments"
---
> **This Module requires that you connect your account to the `Linked Accounts` page. Go to Settings to get this done.**
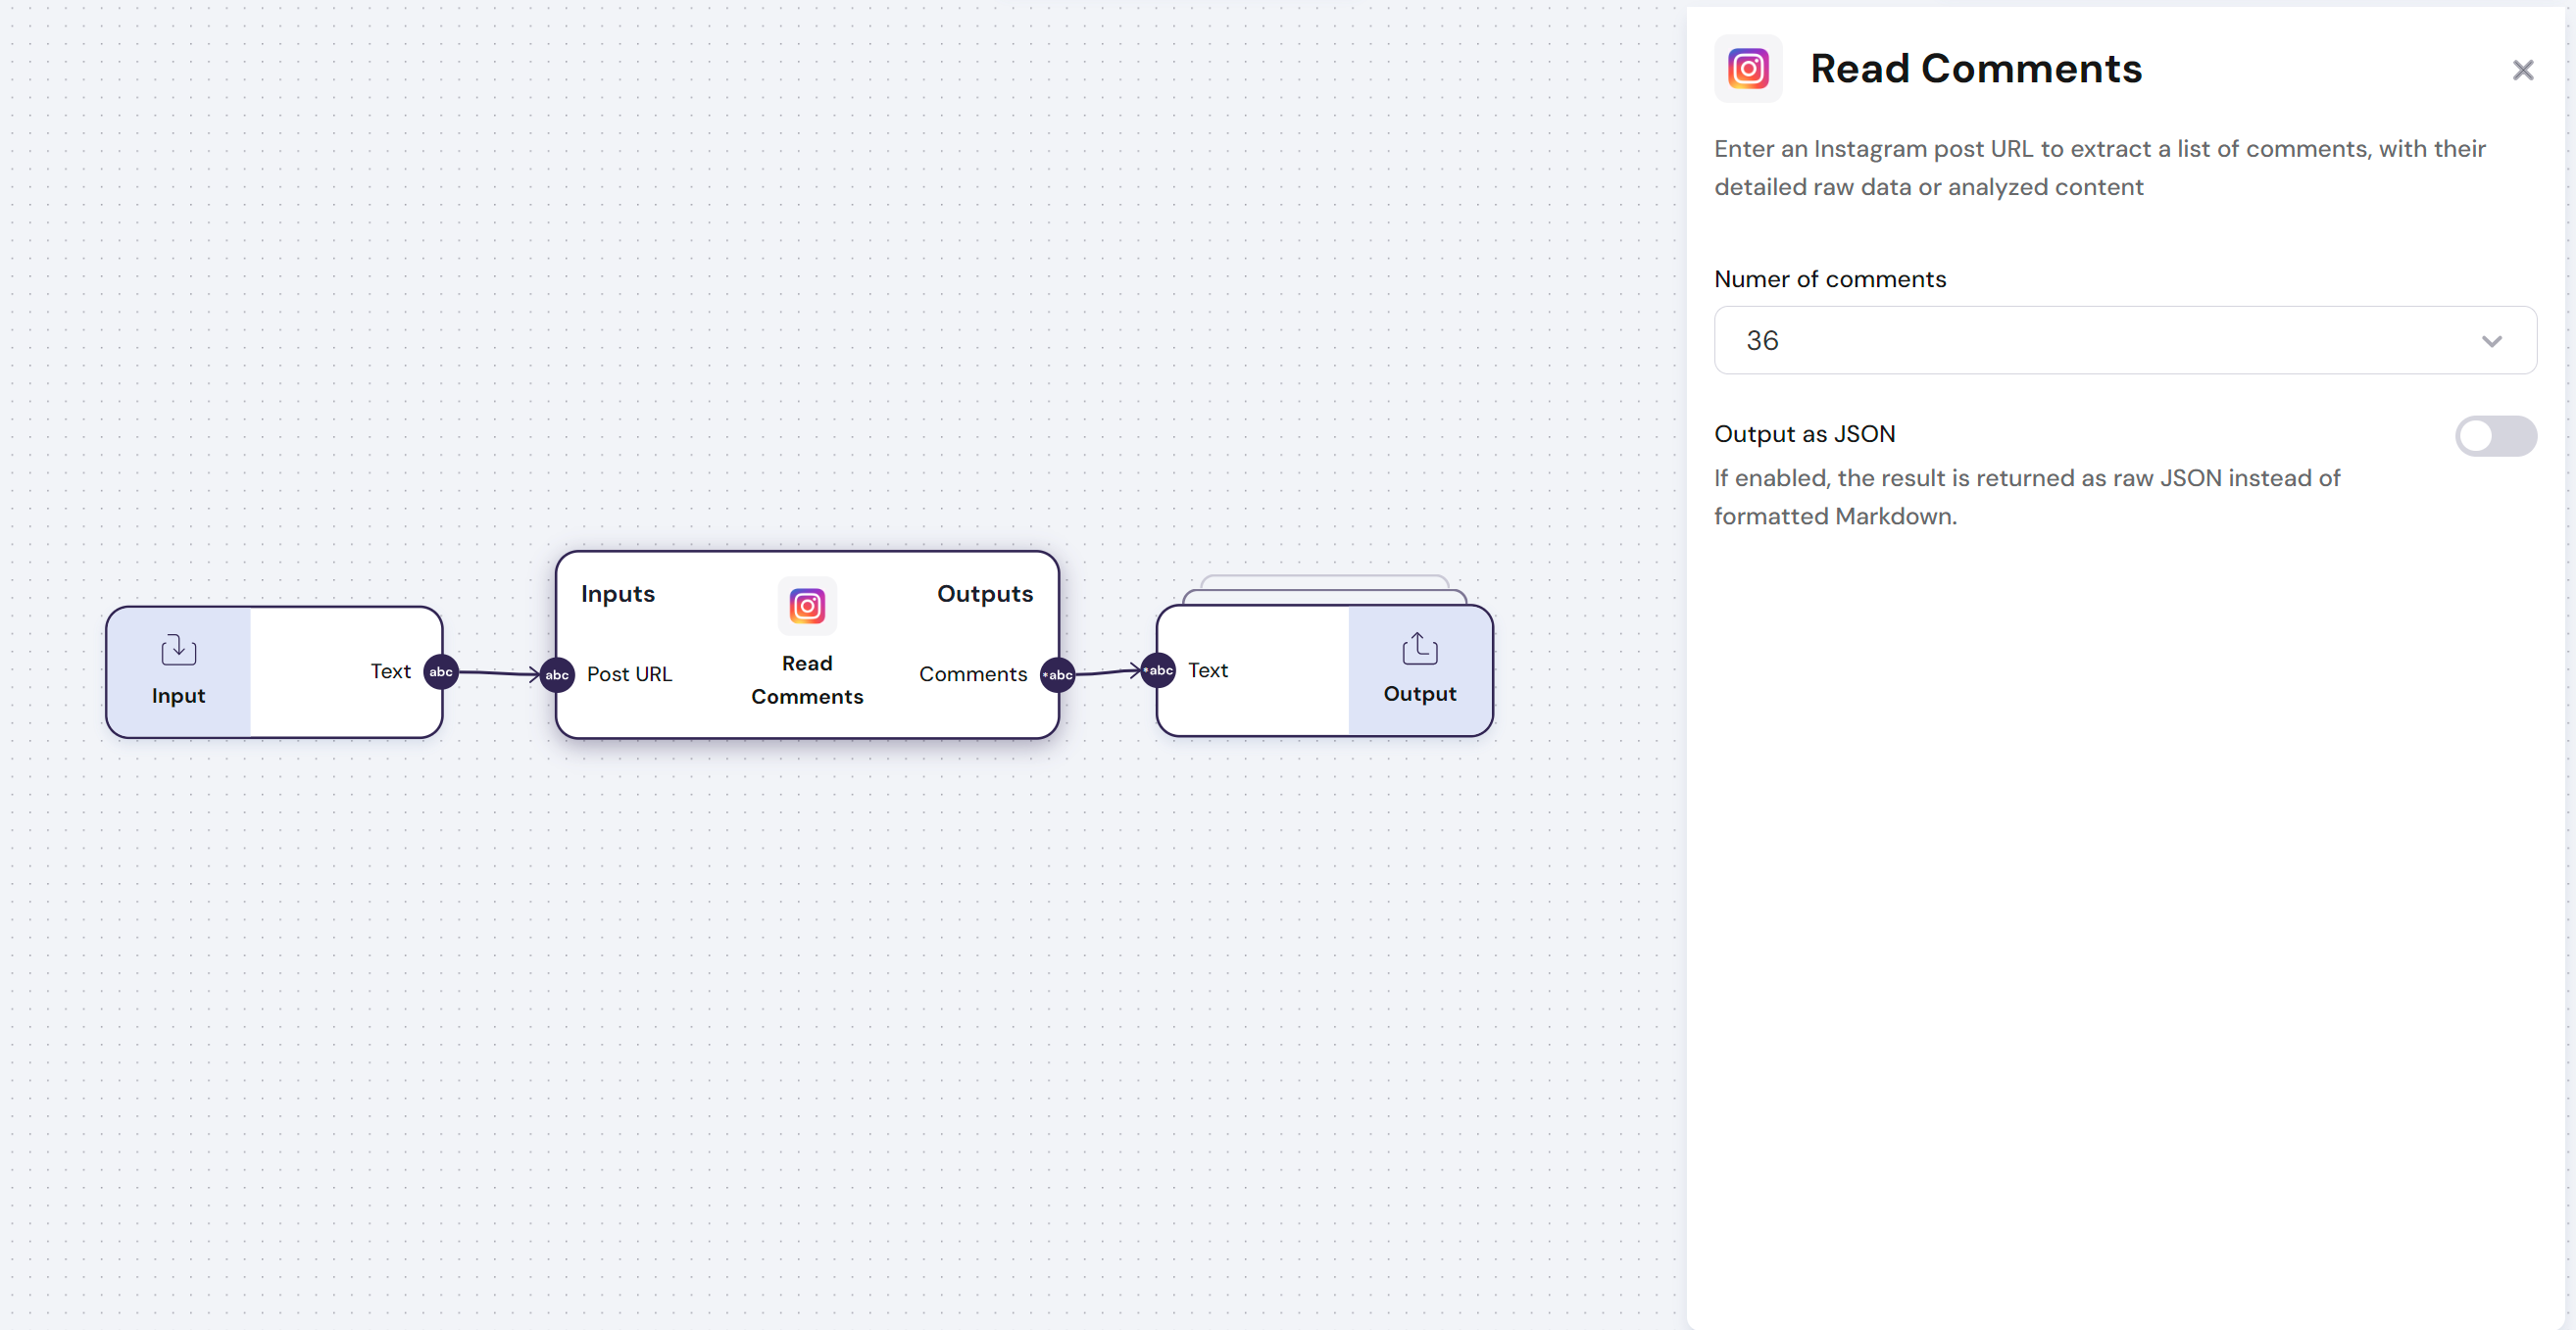
The `Instagram - Read Comments` module uses an Instagram post URL to extract a list of comments, with their detailed raw data or analyzed content
The `Instagram - Read Comments` module has **one input** and **one output**:
- **Input**:
- Instagram post URL for the profile to be read
- **Output**:
- Complete profile with all the information extracted from Instagram
- **Config**:
- `Output as JSON` - If enabled, the result is returned as raw JSON instead of formatted Markdown.
Find below an example of how to use this module:
\n=== Documentation/Integration Modules/IReadComments.mdx ===
---
title: "Instagram - Read Comments"
description: "Enter an Instagram Post URL to extract its comments"
---
> **This Module requires that you connect your account to the `Linked Accounts` page. Go to Settings to get this done.**
The `Instagram - Read Comments` module uses an Instagram post URL to extract a list of comments, with their detailed raw data or analyzed content
The `Instagram - Read Comments` module has **one input** and **one output**:
- **Input**:
- Instagram post URL for the profile to be read
- **Output**:
- Complete profile with all the information extracted from Instagram
- **Config**:
- `Output as JSON` - If enabled, the result is returned as raw JSON instead of formatted Markdown.
Find below an example of how to use this module:
 \n=== Documentation/Integration Modules/ReadR.mdx ===
---
title: "Airtable - Read Records"
description: "Read data directly from an Airtable."
---
> **This Module requires that you connect your account to the `Linked Accounts` page. Go to Settings to get this done.**
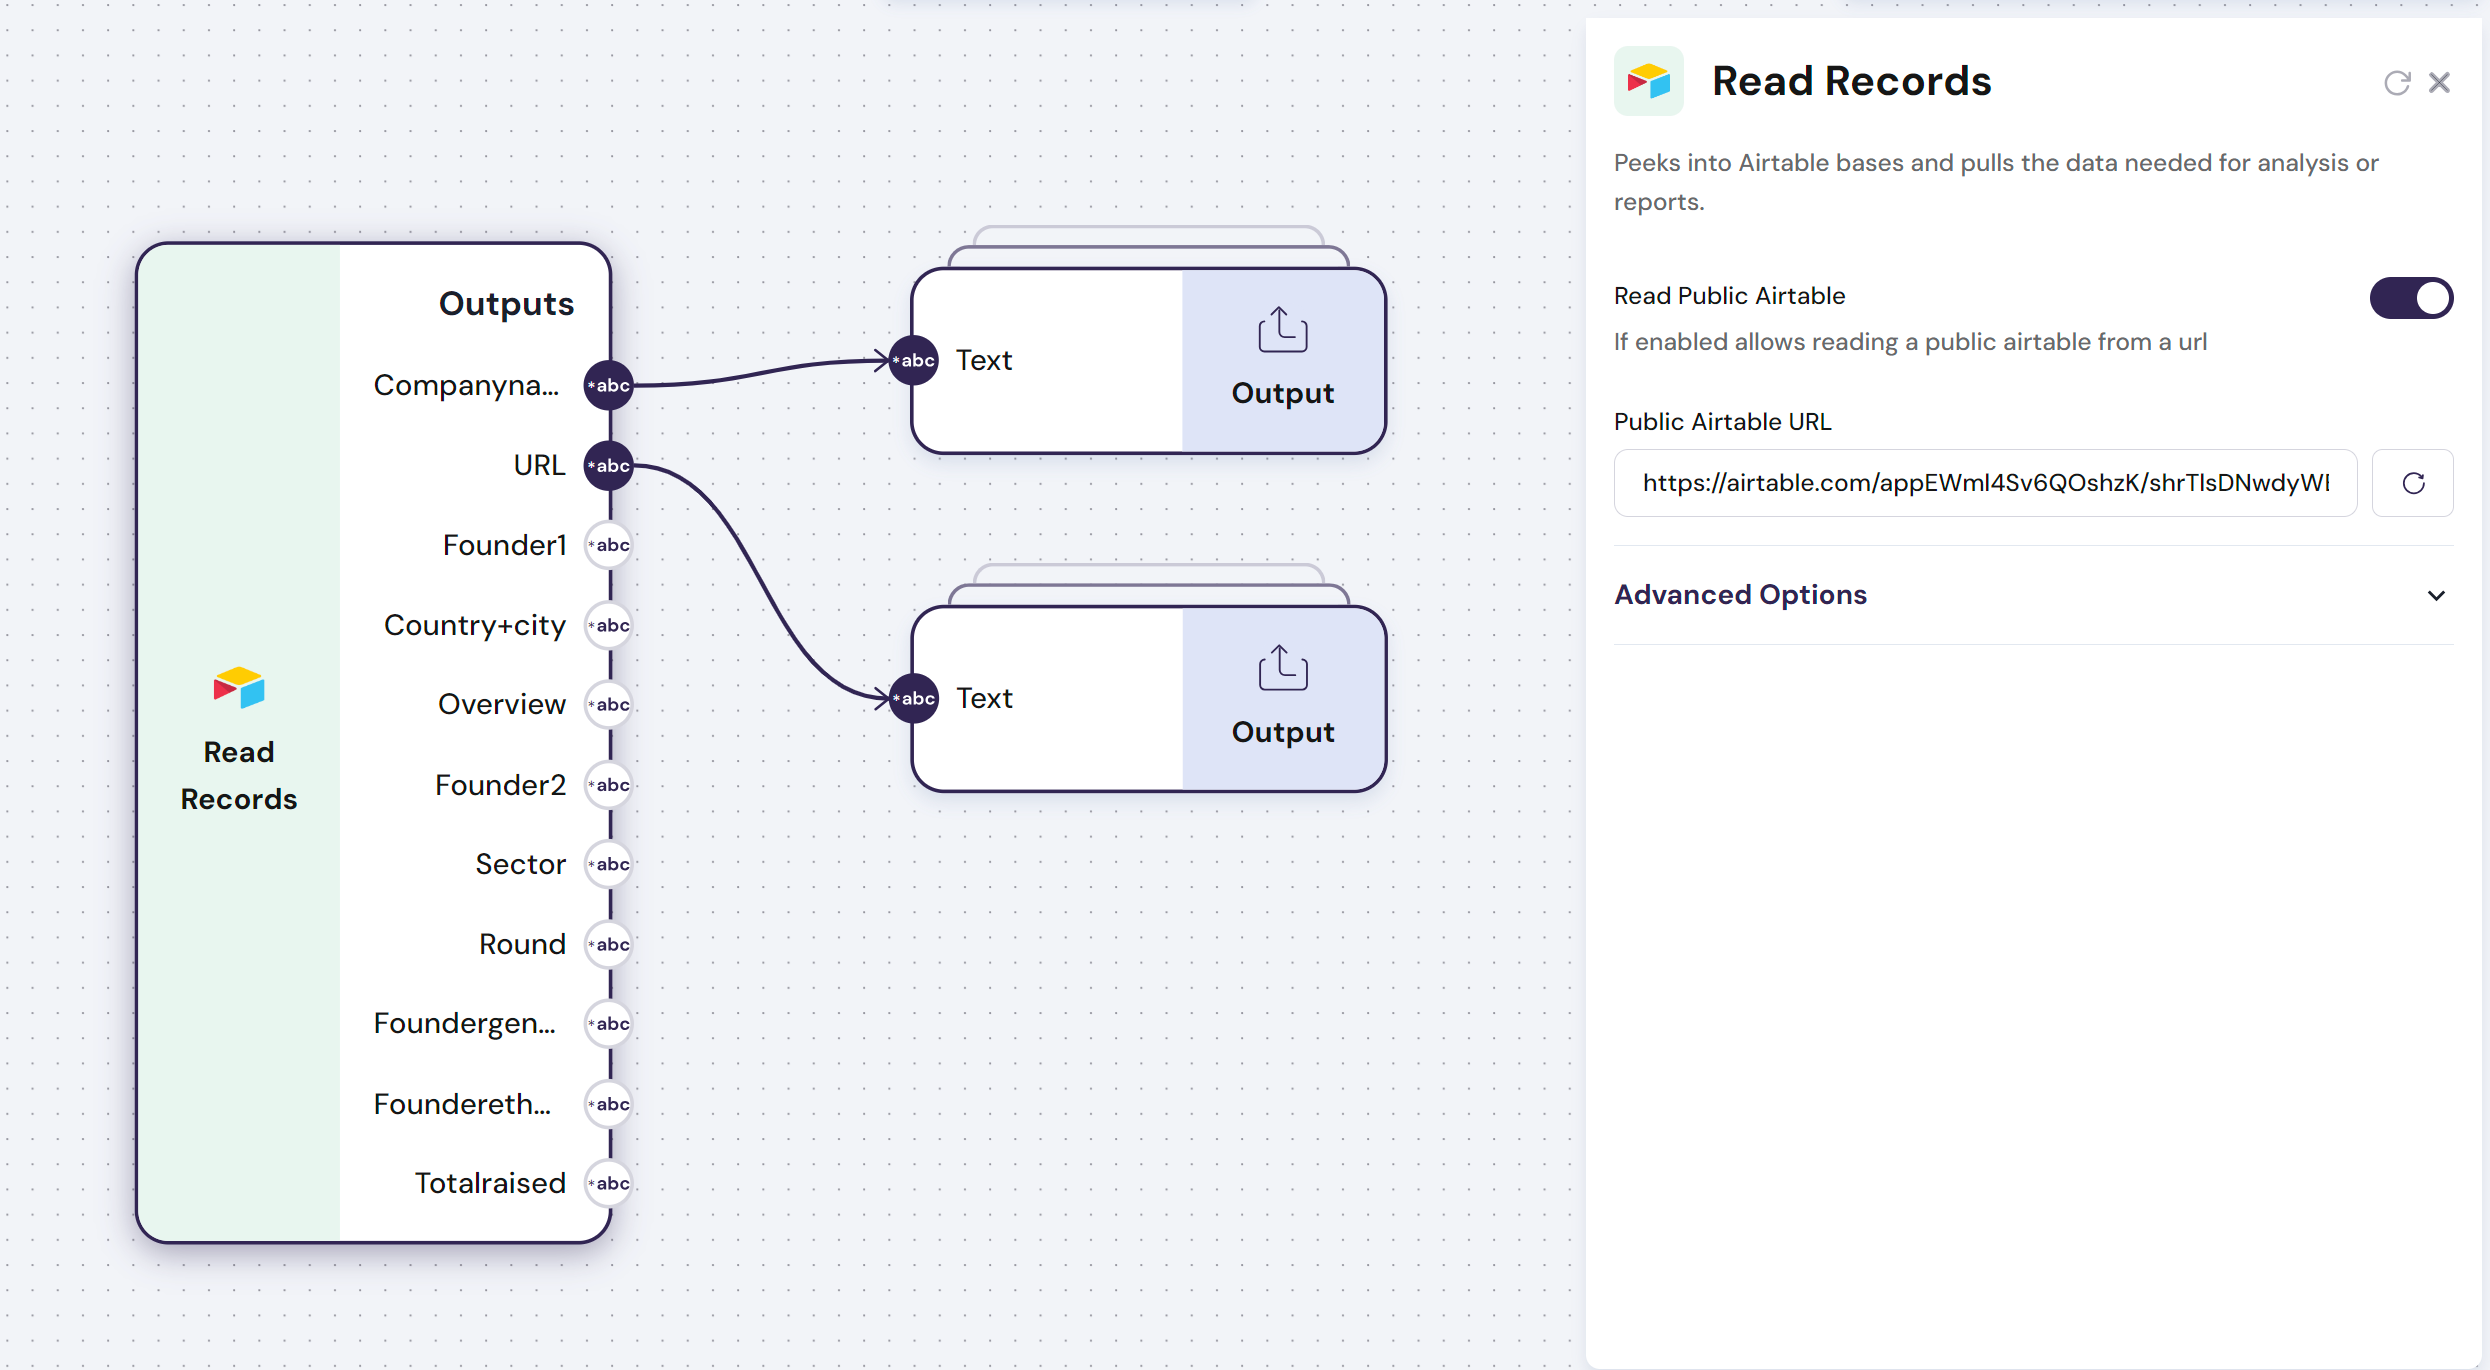
The `Airtable - Read Records` module peeks into Airtable bases and pulls the data needed for analysis or reports.
The `Airtable - Read Records` module has **variable outputs**:
- **Outputs**: Each column header in the first row of the Airtable represents a `variable output` with a list composed of all the rows in each column.
- **Config**:
- `Read Public Table` - It reads all the columns from a public Airtable URL
- `Base` - Select the `Base` from an Airtable account
- `Table` - Select the `Table` from the previously defined `Base`
Find below an example of how to use this module:
\n=== Documentation/Integration Modules/ReadR.mdx ===
---
title: "Airtable - Read Records"
description: "Read data directly from an Airtable."
---
> **This Module requires that you connect your account to the `Linked Accounts` page. Go to Settings to get this done.**
The `Airtable - Read Records` module peeks into Airtable bases and pulls the data needed for analysis or reports.
The `Airtable - Read Records` module has **variable outputs**:
- **Outputs**: Each column header in the first row of the Airtable represents a `variable output` with a list composed of all the rows in each column.
- **Config**:
- `Read Public Table` - It reads all the columns from a public Airtable URL
- `Base` - Select the `Base` from an Airtable account
- `Table` - Select the `Table` from the previously defined `Base`
Find below an example of how to use this module:
 \n=== Documentation/Integration Modules/NWritePage.mdx ===
---
title: "Notion - Write Page"
description: "Write text content from a Notion Page."
---
> **This Module requires that you connect your account to the `Linked Accounts` page. Go to Settings to get this done.**
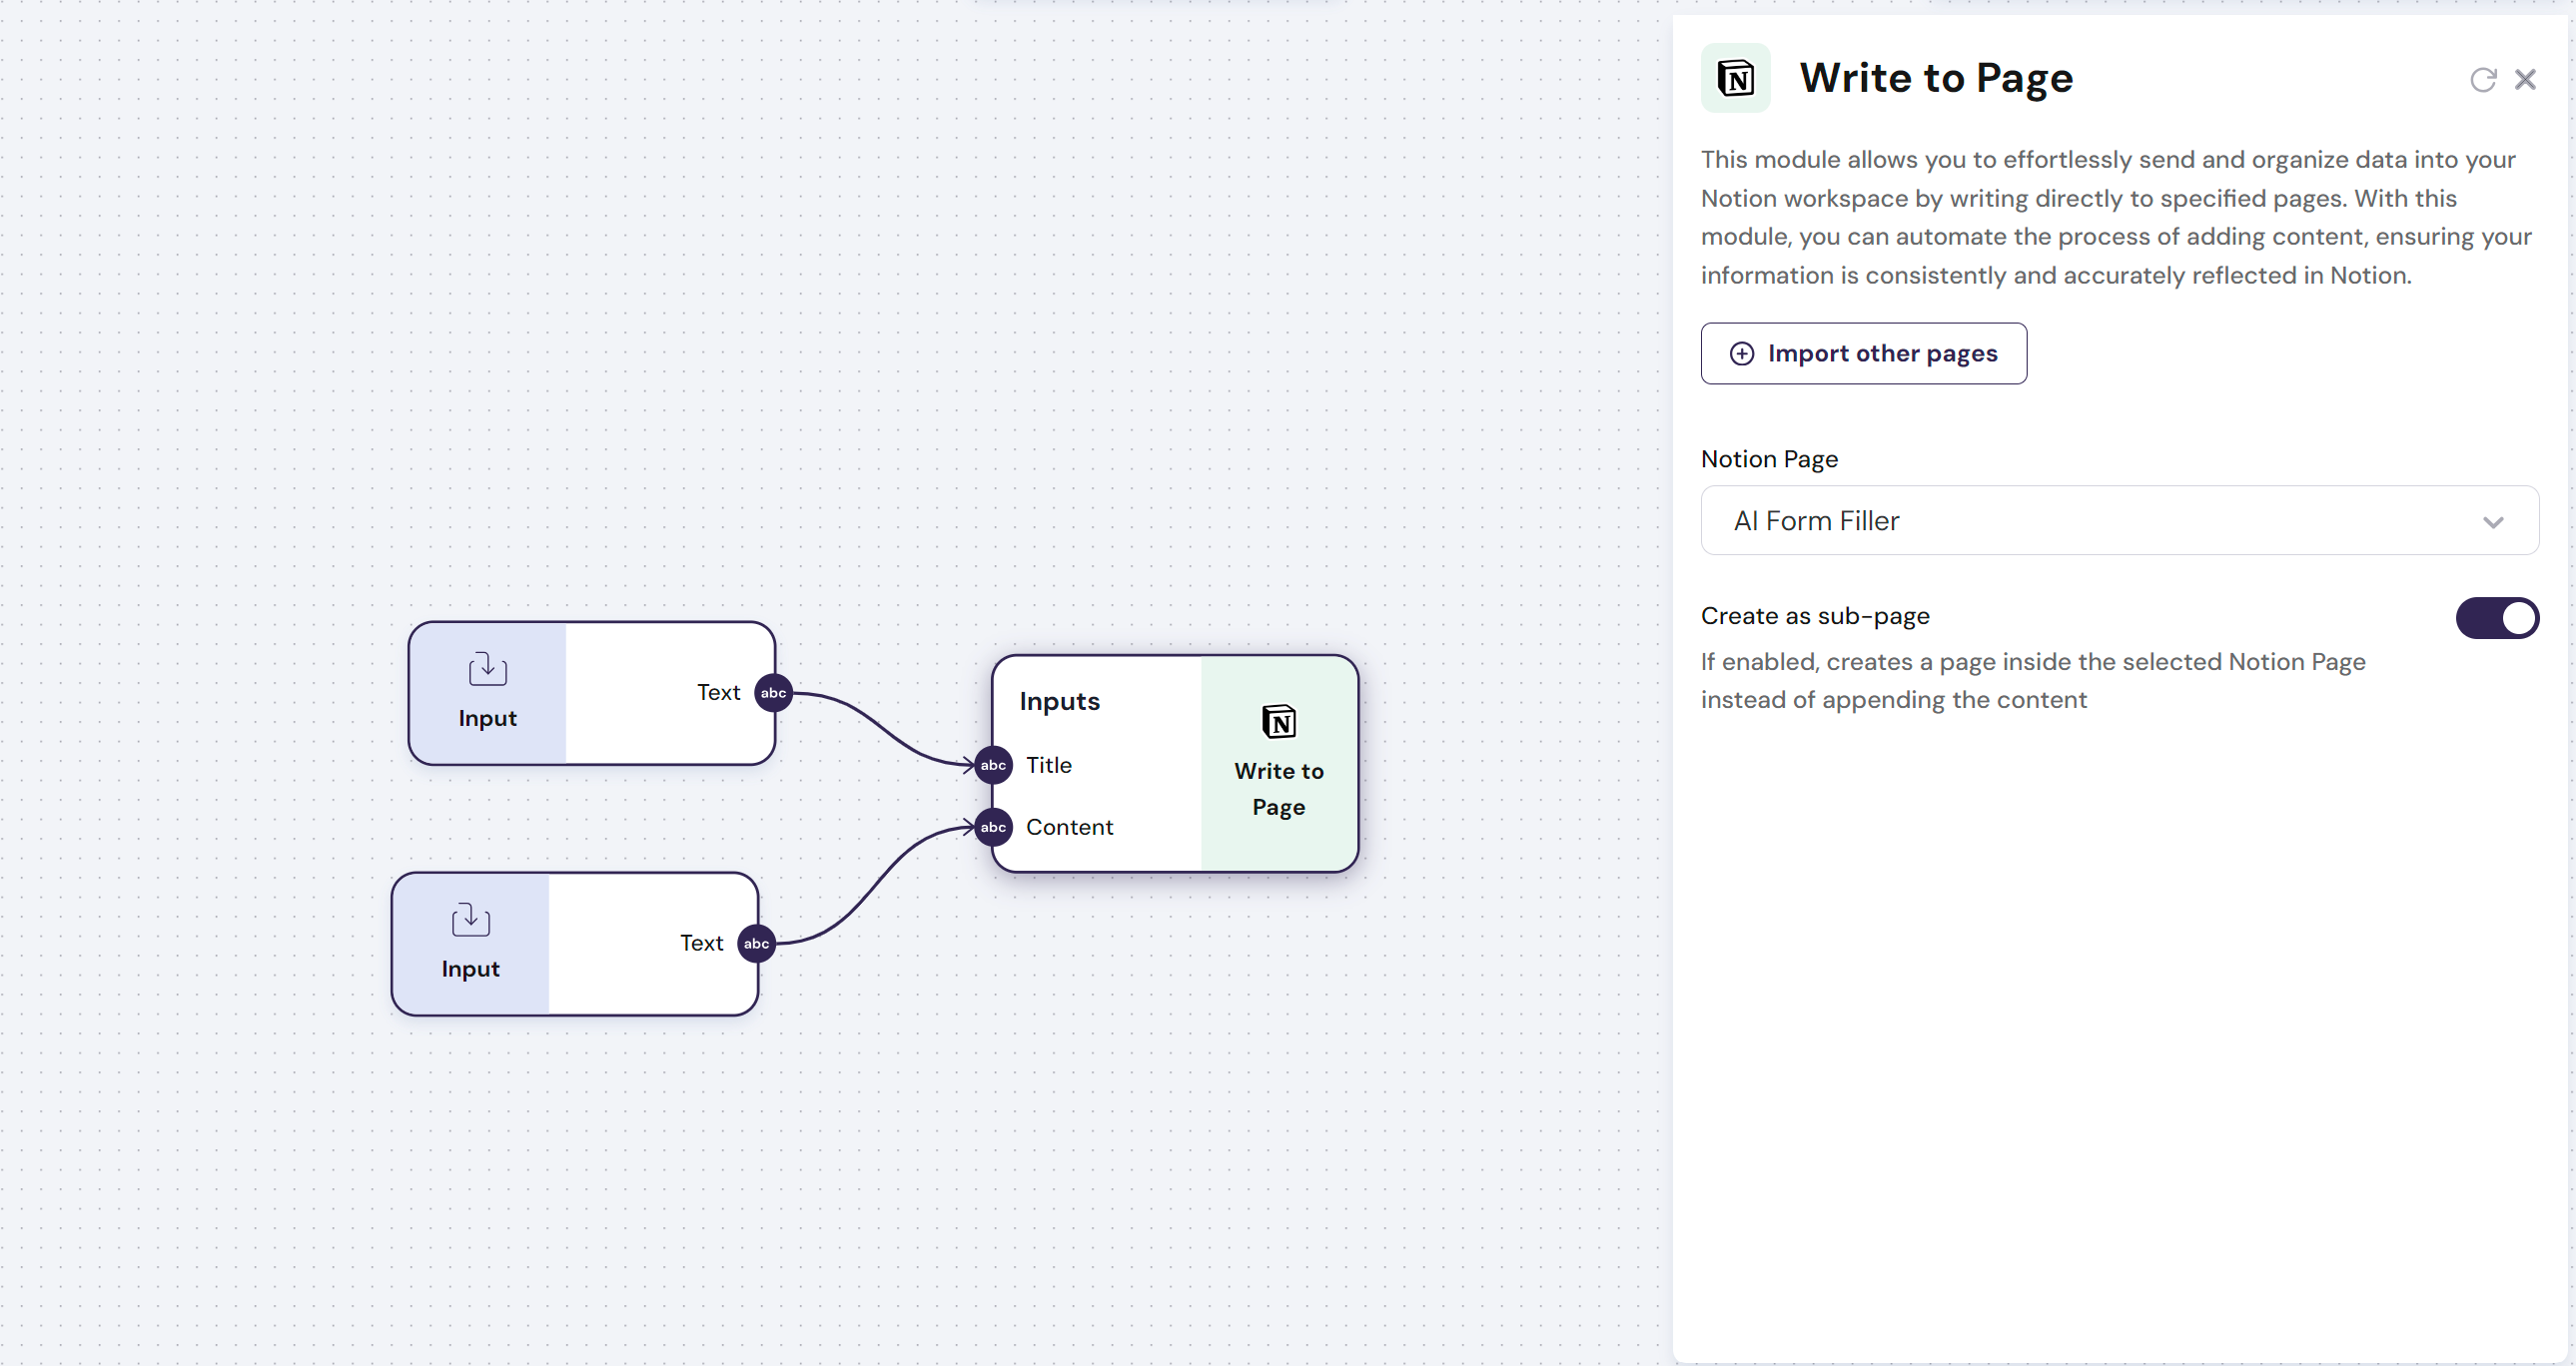
The `Notion - Write Page` module allows you to effortlessly send and organize data into your Notion workspace by writing directly to specified pages. With this module, you can automate the process of adding content, ensuring your information is consistently and accurately reflected in Notion.
The `Notion - Write Page` module has **one Input**:
- **Input**: Text to be written in a Notion Page
- **Config**: The Notion Page from the Notion workspace can be selected from the dropdown of approved access pages. If a page is not available in the drop-down, use the button `Import other pages`
Find below an example of how you use this module:
\n=== Documentation/Integration Modules/NWritePage.mdx ===
---
title: "Notion - Write Page"
description: "Write text content from a Notion Page."
---
> **This Module requires that you connect your account to the `Linked Accounts` page. Go to Settings to get this done.**
The `Notion - Write Page` module allows you to effortlessly send and organize data into your Notion workspace by writing directly to specified pages. With this module, you can automate the process of adding content, ensuring your information is consistently and accurately reflected in Notion.
The `Notion - Write Page` module has **one Input**:
- **Input**: Text to be written in a Notion Page
- **Config**: The Notion Page from the Notion workspace can be selected from the dropdown of approved access pages. If a page is not available in the drop-down, use the button `Import other pages`
Find below an example of how you use this module:
 \n=== Documentation/Integration Modules/Google sheets reader.mdx ===
---
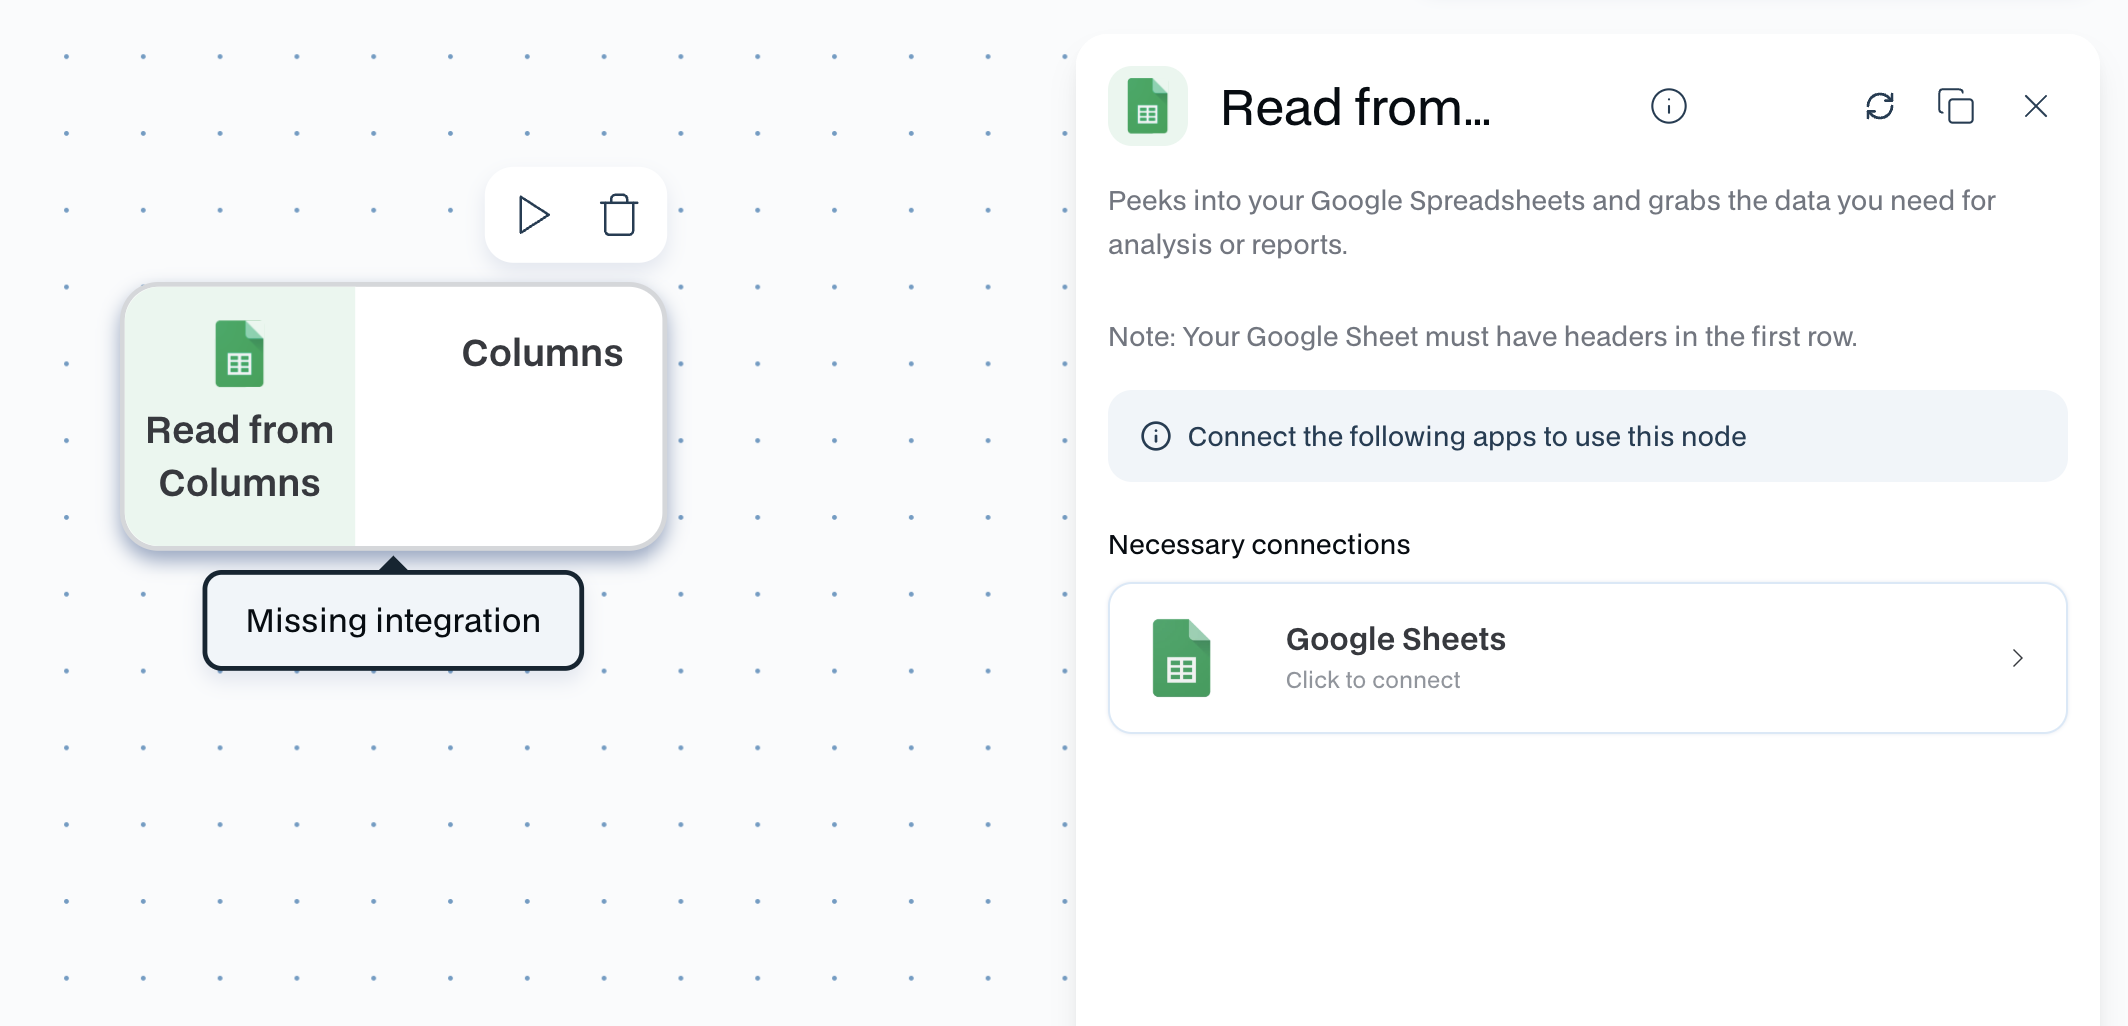
title: "Google Sheets - Read from Columns"
description: "Peeks into your Google Spreadsheets and grabs the data you need for analysis or reports."
---
> This node requires that you connect your account to the `Integrations`, or connect it directly in the configurations of the node
\n=== Documentation/Integration Modules/Google sheets reader.mdx ===
---
title: "Google Sheets - Read from Columns"
description: "Peeks into your Google Spreadsheets and grabs the data you need for analysis or reports."
---
> This node requires that you connect your account to the `Integrations`, or connect it directly in the configurations of the node
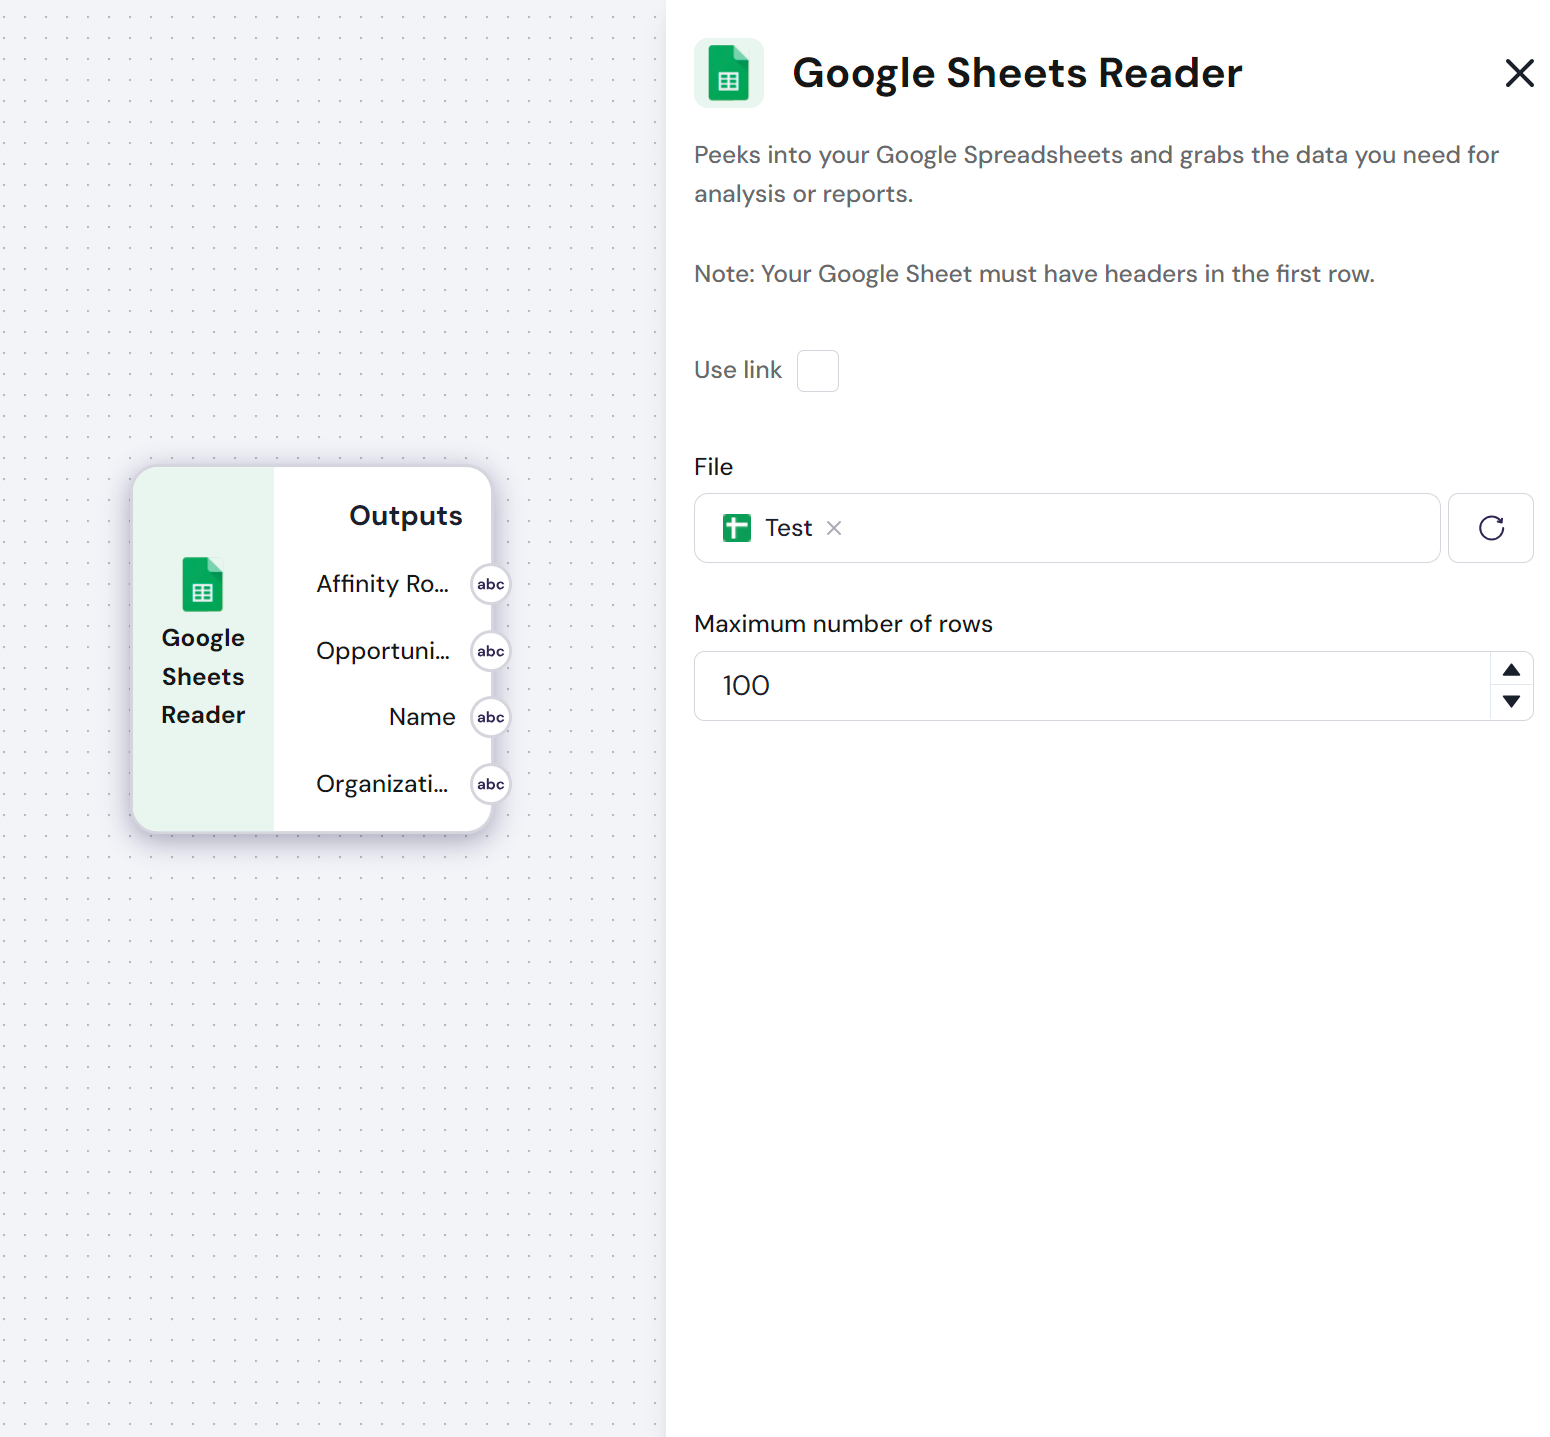
 The `Google Sheets - Read from Columns` module allows you to read data from Google Sheets.
**Google Sheets are processed by column; you must maintain the first row of the Google Sheets for the headers where each column represents a variable.**
The `Google Sheets - Read from Columns` module has **variable outputs**:
- **Outputs**: Each column header in the first row of the google sheets represents a `variable output` with a list composed of all the rows in each column.
- **Config**: The Google Sheets file can be loaded with a link or via the Google Finder
Find below an example of how you can upload a Google Sheets:
The `Google Sheets - Read from Columns` module allows you to read data from Google Sheets.
**Google Sheets are processed by column; you must maintain the first row of the Google Sheets for the headers where each column represents a variable.**
The `Google Sheets - Read from Columns` module has **variable outputs**:
- **Outputs**: Each column header in the first row of the google sheets represents a `variable output` with a list composed of all the rows in each column.
- **Config**: The Google Sheets file can be loaded with a link or via the Google Finder
Find below an example of how you can upload a Google Sheets:
 \n=== Documentation/Integration Modules/Google Docs Writer.mdx ===
---
title: "Google Docs - Write to Document"
description: "Write to Google Docs"
---
> **This Module requires that you connect your account to the `Linked Accounts` page. Go to Settings to get this done.**
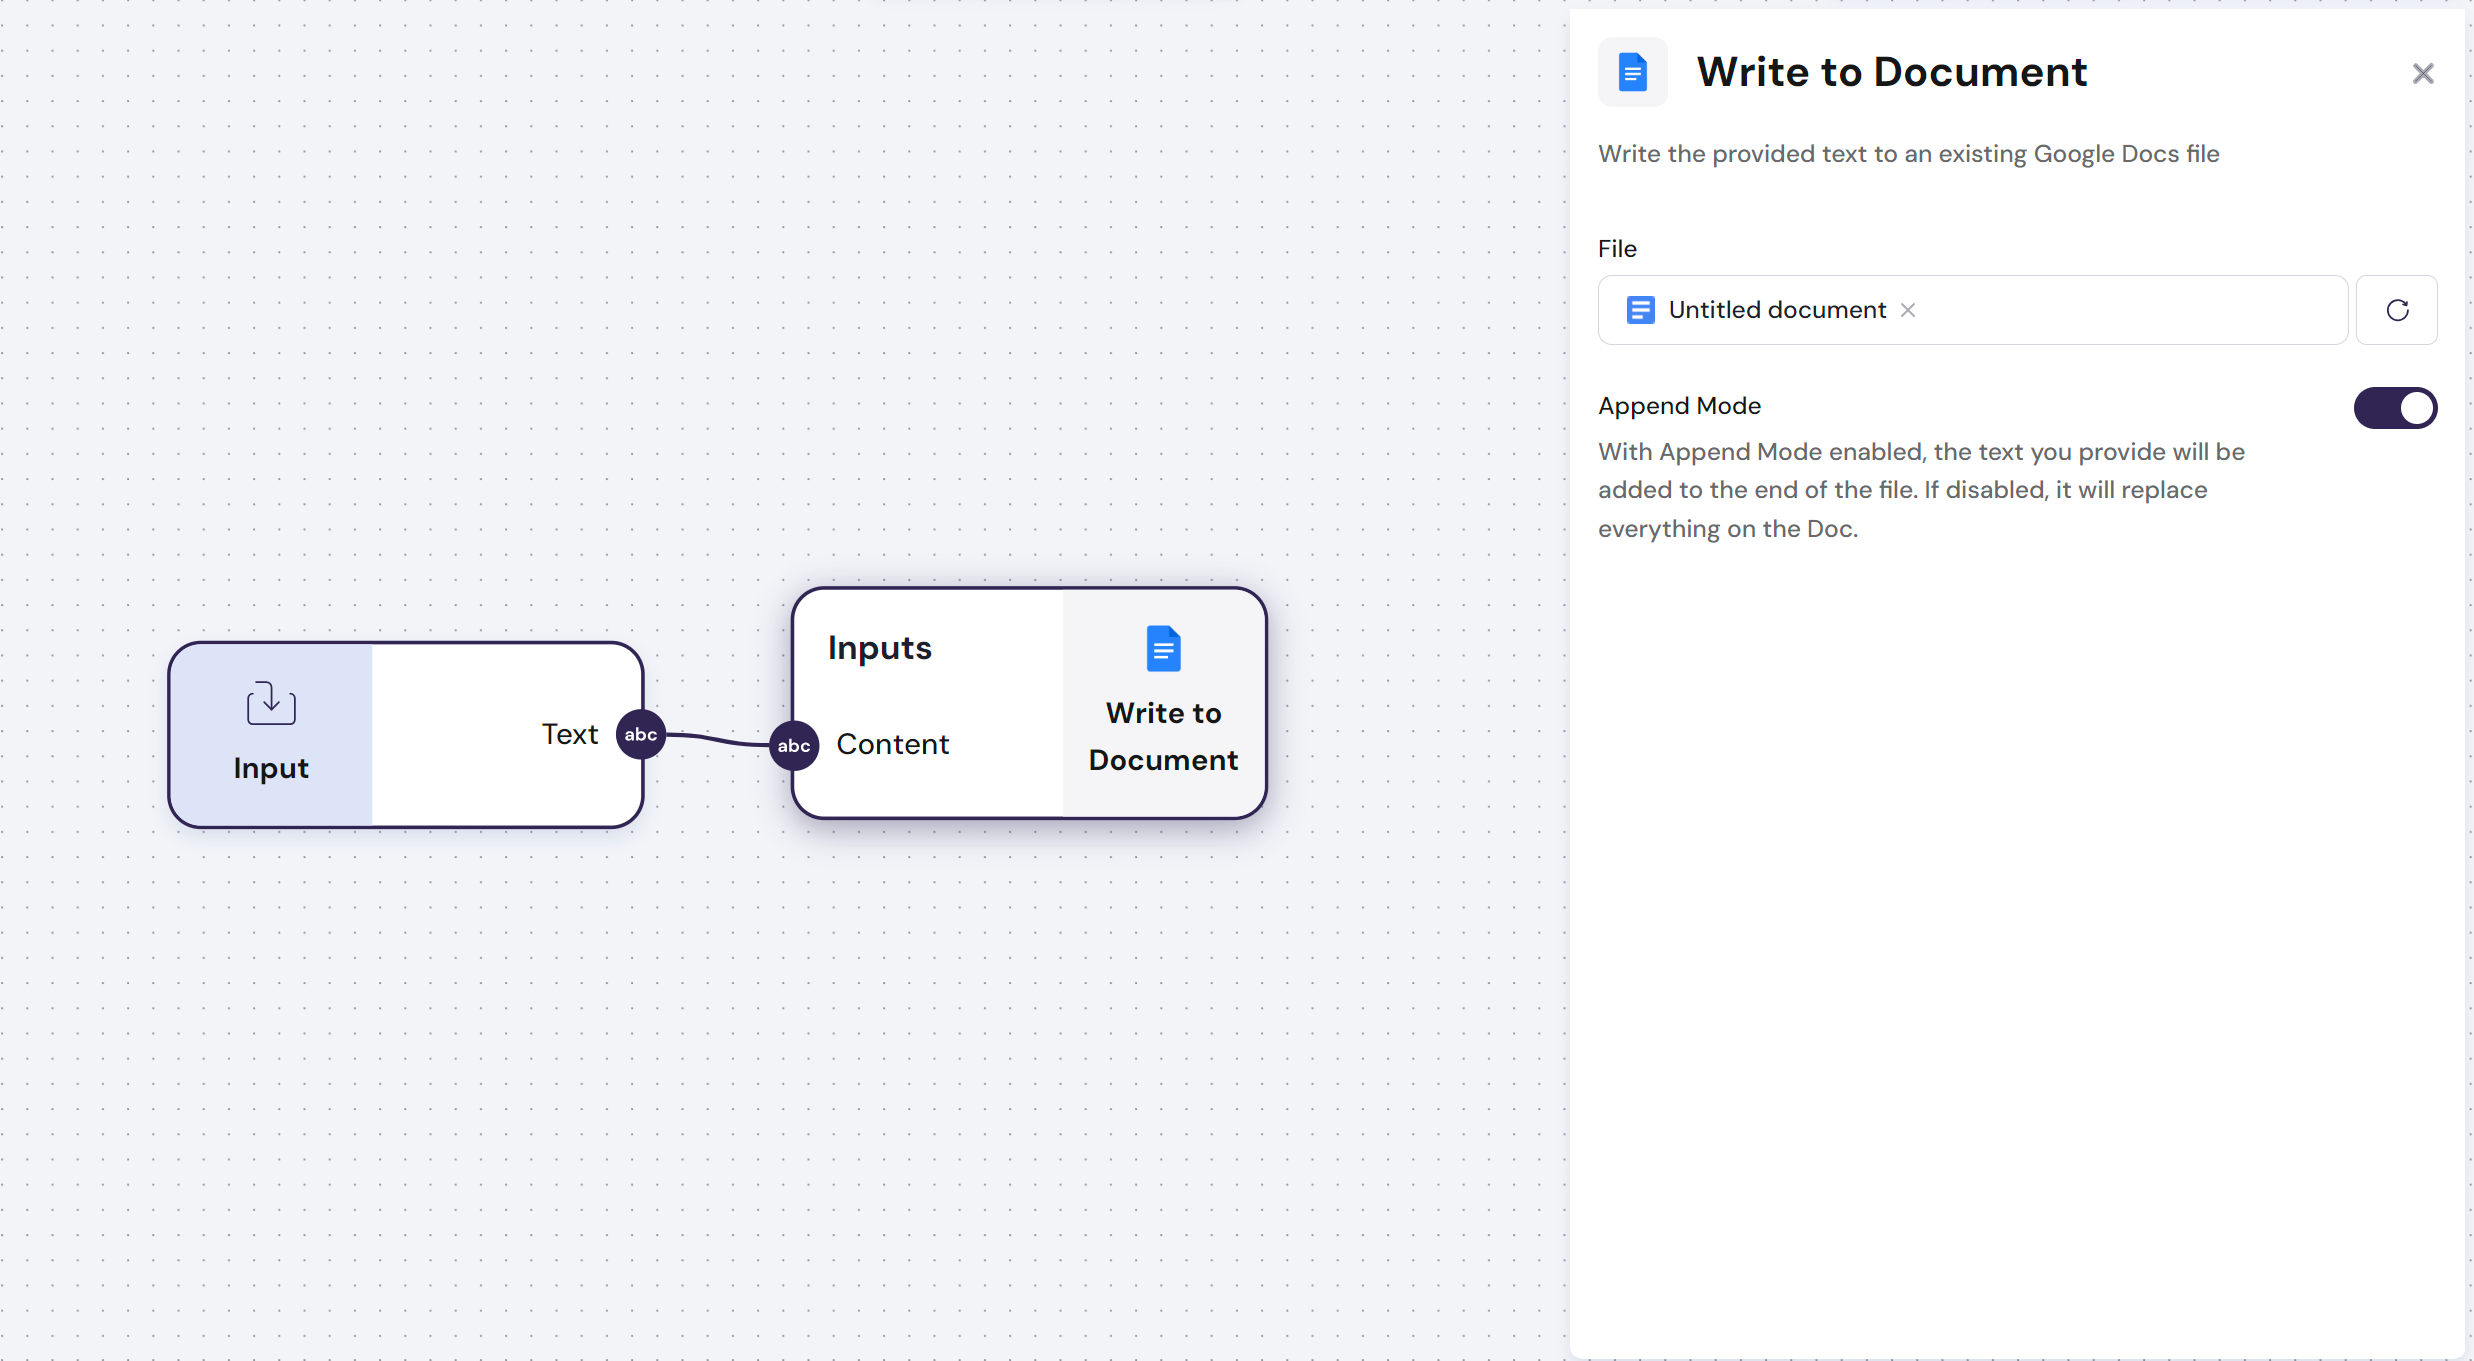
The 'Google Docs - Write to Document' module allows you to effortlessly send and organize data into a document in Google Docs by writing directly into it.
The 'Google Docs - Write to Document' module has **one Input**:
- **Input**: Text to be written in a Google Docs
- **Config**: The document can be selected from your google drive with the google picker
Find below an example of how you use this module:
\n=== Documentation/Integration Modules/Google Docs Writer.mdx ===
---
title: "Google Docs - Write to Document"
description: "Write to Google Docs"
---
> **This Module requires that you connect your account to the `Linked Accounts` page. Go to Settings to get this done.**
The 'Google Docs - Write to Document' module allows you to effortlessly send and organize data into a document in Google Docs by writing directly into it.
The 'Google Docs - Write to Document' module has **one Input**:
- **Input**: Text to be written in a Google Docs
- **Config**: The document can be selected from your google drive with the google picker
Find below an example of how you use this module:
 \n=== Documentation/Integration Modules/GDrive writer.mdx ===
---
title: 'Google Drive - Save to Folder'
description: 'Saves files back into your Google Drive, wherever you want them to go.'
---
>**This Module requires that you connect your account to the `Linked Accounts` page. Go to Settings to get this done.**
The `Google Drive - Save to Folder` module allows you to save any document to your Google Drive.
The `Google Drive - Save to Folder` module has **one output**:
- **Output**: Outputs a text document or a list of text documents
\n=== Documentation/Integration Modules/ReadChannel.mdx ===
---
title: "Youtube - Read Channel"
description: "Enter a Youtube channel URL to extract a concise summary, detailed raw data of the channel"
---
> **This Module requires that you connect your account to the `Linked Accounts` page. Go to Settings to get this done.**
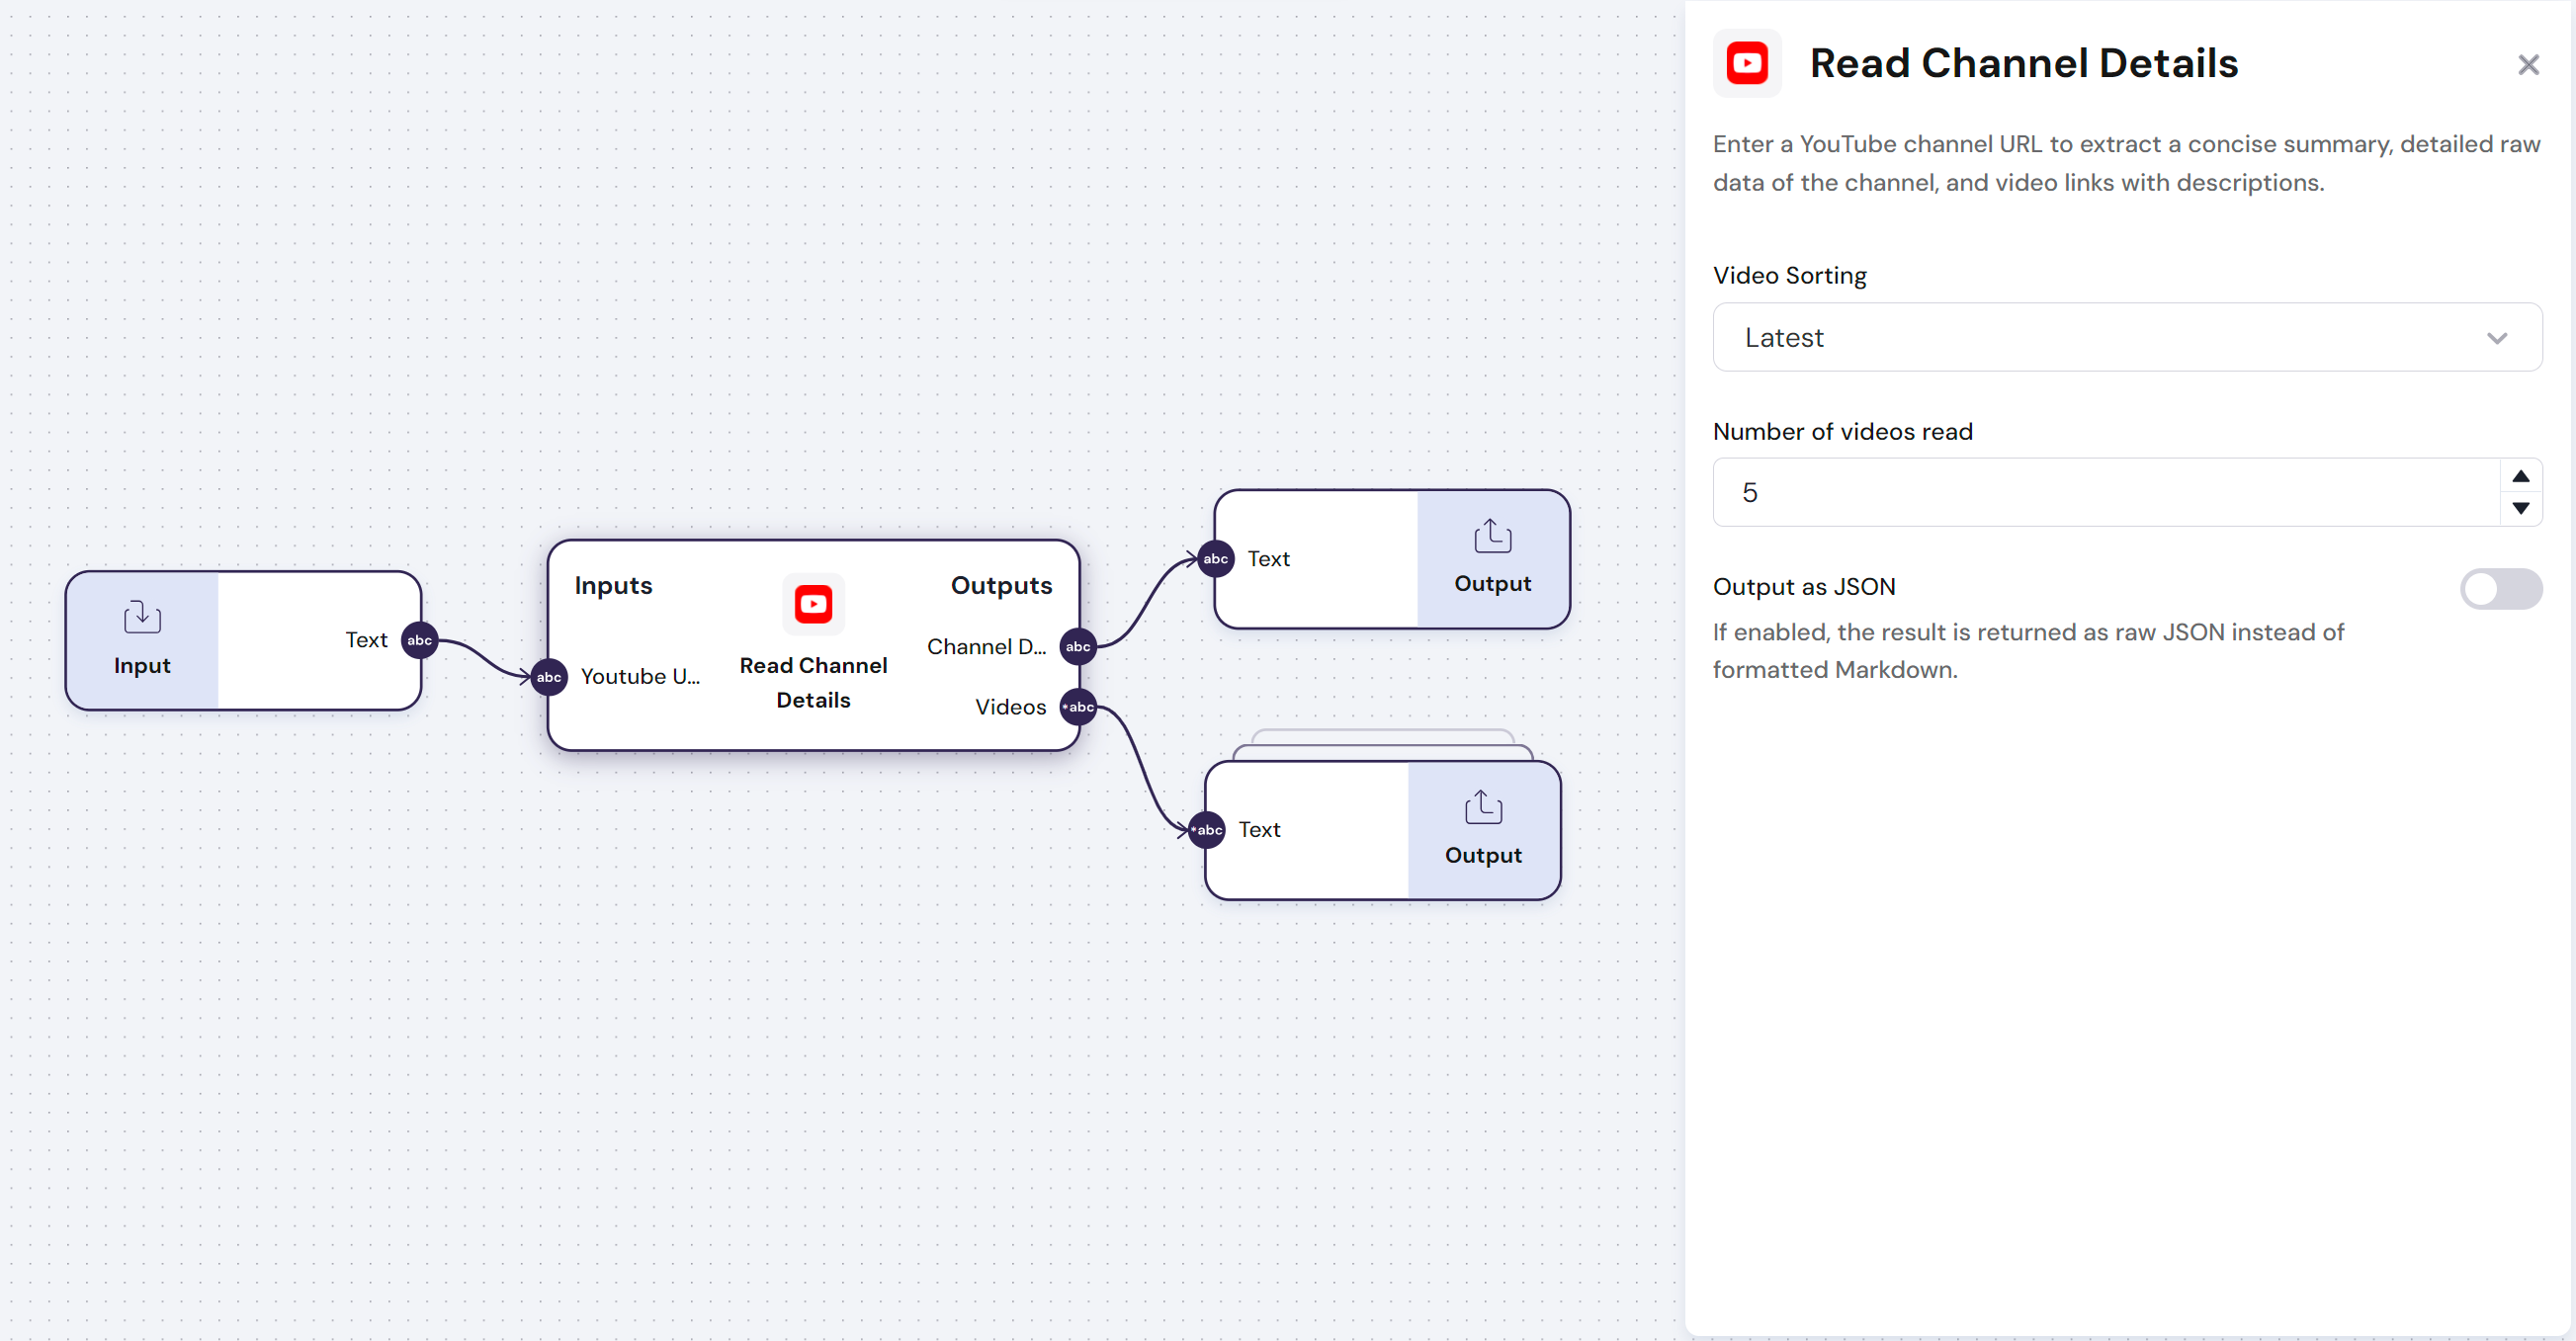
The `Youtube - Read Channel` module uses a YouTube channel URL to extract a concise summary, detailed raw data of the channel, and video links with descriptions.
The `Youtube - Read Channel` module has **one input** and **one output**:
- **Input**:
- Youtube Channel URL
- **Outputs**:
- `Channel Data` - Channel description, analytics and raw data
- `Videos` - Links to videos
- **Config**:
- `Video sorting` - Type of sorting of the videos that are extracted
- `Number of videos read` - Number of videos that are extracted in the output of the module
Find below an example of how to use this module:
\n=== Documentation/Integration Modules/GDrive writer.mdx ===
---
title: 'Google Drive - Save to Folder'
description: 'Saves files back into your Google Drive, wherever you want them to go.'
---
>**This Module requires that you connect your account to the `Linked Accounts` page. Go to Settings to get this done.**
The `Google Drive - Save to Folder` module allows you to save any document to your Google Drive.
The `Google Drive - Save to Folder` module has **one output**:
- **Output**: Outputs a text document or a list of text documents
\n=== Documentation/Integration Modules/ReadChannel.mdx ===
---
title: "Youtube - Read Channel"
description: "Enter a Youtube channel URL to extract a concise summary, detailed raw data of the channel"
---
> **This Module requires that you connect your account to the `Linked Accounts` page. Go to Settings to get this done.**
The `Youtube - Read Channel` module uses a YouTube channel URL to extract a concise summary, detailed raw data of the channel, and video links with descriptions.
The `Youtube - Read Channel` module has **one input** and **one output**:
- **Input**:
- Youtube Channel URL
- **Outputs**:
- `Channel Data` - Channel description, analytics and raw data
- `Videos` - Links to videos
- **Config**:
- `Video sorting` - Type of sorting of the videos that are extracted
- `Number of videos read` - Number of videos that are extracted in the output of the module
Find below an example of how to use this module:
 \n=== Documentation/Integration Modules/SlackWriter.mdx ===
---
title: "Slack - Write Messages"
description: "Write messages from a Slack channel ."
---
> **This Module requires that you connect your account to the `Linked Accounts` page. Go to Settings to get this done.**
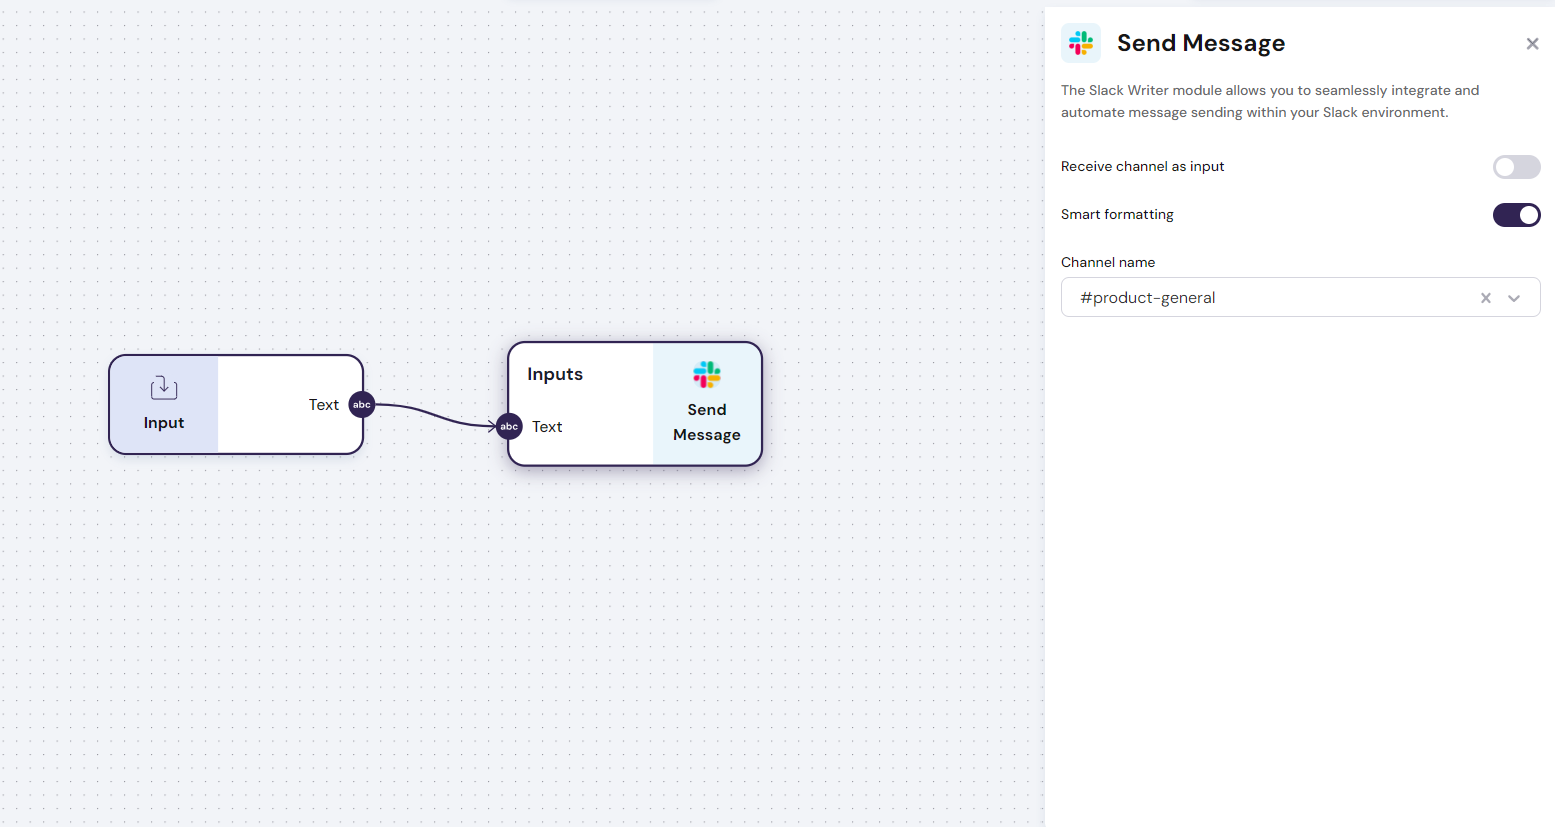
The `Slack - Write Messages` module allows you to write messages to a Slack channel.
> **Note: This module is particularly useful if you want to build an agent for your Slack. It ensures that you can write messages to any channel.**
> **To build a Slack agent you should use a Slack trigger, to activate the workflow on every message**
The `Slack - Write Messages` module has **one input**:
- **Input**: Text contained in the messages of a Slack channel
- **Config**:
- **Channel name**: The name of the slack channel to be read
- **Number of messages read**: Number of historical messages read in the Slack channel
Find below an example of how you use this module:
\n=== Documentation/Integration Modules/SlackWriter.mdx ===
---
title: "Slack - Write Messages"
description: "Write messages from a Slack channel ."
---
> **This Module requires that you connect your account to the `Linked Accounts` page. Go to Settings to get this done.**
The `Slack - Write Messages` module allows you to write messages to a Slack channel.
> **Note: This module is particularly useful if you want to build an agent for your Slack. It ensures that you can write messages to any channel.**
> **To build a Slack agent you should use a Slack trigger, to activate the workflow on every message**
The `Slack - Write Messages` module has **one input**:
- **Input**: Text contained in the messages of a Slack channel
- **Config**:
- **Channel name**: The name of the slack channel to be read
- **Number of messages read**: Number of historical messages read in the Slack channel
Find below an example of how you use this module:
 \n=== Documentation/Integration Modules/CompanySearch.mdx ===
---
title: "Linkedin - Company Search"
description: "Enter a company domain to extract a company summary or raw data"
---
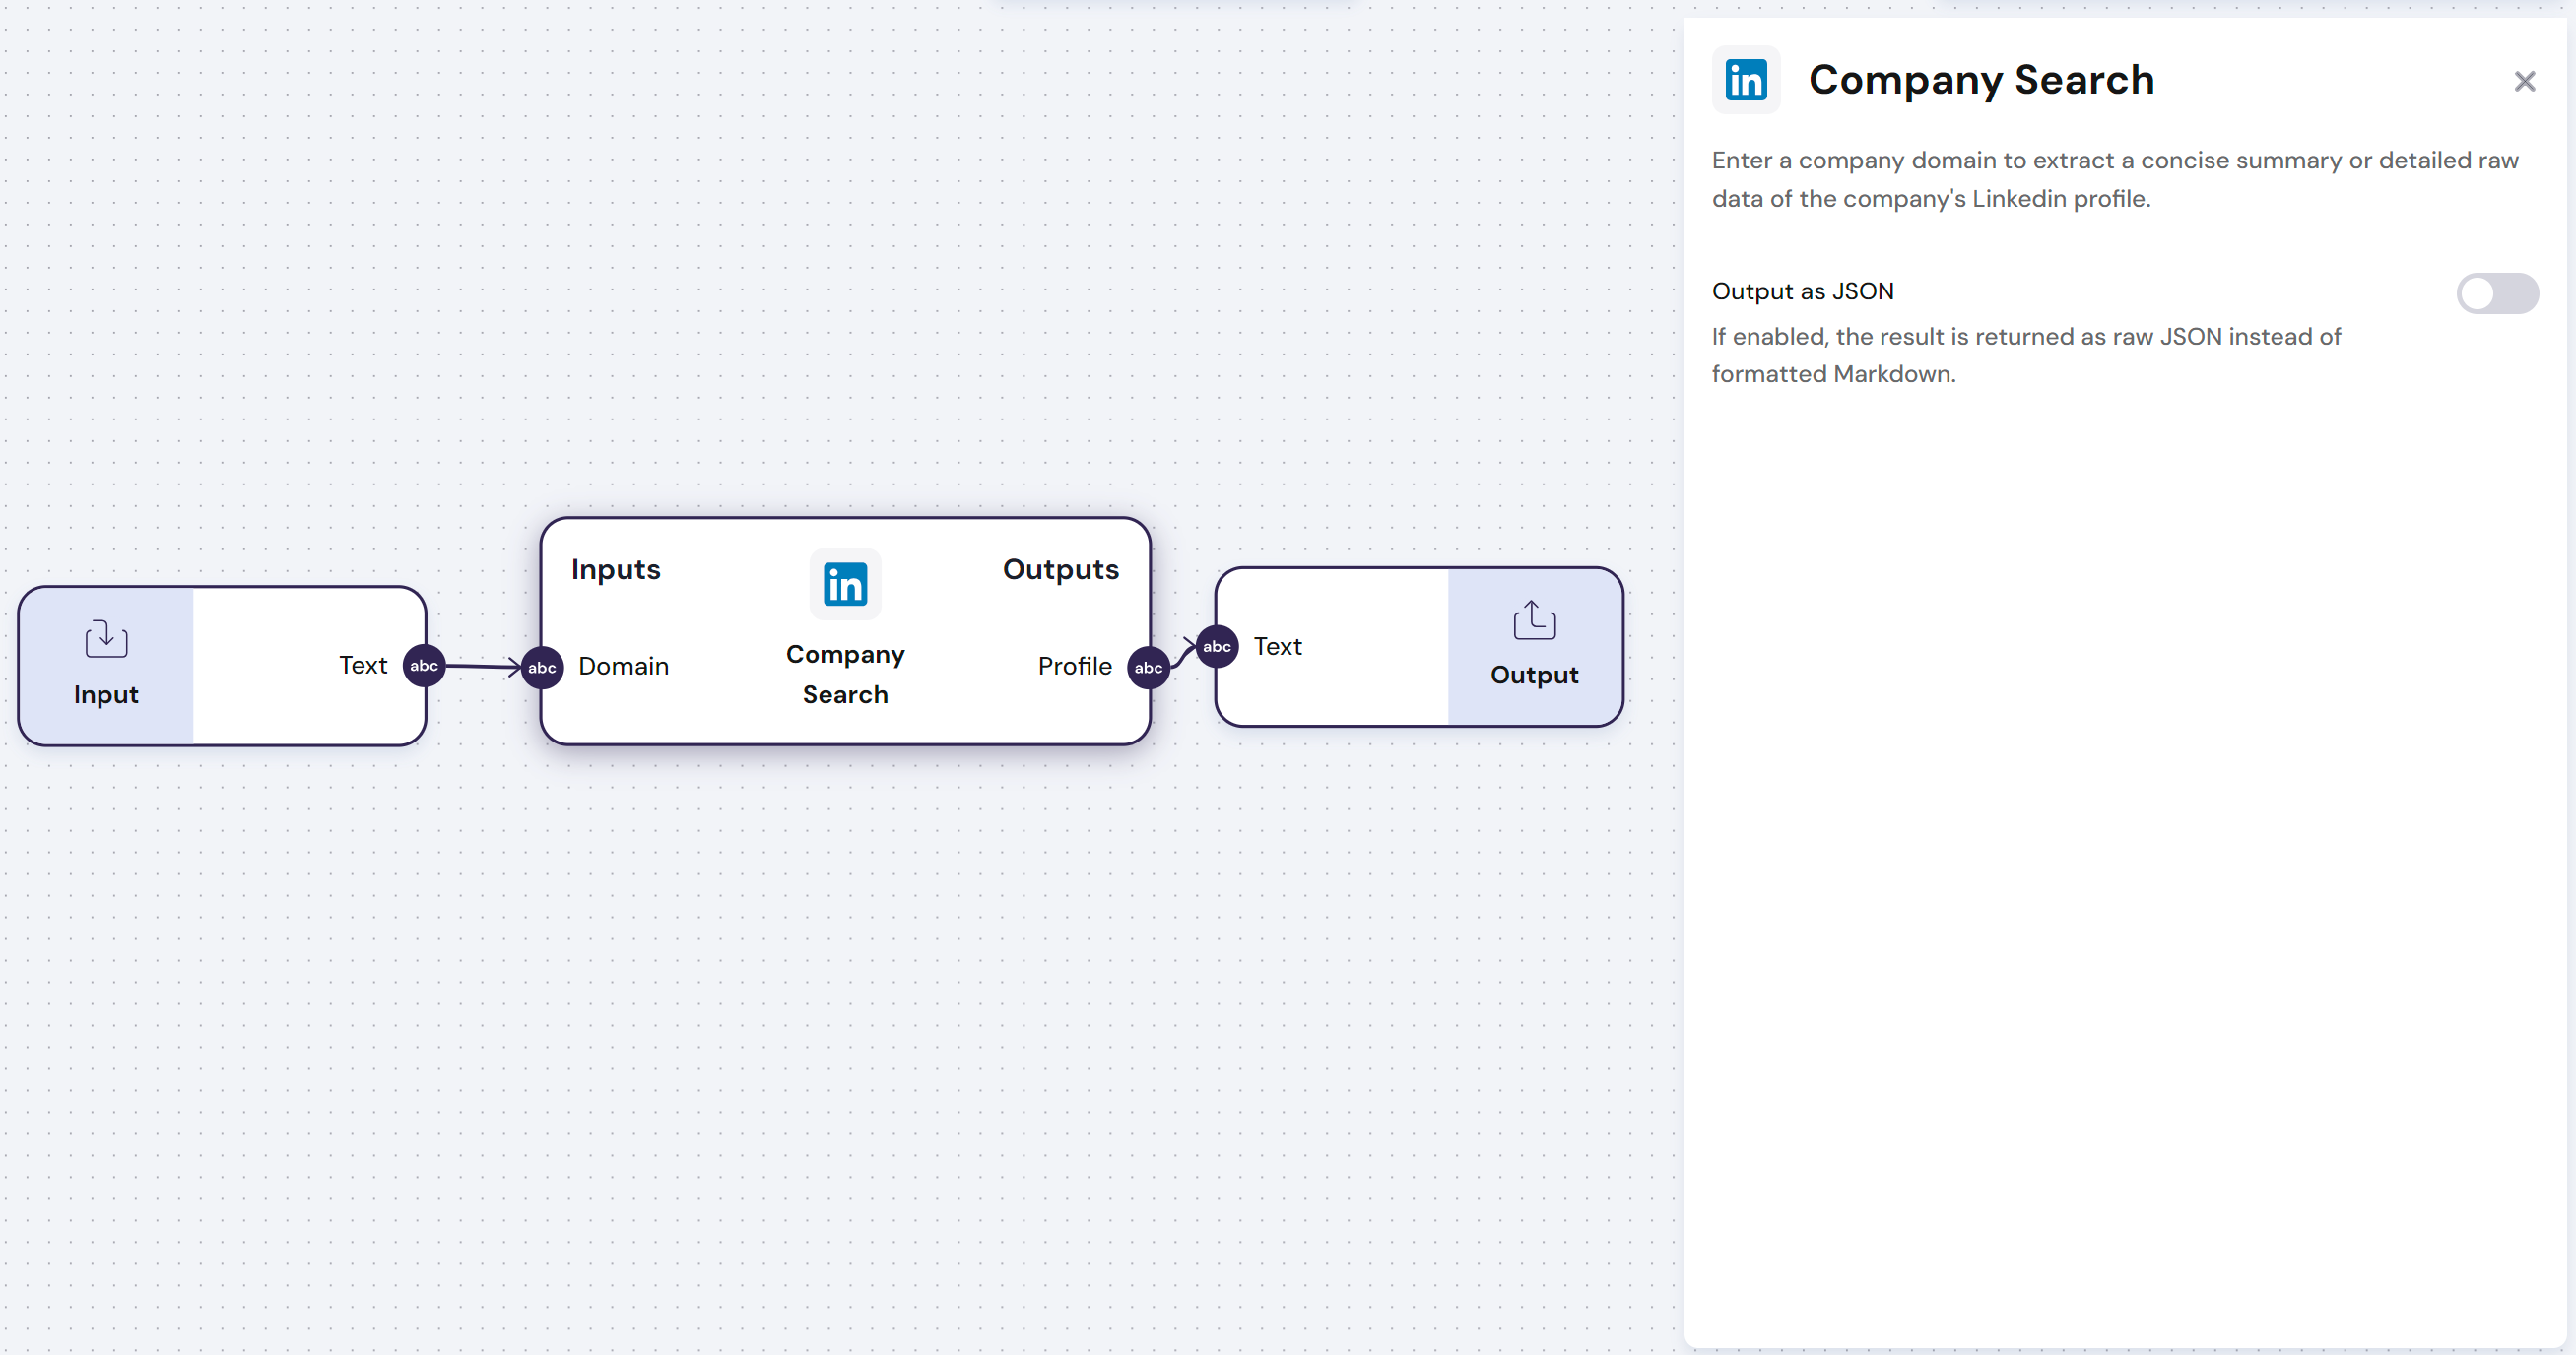
The `Linkedin - Company Search` module uses a company website domain to extract a concise summary or detailed raw data of the company's Linkedin profile.
The `Linkedin - Company Search` module has **one input** and **one output**:
- **Input**
- Company Website Domain in LinkedIn. Eg. "https://www.linkedin.com/company/pandadoc/"
- **Output**:
- Complete profile with all the information extracted from Linkedin
- **Config**:
- `Output as JSON` - If enabled, the result is returned as raw JSON instead of formatted Markdown.
Find below an example of how to use this module:
\n=== Documentation/Integration Modules/CompanySearch.mdx ===
---
title: "Linkedin - Company Search"
description: "Enter a company domain to extract a company summary or raw data"
---
The `Linkedin - Company Search` module uses a company website domain to extract a concise summary or detailed raw data of the company's Linkedin profile.
The `Linkedin - Company Search` module has **one input** and **one output**:
- **Input**
- Company Website Domain in LinkedIn. Eg. "https://www.linkedin.com/company/pandadoc/"
- **Output**:
- Complete profile with all the information extracted from Linkedin
- **Config**:
- `Output as JSON` - If enabled, the result is returned as raw JSON instead of formatted Markdown.
Find below an example of how to use this module:
 \n=== Documentation/Integration Modules/GDrive Reader.mdx ===
---
title: 'Google Drive - Read Files'
description: 'Grabs any documents you choose in Google Drive, ready for you to use.'
---
>**This Module requires that you connect your account to the `Linked Accounts` page. Go to Settings to get this done.**
The `Google Drive - Read Files` module allows you read any text documents from your Google Drive.
The `Google Drive - Read Files` module has **one output**:
- **Output**: Outputs a text document or a list of text documents inside a folder
\n=== Documentation/Integration Modules/WriteR.mdx ===
---
title: "Airtable - Write Records"
description: "Writes values across any fields of Airtable bases"
---
> **This Module requires that you connect your account to the `Linked Accounts` page. Go to Settings to get this done.**
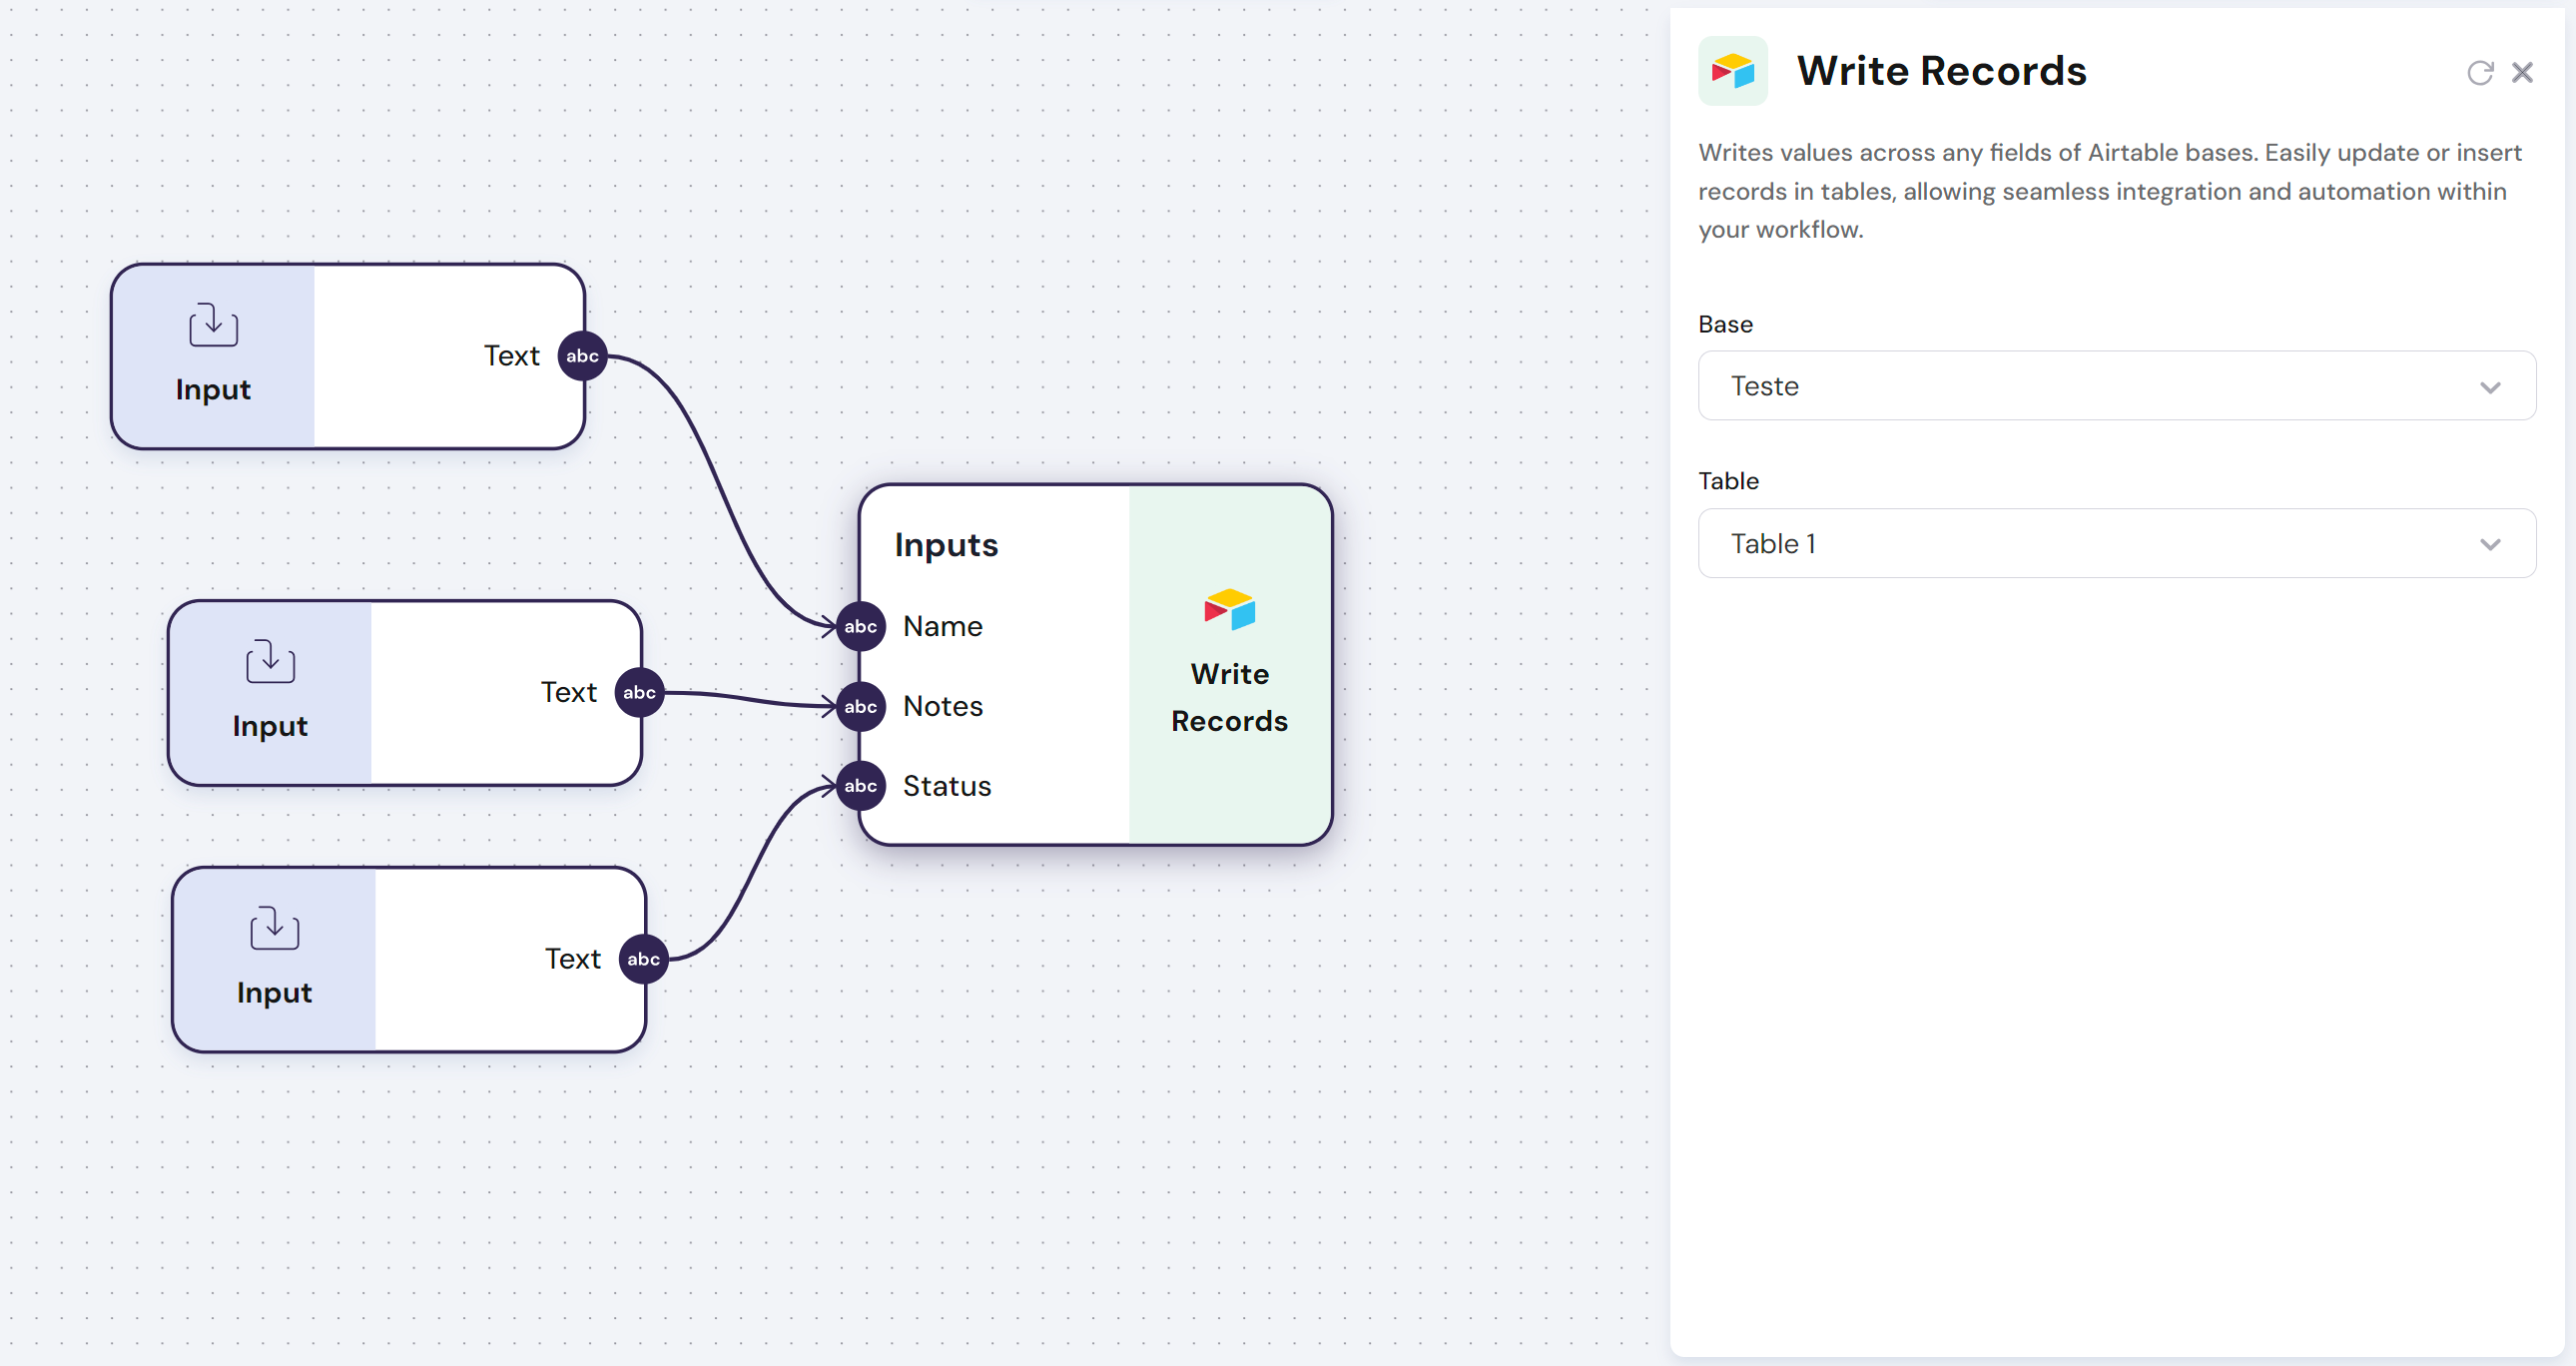
The `Airtable - Write Records` module easily updates or inserts records in tables, allowing seamless integration and automation within your workflow.
The `Airtable - Write Records` module has **variable inputs**:
- **Inputs**: Each column header in the first row of the Airtable represents a `variable inputs` with a list composed of all the rows in each column.
- **Config**:
- `Read Public Table` - It reads all the columns from a public Airtable URL
- `Base` - Select the `Base` from an Airtable account
- `Table` - Select the `Table` from the previously defined `Base`
Find below an example of how to use this module:
\n=== Documentation/Integration Modules/GDrive Reader.mdx ===
---
title: 'Google Drive - Read Files'
description: 'Grabs any documents you choose in Google Drive, ready for you to use.'
---
>**This Module requires that you connect your account to the `Linked Accounts` page. Go to Settings to get this done.**
The `Google Drive - Read Files` module allows you read any text documents from your Google Drive.
The `Google Drive - Read Files` module has **one output**:
- **Output**: Outputs a text document or a list of text documents inside a folder
\n=== Documentation/Integration Modules/WriteR.mdx ===
---
title: "Airtable - Write Records"
description: "Writes values across any fields of Airtable bases"
---
> **This Module requires that you connect your account to the `Linked Accounts` page. Go to Settings to get this done.**
The `Airtable - Write Records` module easily updates or inserts records in tables, allowing seamless integration and automation within your workflow.
The `Airtable - Write Records` module has **variable inputs**:
- **Inputs**: Each column header in the first row of the Airtable represents a `variable inputs` with a list composed of all the rows in each column.
- **Config**:
- `Read Public Table` - It reads all the columns from a public Airtable URL
- `Base` - Select the `Base` from an Airtable account
- `Table` - Select the `Table` from the previously defined `Base`
Find below an example of how to use this module:
 \n=== Documentation/Integration Modules/Google sheets writer.mdx ===
---
title: 'Google Sheets - Write in Columns'
description: 'Write values across any columns of your Google Sheets.'
---
>**This Module requires that you connect your account to the `Linked Accounts` page. Go to Settings to get this done.**
\n=== Documentation/Integration Modules/Google sheets writer.mdx ===
---
title: 'Google Sheets - Write in Columns'
description: 'Write values across any columns of your Google Sheets.'
---
>**This Module requires that you connect your account to the `Linked Accounts` page. Go to Settings to get this done.**
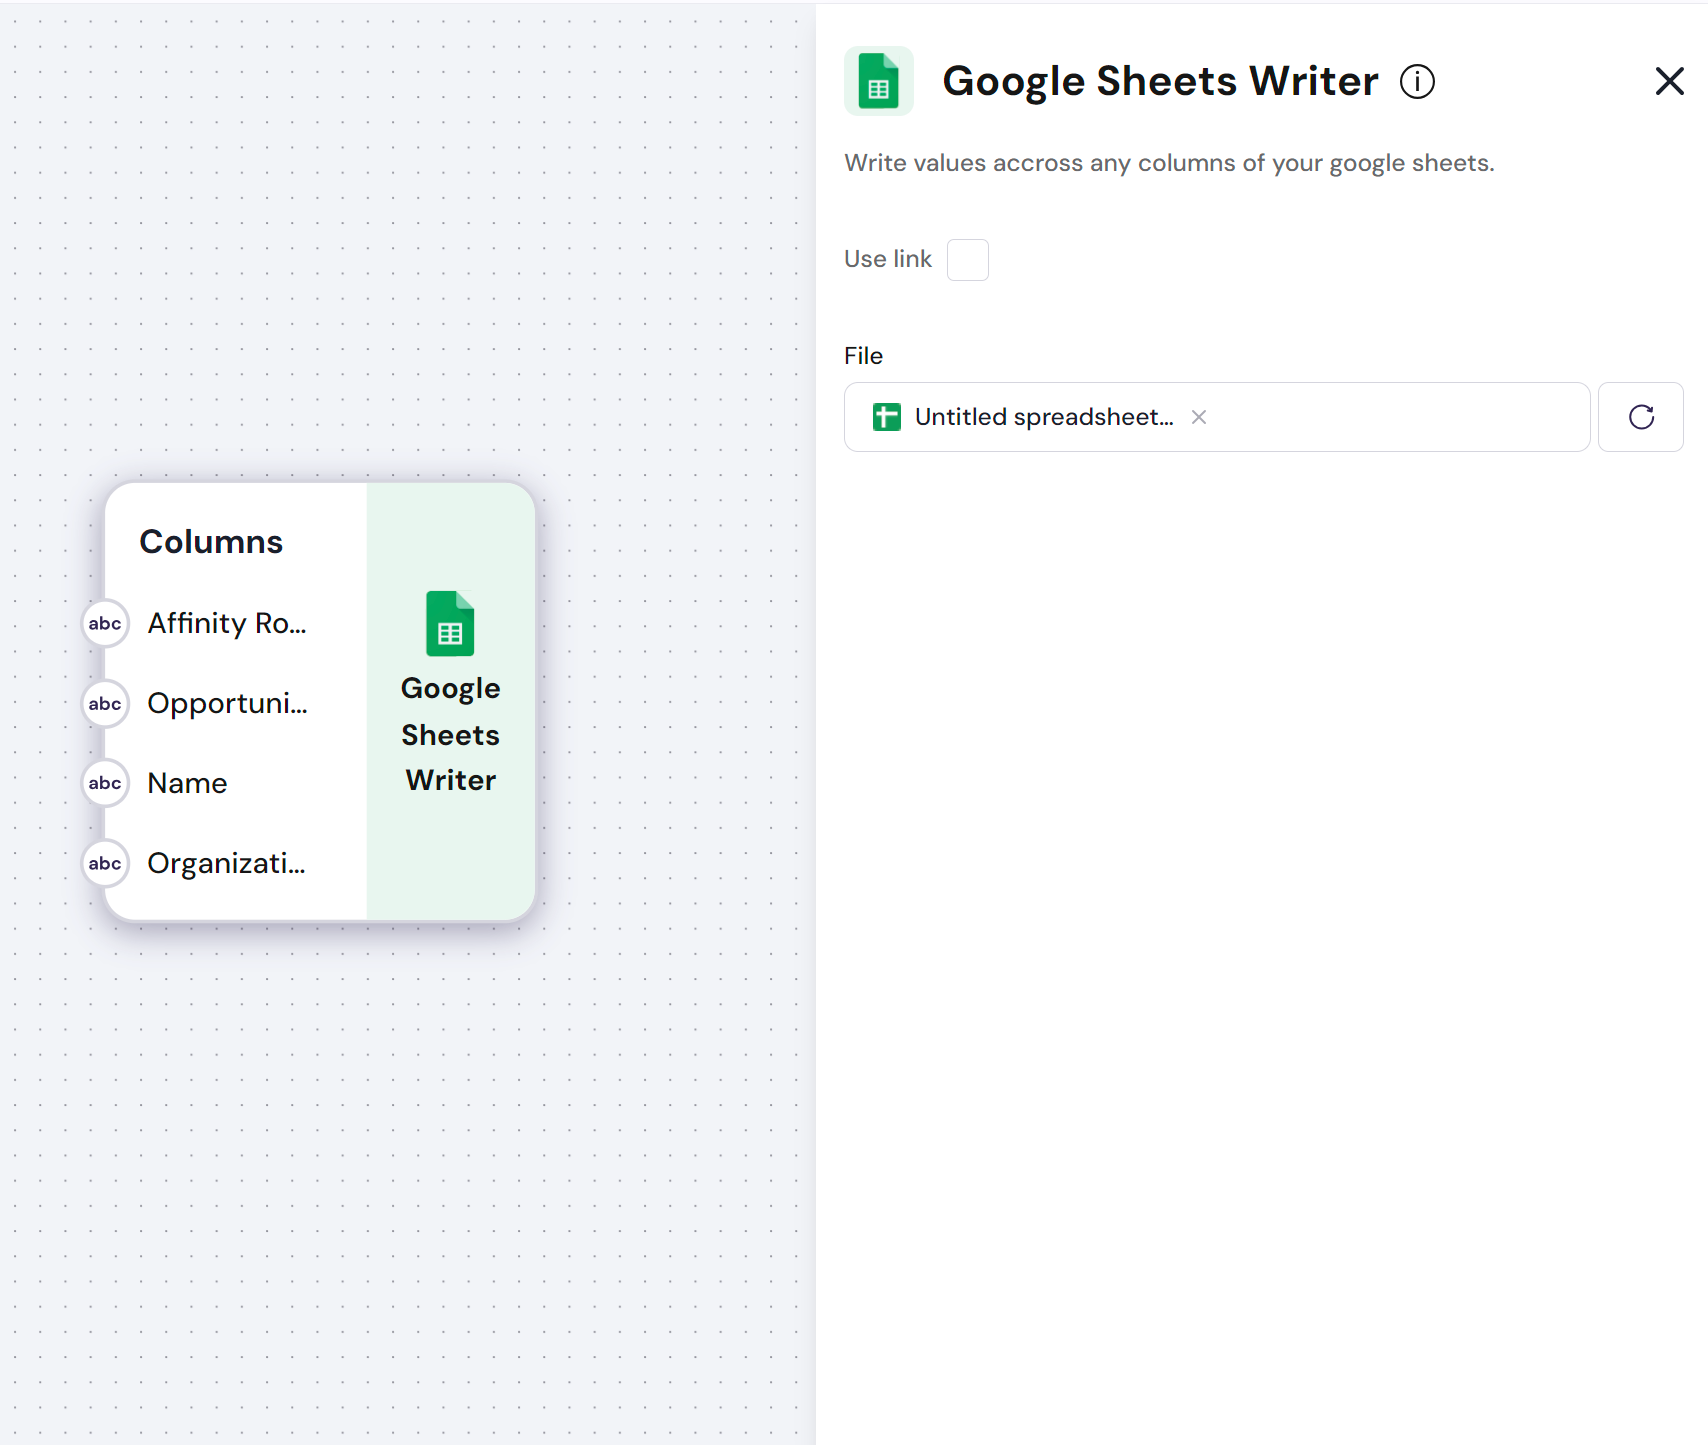 The `Google Sheets - Write in Columns` module allows you to write data using Google Sheets.
**Google Sheets are processed by column; you must maintain the first row of the Google Sheets for the headers where each column represents a variable.**
**To better use this module, you should create empty columns in Google Sheets and write the information you have processed in the workflow into those columns**
The `Google Sheets - Write in Columns` module has **variable inputs**:
- **Inputs**: Each column header in the first row of the Google Sheets represents a `variable input` that receives a list to be written in each Google Sheets column.
- **Config**: The Google Sheets file can be loaded with a link or via the Google Finder\n=== Documentation/Integration Modules/ReadProfile.mdx ===
---
title: "Linkedin - Read Profile"
description: "Enter a Linkedin URL to extract a profile summary or raw data"
---
The `Linkedin - Read Profile` module uses a LinkedIn URL to extract a concise summary or detailed raw data of an individual or company profile.
The `Linkedin - Read Profile` module has **one input** and **one output**:
- **Input**:
- Linkedin URL for the profile to be read. Only the URL can enter here. Anything else, will produce an error.
- **Output**:
- Complete profile with all the information extracted from Linkedin
- **Config**:
- `Output as JSON` - If enabled, the result is returned as raw JSON instead of formatted Markdown.
Find below an example of how to use this module:
The `Google Sheets - Write in Columns` module allows you to write data using Google Sheets.
**Google Sheets are processed by column; you must maintain the first row of the Google Sheets for the headers where each column represents a variable.**
**To better use this module, you should create empty columns in Google Sheets and write the information you have processed in the workflow into those columns**
The `Google Sheets - Write in Columns` module has **variable inputs**:
- **Inputs**: Each column header in the first row of the Google Sheets represents a `variable input` that receives a list to be written in each Google Sheets column.
- **Config**: The Google Sheets file can be loaded with a link or via the Google Finder\n=== Documentation/Integration Modules/ReadProfile.mdx ===
---
title: "Linkedin - Read Profile"
description: "Enter a Linkedin URL to extract a profile summary or raw data"
---
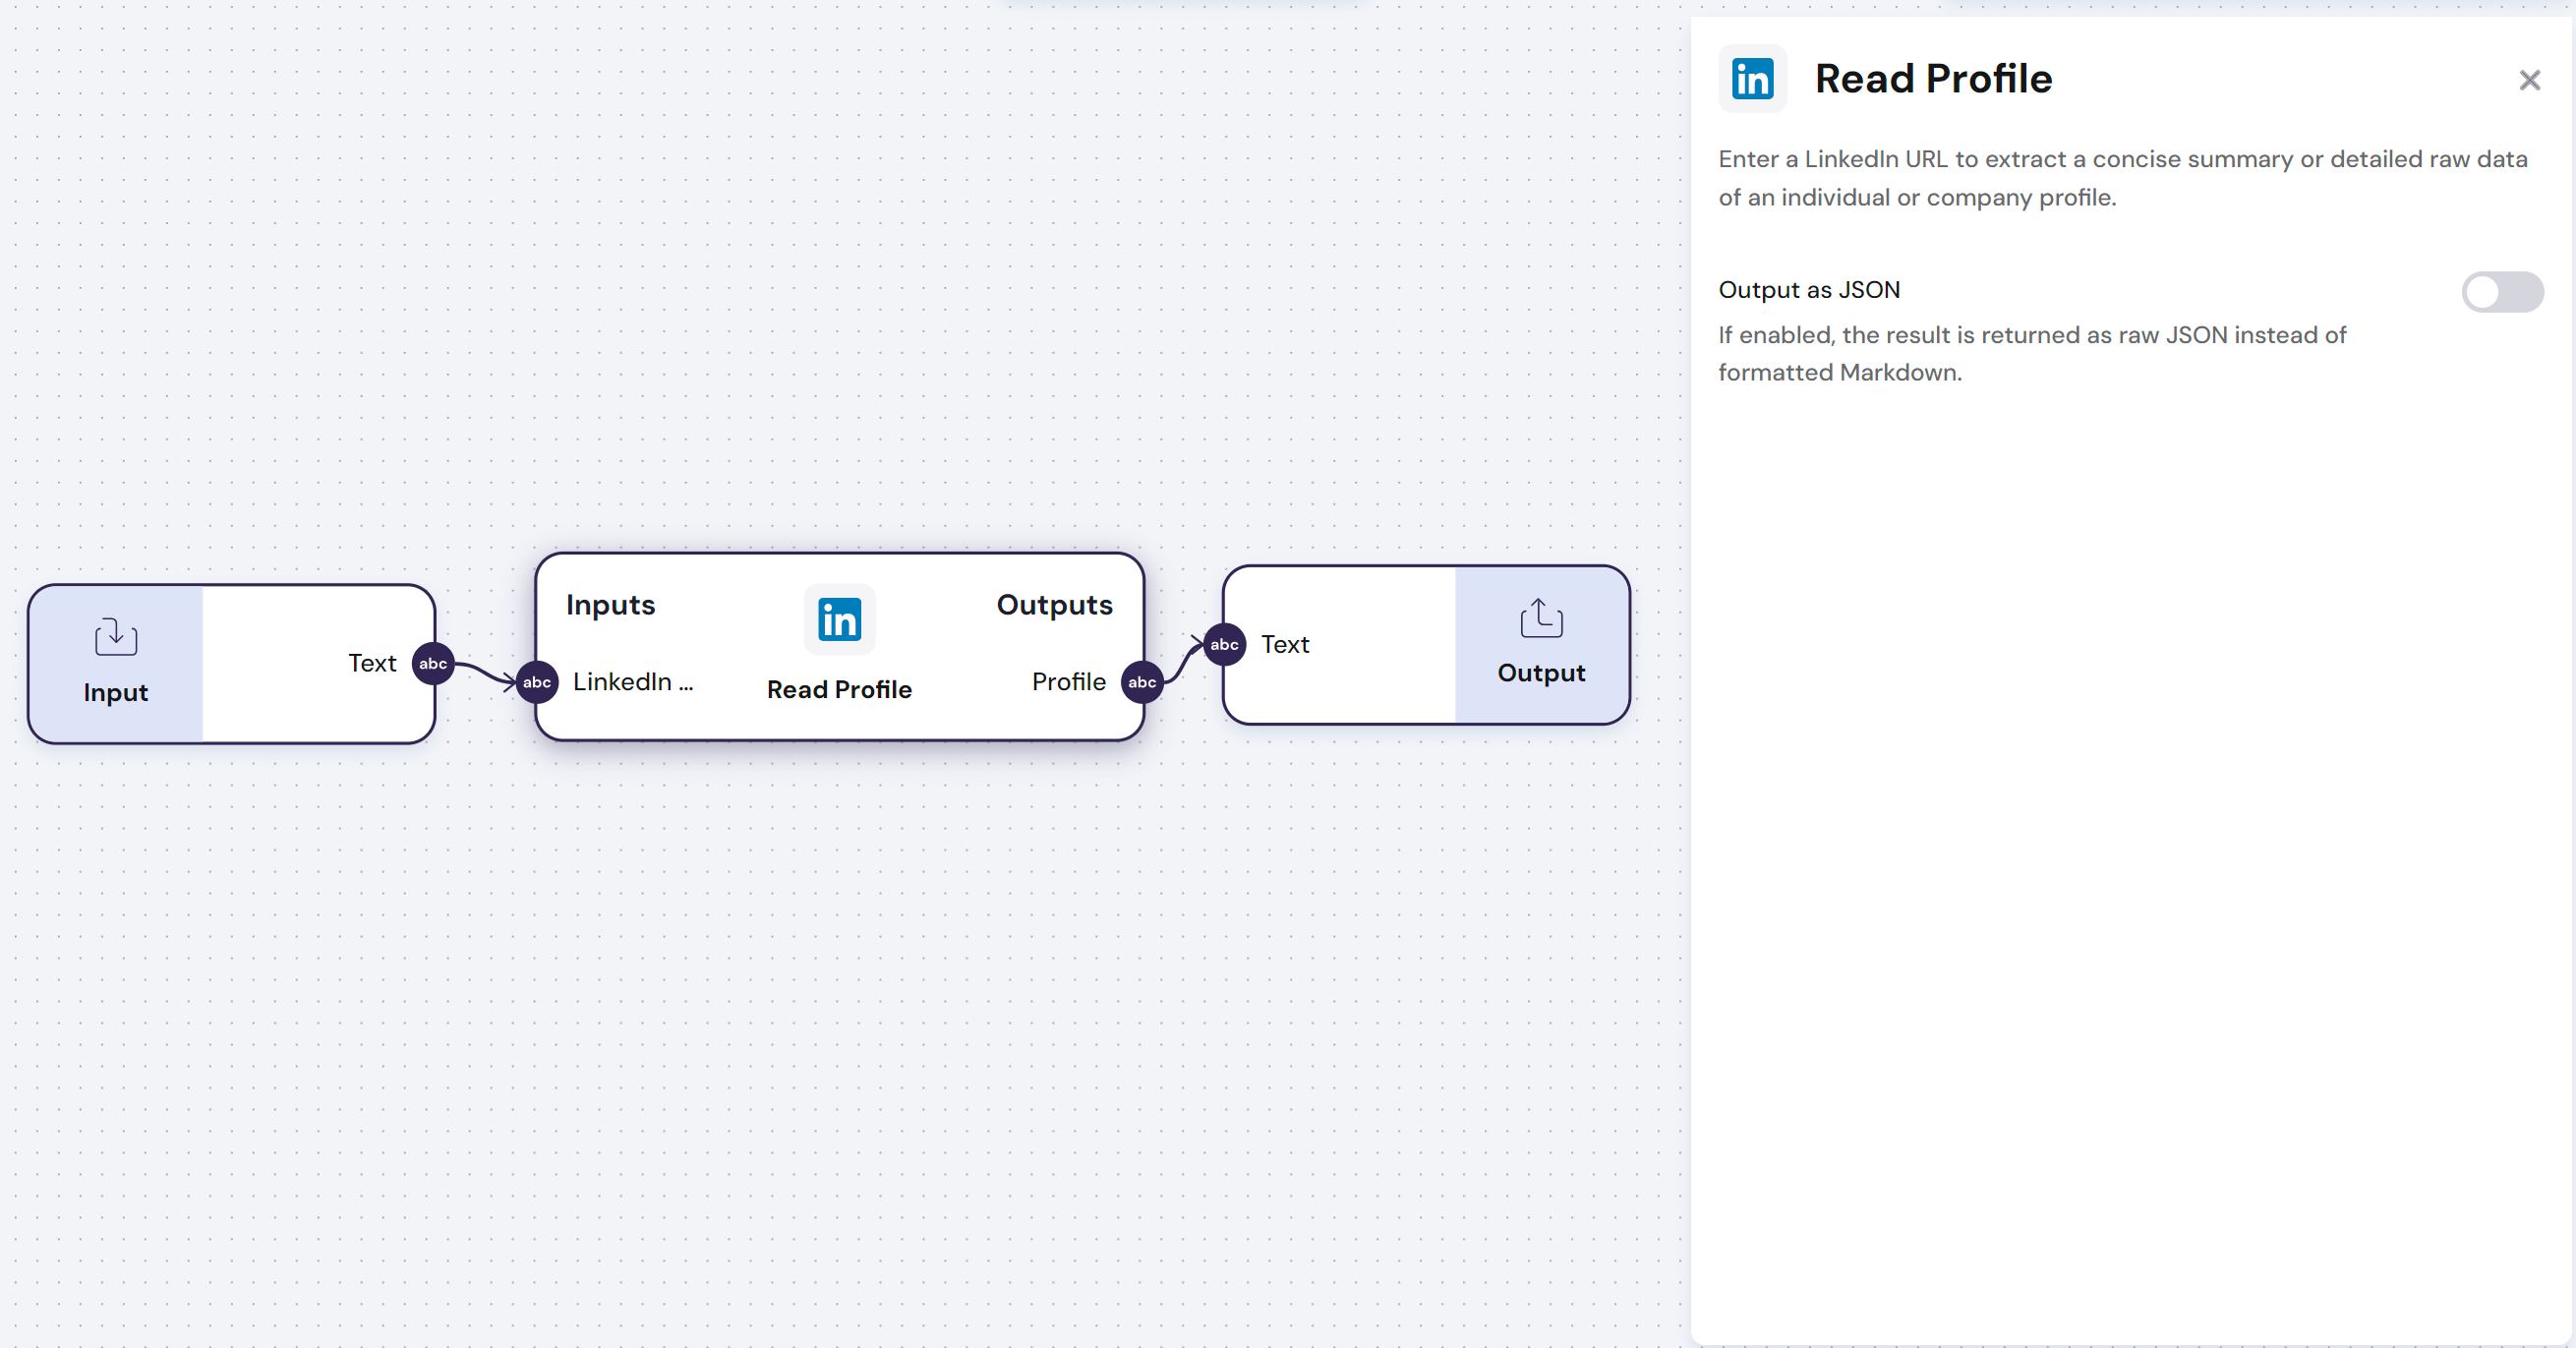
The `Linkedin - Read Profile` module uses a LinkedIn URL to extract a concise summary or detailed raw data of an individual or company profile.
The `Linkedin - Read Profile` module has **one input** and **one output**:
- **Input**:
- Linkedin URL for the profile to be read. Only the URL can enter here. Anything else, will produce an error.
- **Output**:
- Complete profile with all the information extracted from Linkedin
- **Config**:
- `Output as JSON` - If enabled, the result is returned as raw JSON instead of formatted Markdown.
Find below an example of how to use this module:
 \n=== Documentation/Integration Modules/GmailR.mdx ===
---
title: "Gmail - Read Emails"
description: "This module allows you to read emails directly from your Gmail account"
---
> **This Module requires that you connect your account to the `Linked Accounts` page. Go to Settings to get this done.**
The `Gmail - Read Emails` pulls emails from your Gmail when you need them, based on what you're looking for.
**This is particularly useful when you want to pull information from your emails to action a workflow or use information from emails as part of the context**
The `Gmail - Read Emails` module has **six outputs**:
- **Outputs**:
- `Sender`- Email address of the sender
- `Receiver`- Email address of the receiving party
- `CC`- Email addresses in CC
- `Attachment` - Files attached to the email
- `Date` - Date and time the email was sent
- `Body` - Content in the body of the email
- **Config**:
- `Output as JSON`: If enabled, returns the result as a raw JSON result instead of a formatted markdown
- `Label`- Label of your gmail account associated with the emails to be read
- `Number of read emails`- Number of emails that should be read
- `Read Attachments` - Toggle to select wether attachments are read or not in each email
- `Read only unread emails` - Read only unread emails in your inbox
\n=== Documentation/Integration Modules/GmailR.mdx ===
---
title: "Gmail - Read Emails"
description: "This module allows you to read emails directly from your Gmail account"
---
> **This Module requires that you connect your account to the `Linked Accounts` page. Go to Settings to get this done.**
The `Gmail - Read Emails` pulls emails from your Gmail when you need them, based on what you're looking for.
**This is particularly useful when you want to pull information from your emails to action a workflow or use information from emails as part of the context**
The `Gmail - Read Emails` module has **six outputs**:
- **Outputs**:
- `Sender`- Email address of the sender
- `Receiver`- Email address of the receiving party
- `CC`- Email addresses in CC
- `Attachment` - Files attached to the email
- `Date` - Date and time the email was sent
- `Body` - Content in the body of the email
- **Config**:
- `Output as JSON`: If enabled, returns the result as a raw JSON result instead of a formatted markdown
- `Label`- Label of your gmail account associated with the emails to be read
- `Number of read emails`- Number of emails that should be read
- `Read Attachments` - Toggle to select wether attachments are read or not in each email
- `Read only unread emails` - Read only unread emails in your inbox
 \n=== Documentation/Integration Modules/NReadPage.mdx ===
---
title: "Notion - Read Page"
description: "Read and return the text content from a Notion Page."
---
> **This Module requires that you connect your account to the `Linked Accounts` page. Go to Settings to get this done.**
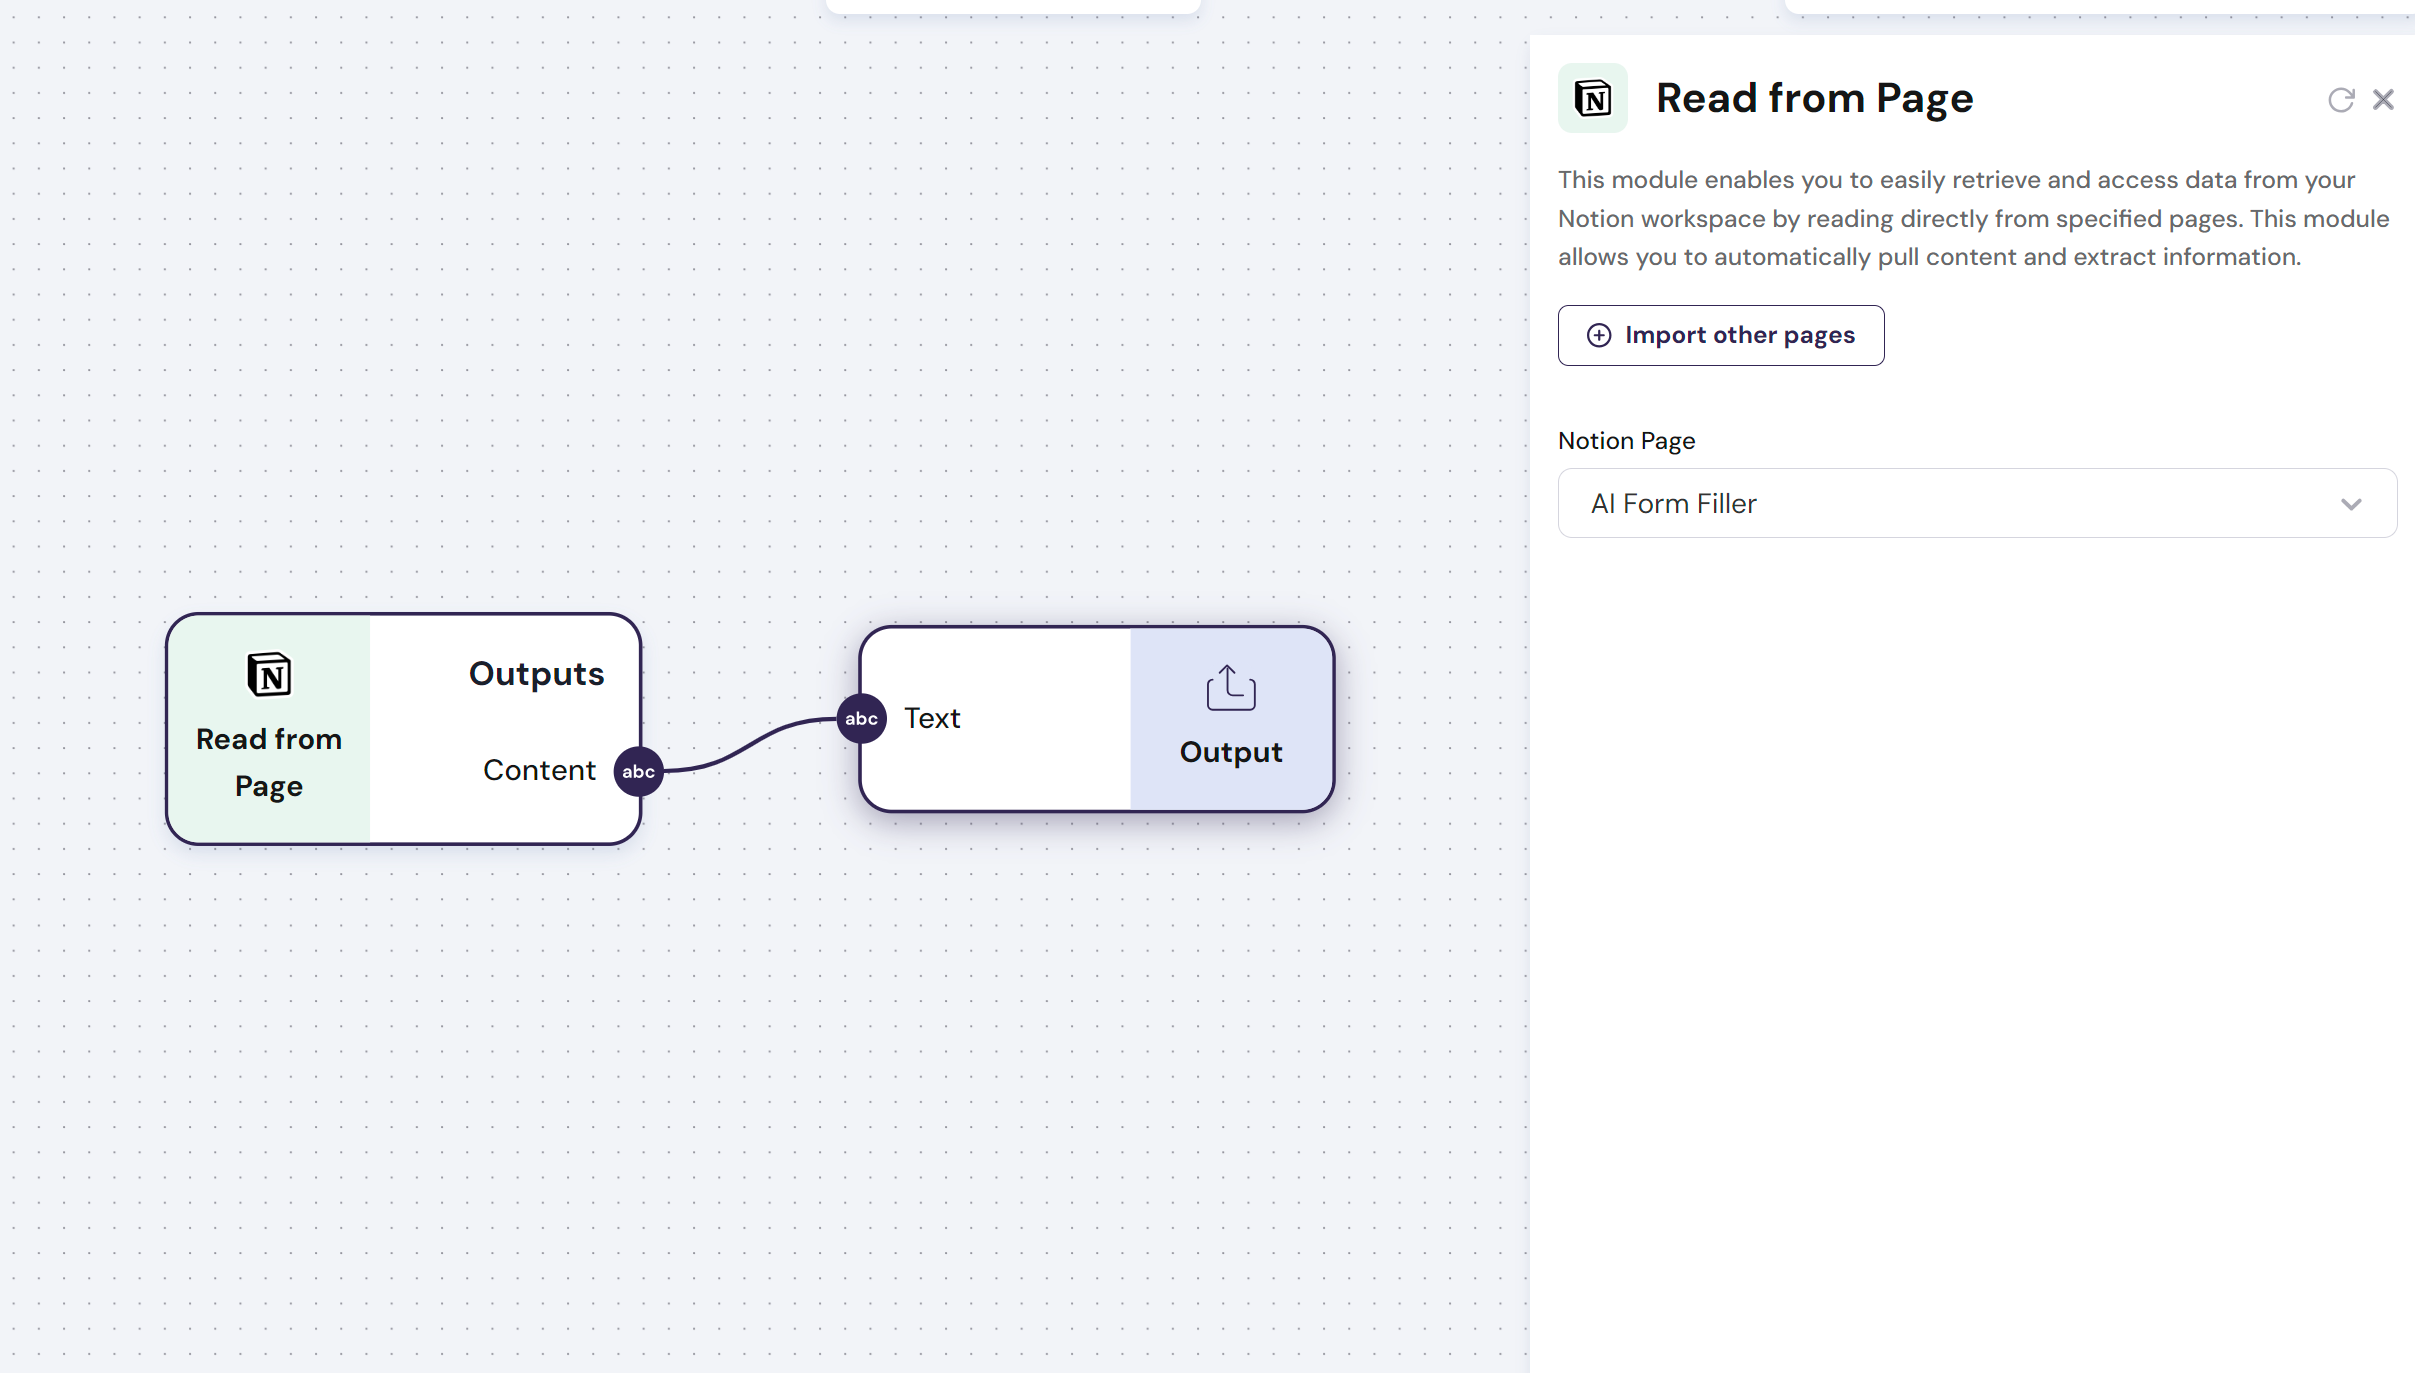
The `Notion - Read Page` module enables you to easily retrieve and access data from your Notion workspace by reading directly from specified pages. This module allows you to automatically pull content and extract information.
The `Notion - Read Page` module has **one output**:
- **Outputs**: Text contained in the Notion Page
- **Config**: The Notion Page from the Notion workspace can be selected from the dropdown of approved access pages. If a page is not available in the drop-down, use the button `Import other pages`
Find below an example of how you use this module:
\n=== Documentation/Integration Modules/NReadPage.mdx ===
---
title: "Notion - Read Page"
description: "Read and return the text content from a Notion Page."
---
> **This Module requires that you connect your account to the `Linked Accounts` page. Go to Settings to get this done.**
The `Notion - Read Page` module enables you to easily retrieve and access data from your Notion workspace by reading directly from specified pages. This module allows you to automatically pull content and extract information.
The `Notion - Read Page` module has **one output**:
- **Outputs**: Text contained in the Notion Page
- **Config**: The Notion Page from the Notion workspace can be selected from the dropdown of approved access pages. If a page is not available in the drop-down, use the button `Import other pages`
Find below an example of how you use this module:
 \n=== Documentation/Integration Modules/Linked.mdx ===
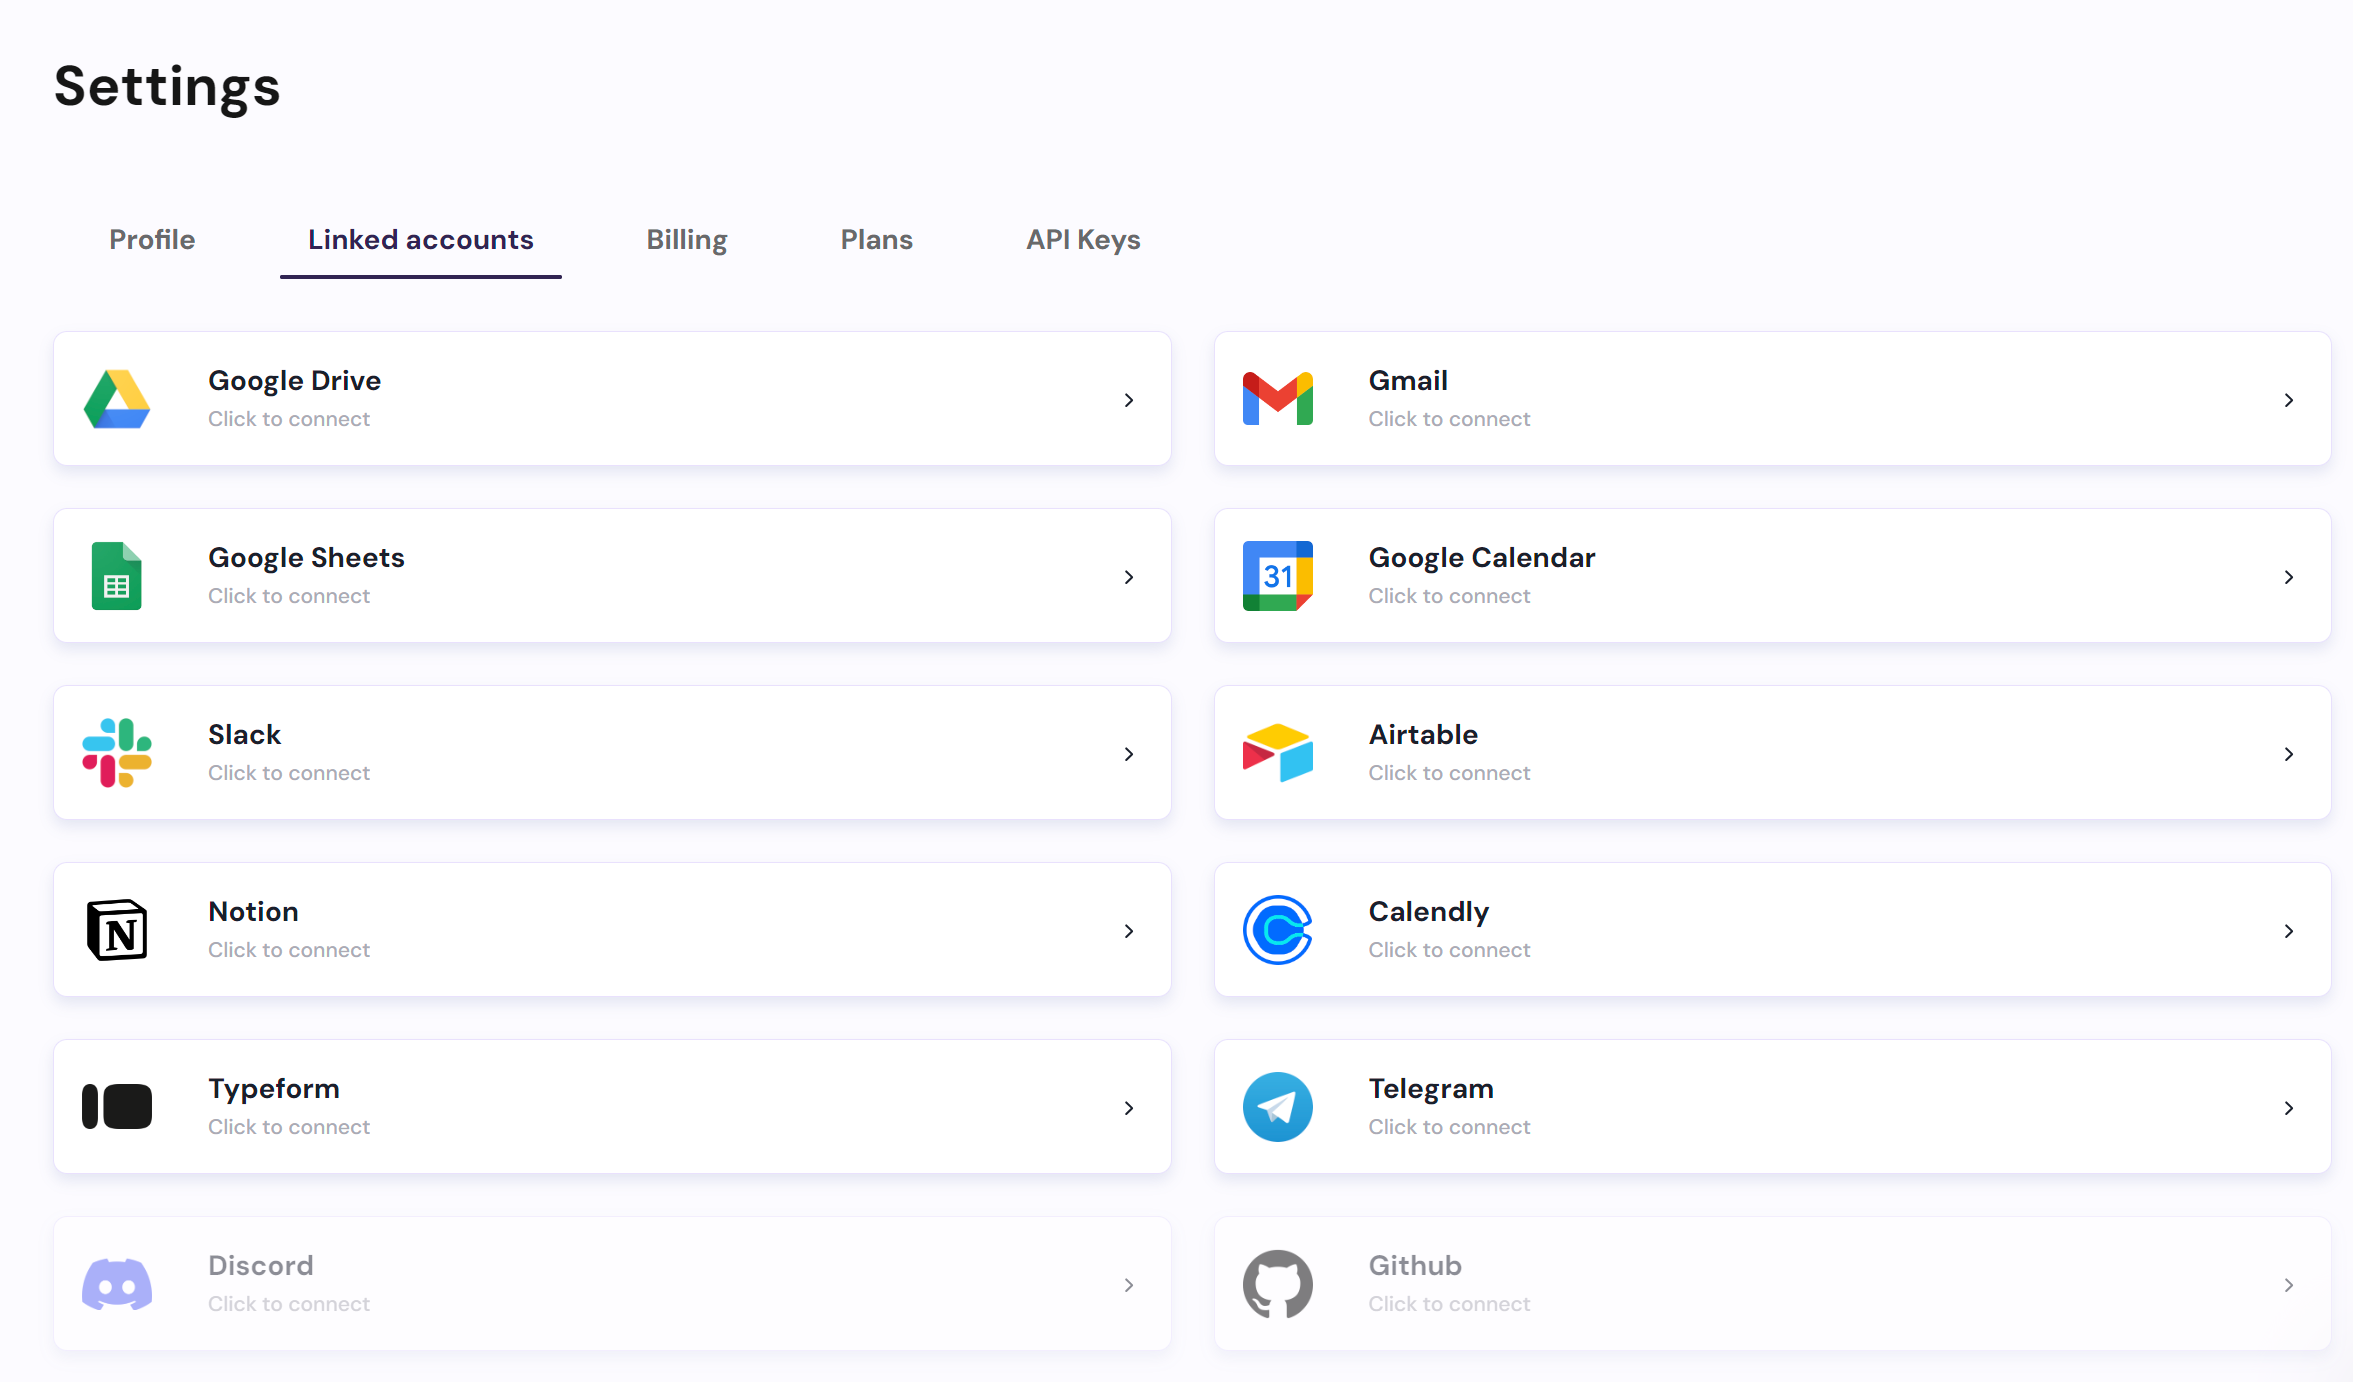
---
title: "Linked Accounts"
description: "You can access this page in settings to link all your accounts."
---
> **The integrations will only work if their respective authentication has been granted**
\n=== Documentation/Integration Modules/Linked.mdx ===
---
title: "Linked Accounts"
description: "You can access this page in settings to link all your accounts."
---
> **The integrations will only work if their respective authentication has been granted**
 \n=== Documentation/Integration Modules/GmailW.mdx ===
---
title: "Gmail - Send Email"
description: "This module allows you to create and send an email directly from your Gmail account"
---
> **This Module requires that you connect your account. You can do this in the configuration of the node, or in the Integrations page**
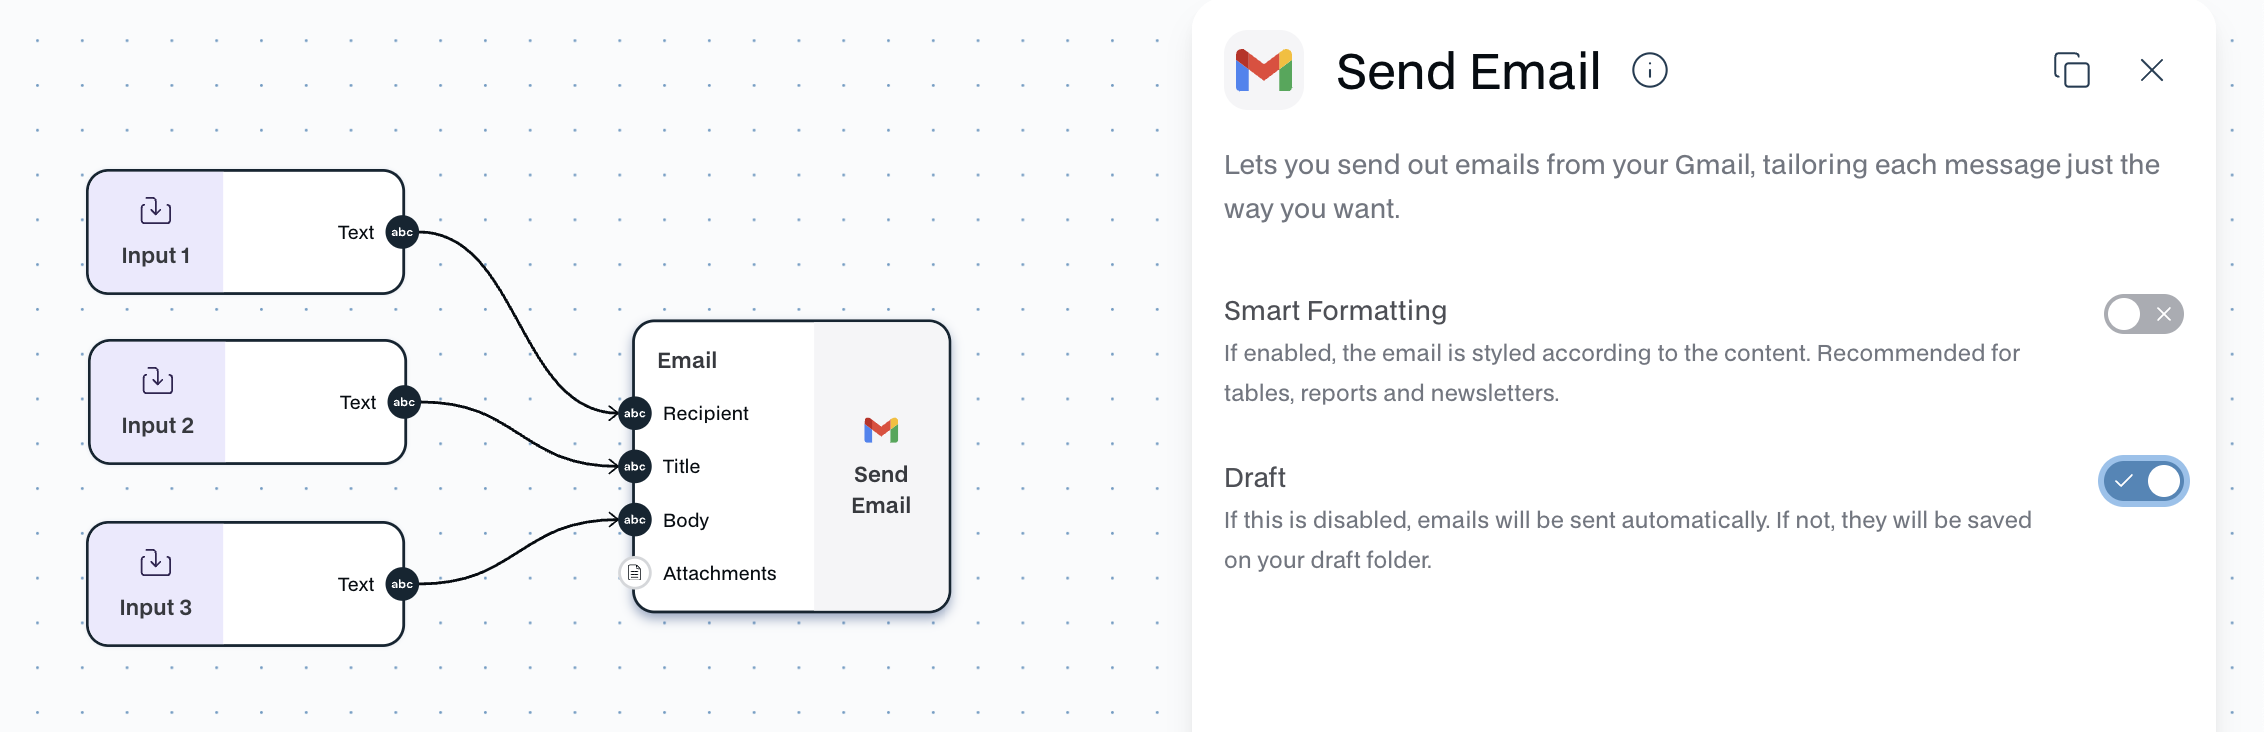
The `Gmail - Send Email` module allows you to send an email from your Gmail address.
**This is particularly useful when you want to automate email outreach or receive / send reports (e.g., News reports / Competitor reports / Operational reports).**
The configurations of the node are:
- **Smart Formatting**
- If enabled, the email is styled according to the content. Recommended for tables, reports and newsletters.
- **Draft**
- If this is disabled, emails will be sent automatically. If not, they will be saved on your draft folder. We reccomend enabling this if you want to review your emails.
The `Gmail - Send Email` module has **four inputs**:
- **Input**:
- `Recipient` - The email you want to send an email to
- `Title` - The title of the email. (Consider using a generate text to produce this)
- `Body` - The actual body of the email
- `Attachments` - Attachments to go with your email. They have to be in File form. (Consider using the text to file node)
Important to note that the emails can take up to 2-3 minutes to be processed and sent.
\n=== Documentation/Integration Modules/GmailW.mdx ===
---
title: "Gmail - Send Email"
description: "This module allows you to create and send an email directly from your Gmail account"
---
> **This Module requires that you connect your account. You can do this in the configuration of the node, or in the Integrations page**
The `Gmail - Send Email` module allows you to send an email from your Gmail address.
**This is particularly useful when you want to automate email outreach or receive / send reports (e.g., News reports / Competitor reports / Operational reports).**
The configurations of the node are:
- **Smart Formatting**
- If enabled, the email is styled according to the content. Recommended for tables, reports and newsletters.
- **Draft**
- If this is disabled, emails will be sent automatically. If not, they will be saved on your draft folder. We reccomend enabling this if you want to review your emails.
The `Gmail - Send Email` module has **four inputs**:
- **Input**:
- `Recipient` - The email you want to send an email to
- `Title` - The title of the email. (Consider using a generate text to produce this)
- `Body` - The actual body of the email
- `Attachments` - Attachments to go with your email. They have to be in File form. (Consider using the text to file node)
Important to note that the emails can take up to 2-3 minutes to be processed and sent.
 \n=== Documentation/Integration Modules/NReadDatabase.mdx ===
---
title: "Notion - Read Database"
description: "Read data directly from a Notion Database."
---
> **This Module requires that you connect your account to the `Linked Accounts` page. Go to Settings to get this done.**
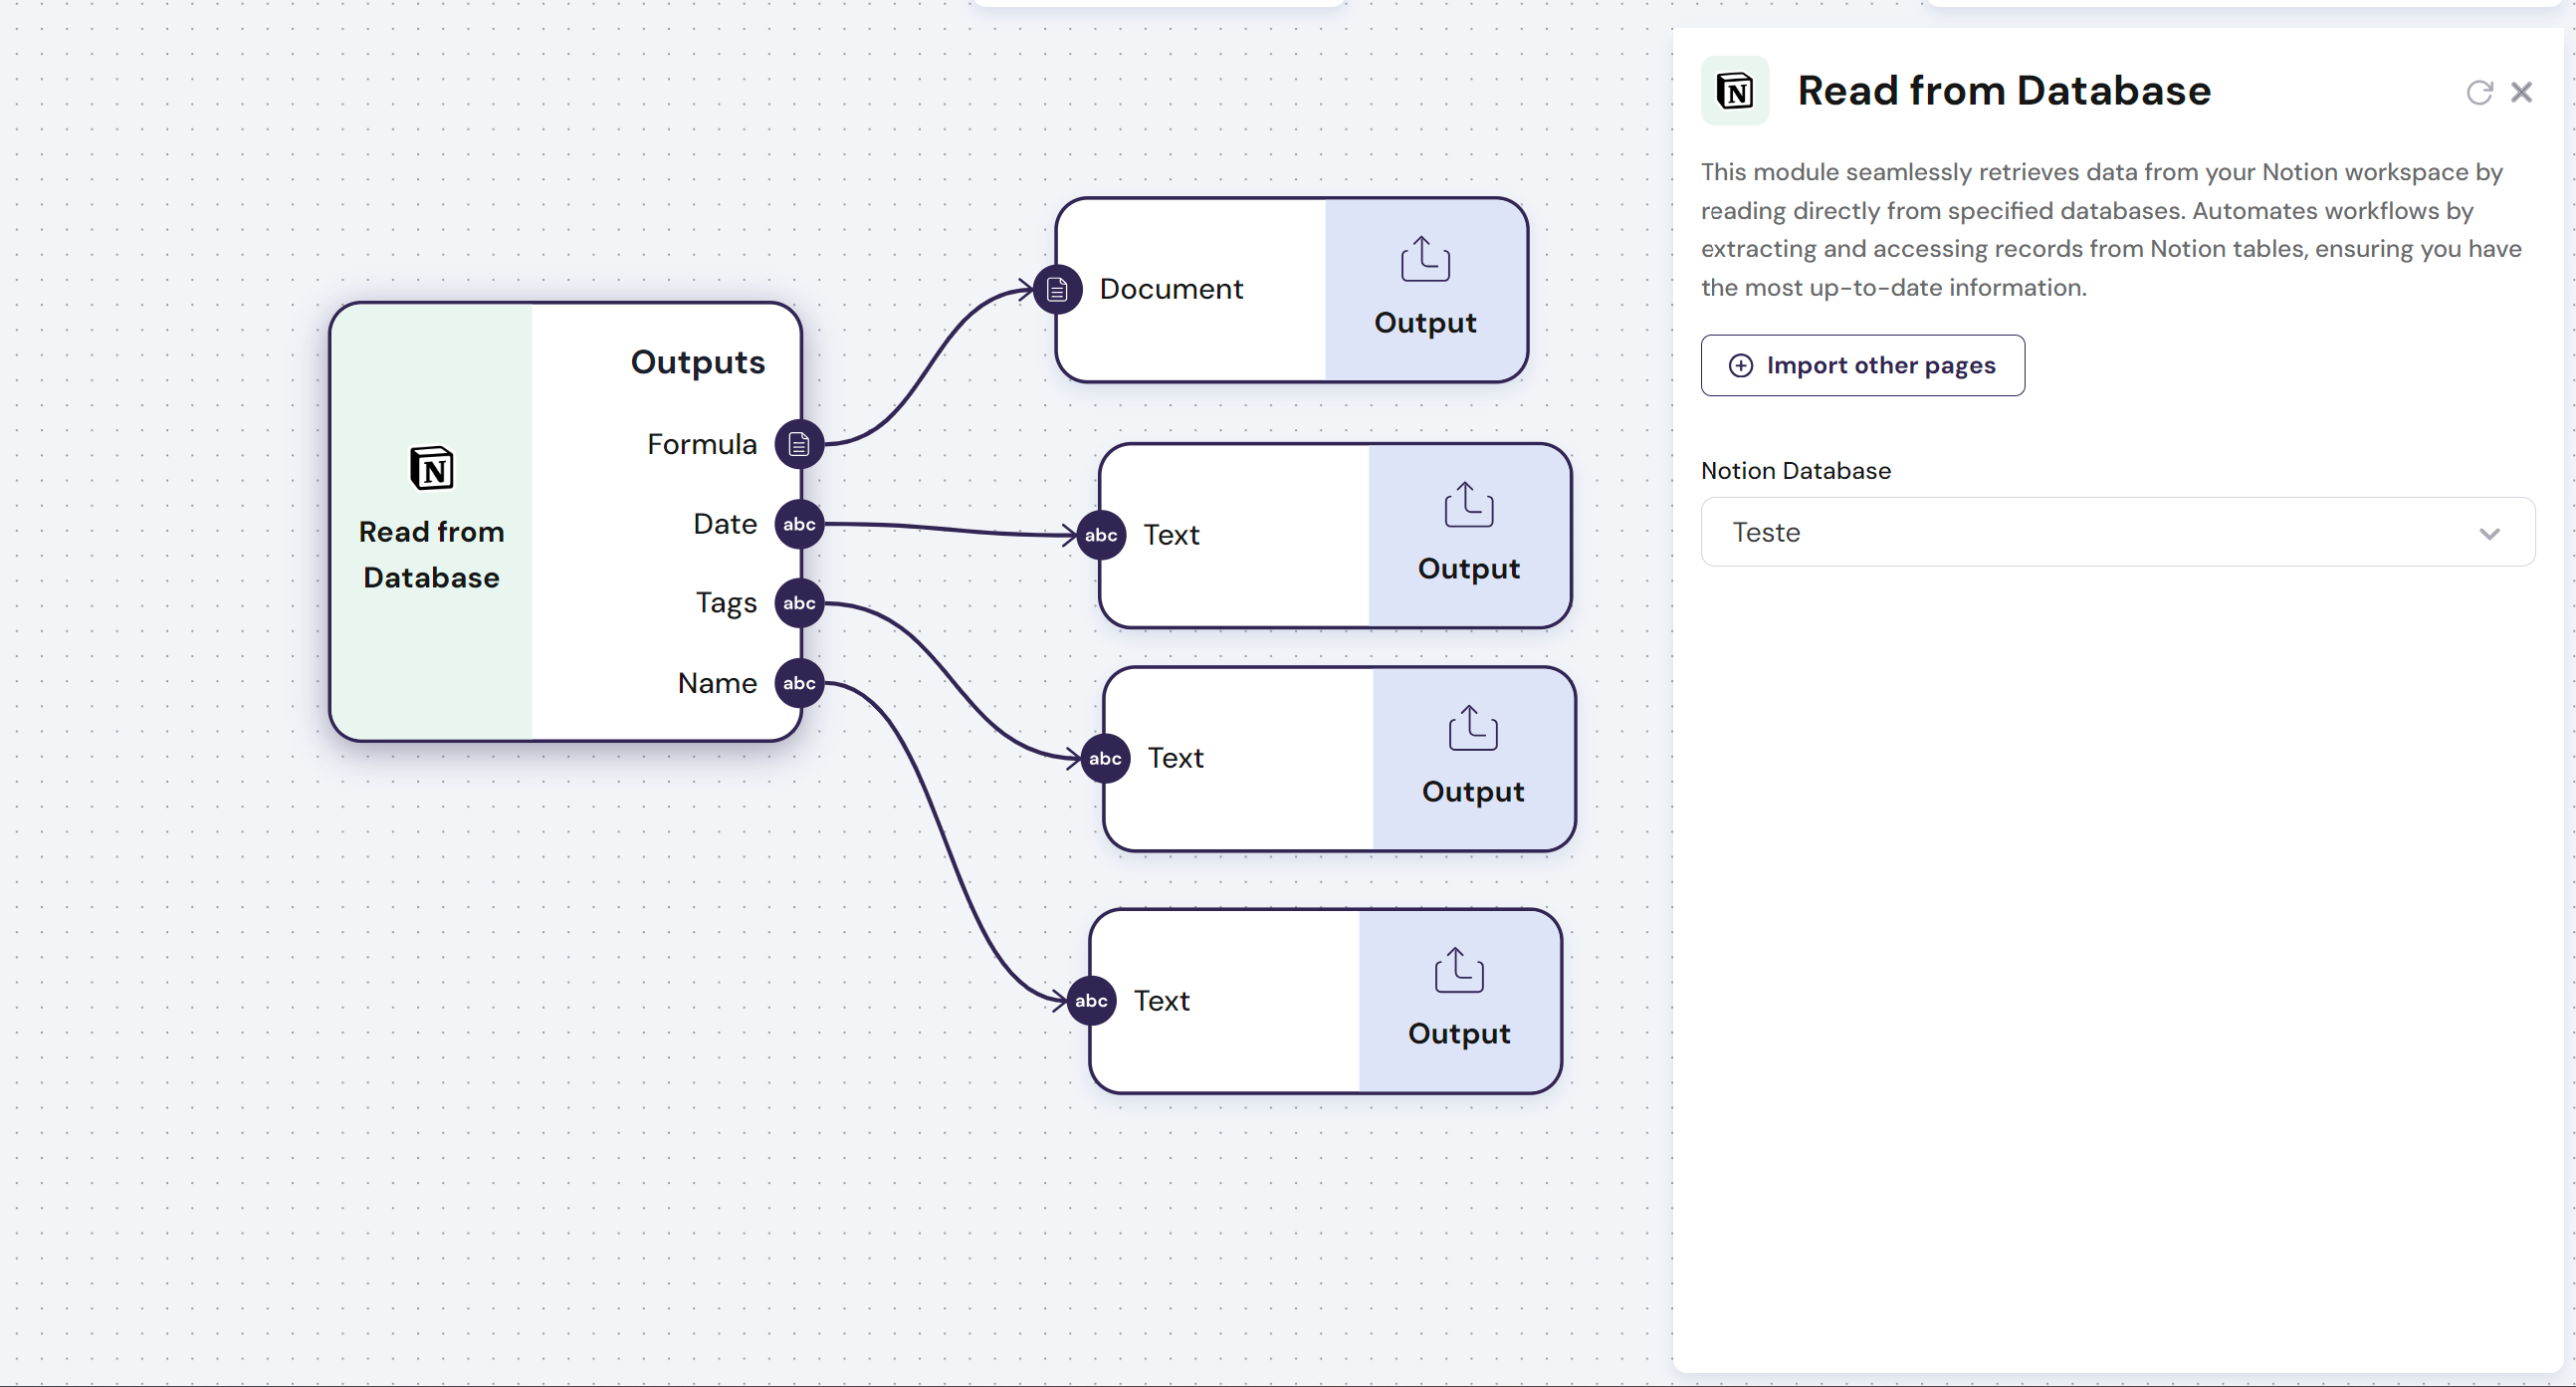
The `Notion - Read Database` module seamlessly retrieves data from your Notion workspace by reading directly from specified databases. Automates workflows by extracting and accessing records from Notion tables, ensuring you have the most up-to-date information.
The `Notion - Read Database` module has **variable outputs**:
- **Outputs**: Each column header in the first row of the Notion Database represents a `variable output` with a list composed of all the rows in each column.
- **Config**: The Notion Page from the Notion workspace can be selected from the dropdown of approved access pages. If a page is not available in the drop-down, use the button `Import other pages`
Find below an example of how you use this module:
\n=== Documentation/Integration Modules/NReadDatabase.mdx ===
---
title: "Notion - Read Database"
description: "Read data directly from a Notion Database."
---
> **This Module requires that you connect your account to the `Linked Accounts` page. Go to Settings to get this done.**
The `Notion - Read Database` module seamlessly retrieves data from your Notion workspace by reading directly from specified databases. Automates workflows by extracting and accessing records from Notion tables, ensuring you have the most up-to-date information.
The `Notion - Read Database` module has **variable outputs**:
- **Outputs**: Each column header in the first row of the Notion Database represents a `variable output` with a list composed of all the rows in each column.
- **Config**: The Notion Page from the Notion workspace can be selected from the dropdown of approved access pages. If a page is not available in the drop-down, use the button `Import other pages`
Find below an example of how you use this module:
 \n=== Documentation/Integration Modules/TranscribeVideo copy.mdx ===
---
title: 'Youtube - Transcribe Video'
description: 'Transcribe any YouTube video'
---
>**This Module requires that you connect your account to the `Linked Accounts` page. Go to Settings to get this done.**
The `Youtube - Transcribe Video` module uses a Youtube video URL to extract a transcript of any given video.
The `Youtube - Transcribe Video` module has **one input** and **one output**:
- **Input**:
- Youtube video URL
- **Output**:
- Transcript of the video\n=== Documentation/Integration Modules/Create Event.mdx ===
---
title: "Google Calendar - Create Event"
description: "Create an event on Google Calendar from a received input"
---
> **This Module requires that you connect your account to the `Linked Accounts` page. Go to Settings to get this done.**
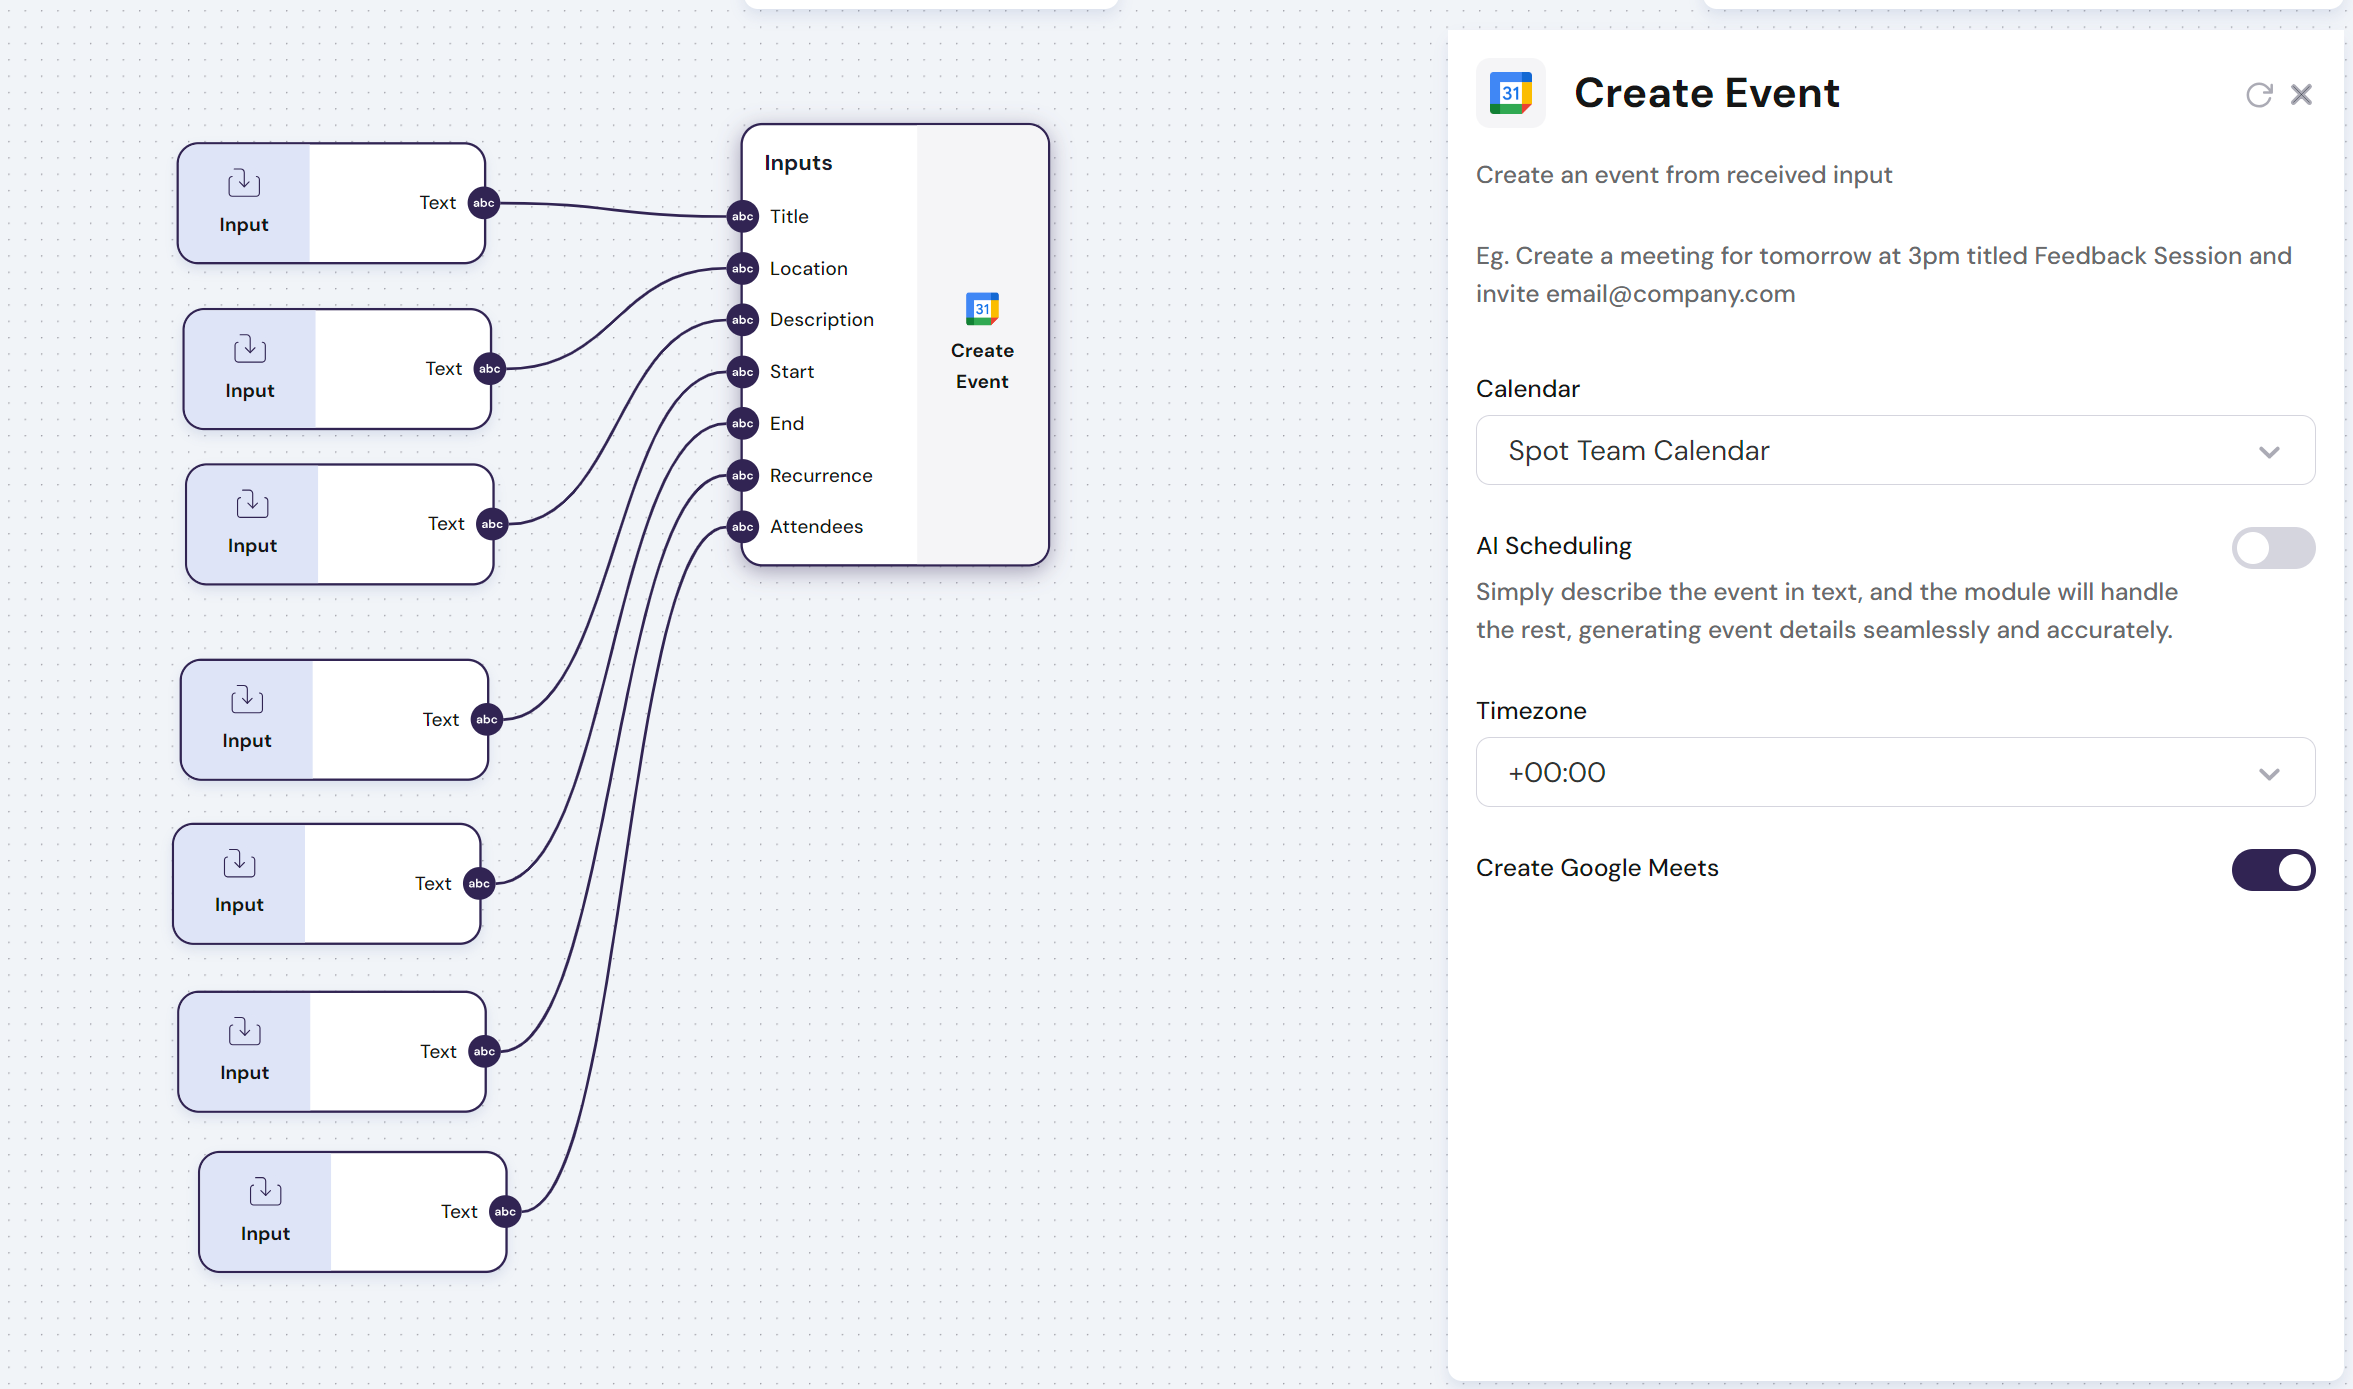
The `Google Calendar - Read Events` creates events on Google Calendar. Events can be created by specifying each of the components of an event or by using AI to describe the event
The `Google Calendar - Read Events` module has **multiple inputs** or **one input** when using AI Scheduling :
- **Inputs**:
- `Multiple Inputs` - Title of the event, Location, Description, Starting Time, Ending Time, Recurrence and Emails of the Attendees. Each of the components can be written in no particular way as AI models are used to comprehend and parse the inputs.
- `One Input` - Using AI Scheduling, simply describe the event in text, and the module will handle the rest, generating event details seamlessly and accurately.
- **Config**:
- `Timezone` - Select the timezone for the invite (correspondent to the time that is being booked)
- `Create Google Meets` - Will attach a google meets link to the invite
Find below an example of how you can use the module to create an event:
> Create a meeting for tomorrow at 3pm titled Feedback Session and invite email@company.com
\n=== Documentation/Integration Modules/TranscribeVideo copy.mdx ===
---
title: 'Youtube - Transcribe Video'
description: 'Transcribe any YouTube video'
---
>**This Module requires that you connect your account to the `Linked Accounts` page. Go to Settings to get this done.**
The `Youtube - Transcribe Video` module uses a Youtube video URL to extract a transcript of any given video.
The `Youtube - Transcribe Video` module has **one input** and **one output**:
- **Input**:
- Youtube video URL
- **Output**:
- Transcript of the video\n=== Documentation/Integration Modules/Create Event.mdx ===
---
title: "Google Calendar - Create Event"
description: "Create an event on Google Calendar from a received input"
---
> **This Module requires that you connect your account to the `Linked Accounts` page. Go to Settings to get this done.**
The `Google Calendar - Read Events` creates events on Google Calendar. Events can be created by specifying each of the components of an event or by using AI to describe the event
The `Google Calendar - Read Events` module has **multiple inputs** or **one input** when using AI Scheduling :
- **Inputs**:
- `Multiple Inputs` - Title of the event, Location, Description, Starting Time, Ending Time, Recurrence and Emails of the Attendees. Each of the components can be written in no particular way as AI models are used to comprehend and parse the inputs.
- `One Input` - Using AI Scheduling, simply describe the event in text, and the module will handle the rest, generating event details seamlessly and accurately.
- **Config**:
- `Timezone` - Select the timezone for the invite (correspondent to the time that is being booked)
- `Create Google Meets` - Will attach a google meets link to the invite
Find below an example of how you can use the module to create an event:
> Create a meeting for tomorrow at 3pm titled Feedback Session and invite email@company.com
 \n=== Documentation/Integration Modules/ReadTypeform.mdx ===
---
title: "Typeform - Read Form Results"
description: "Retrieves the results of a typeform"
---
> **This Module requires that you connect your account to the `Linked Accounts` page. Go to Settings to get this done.**
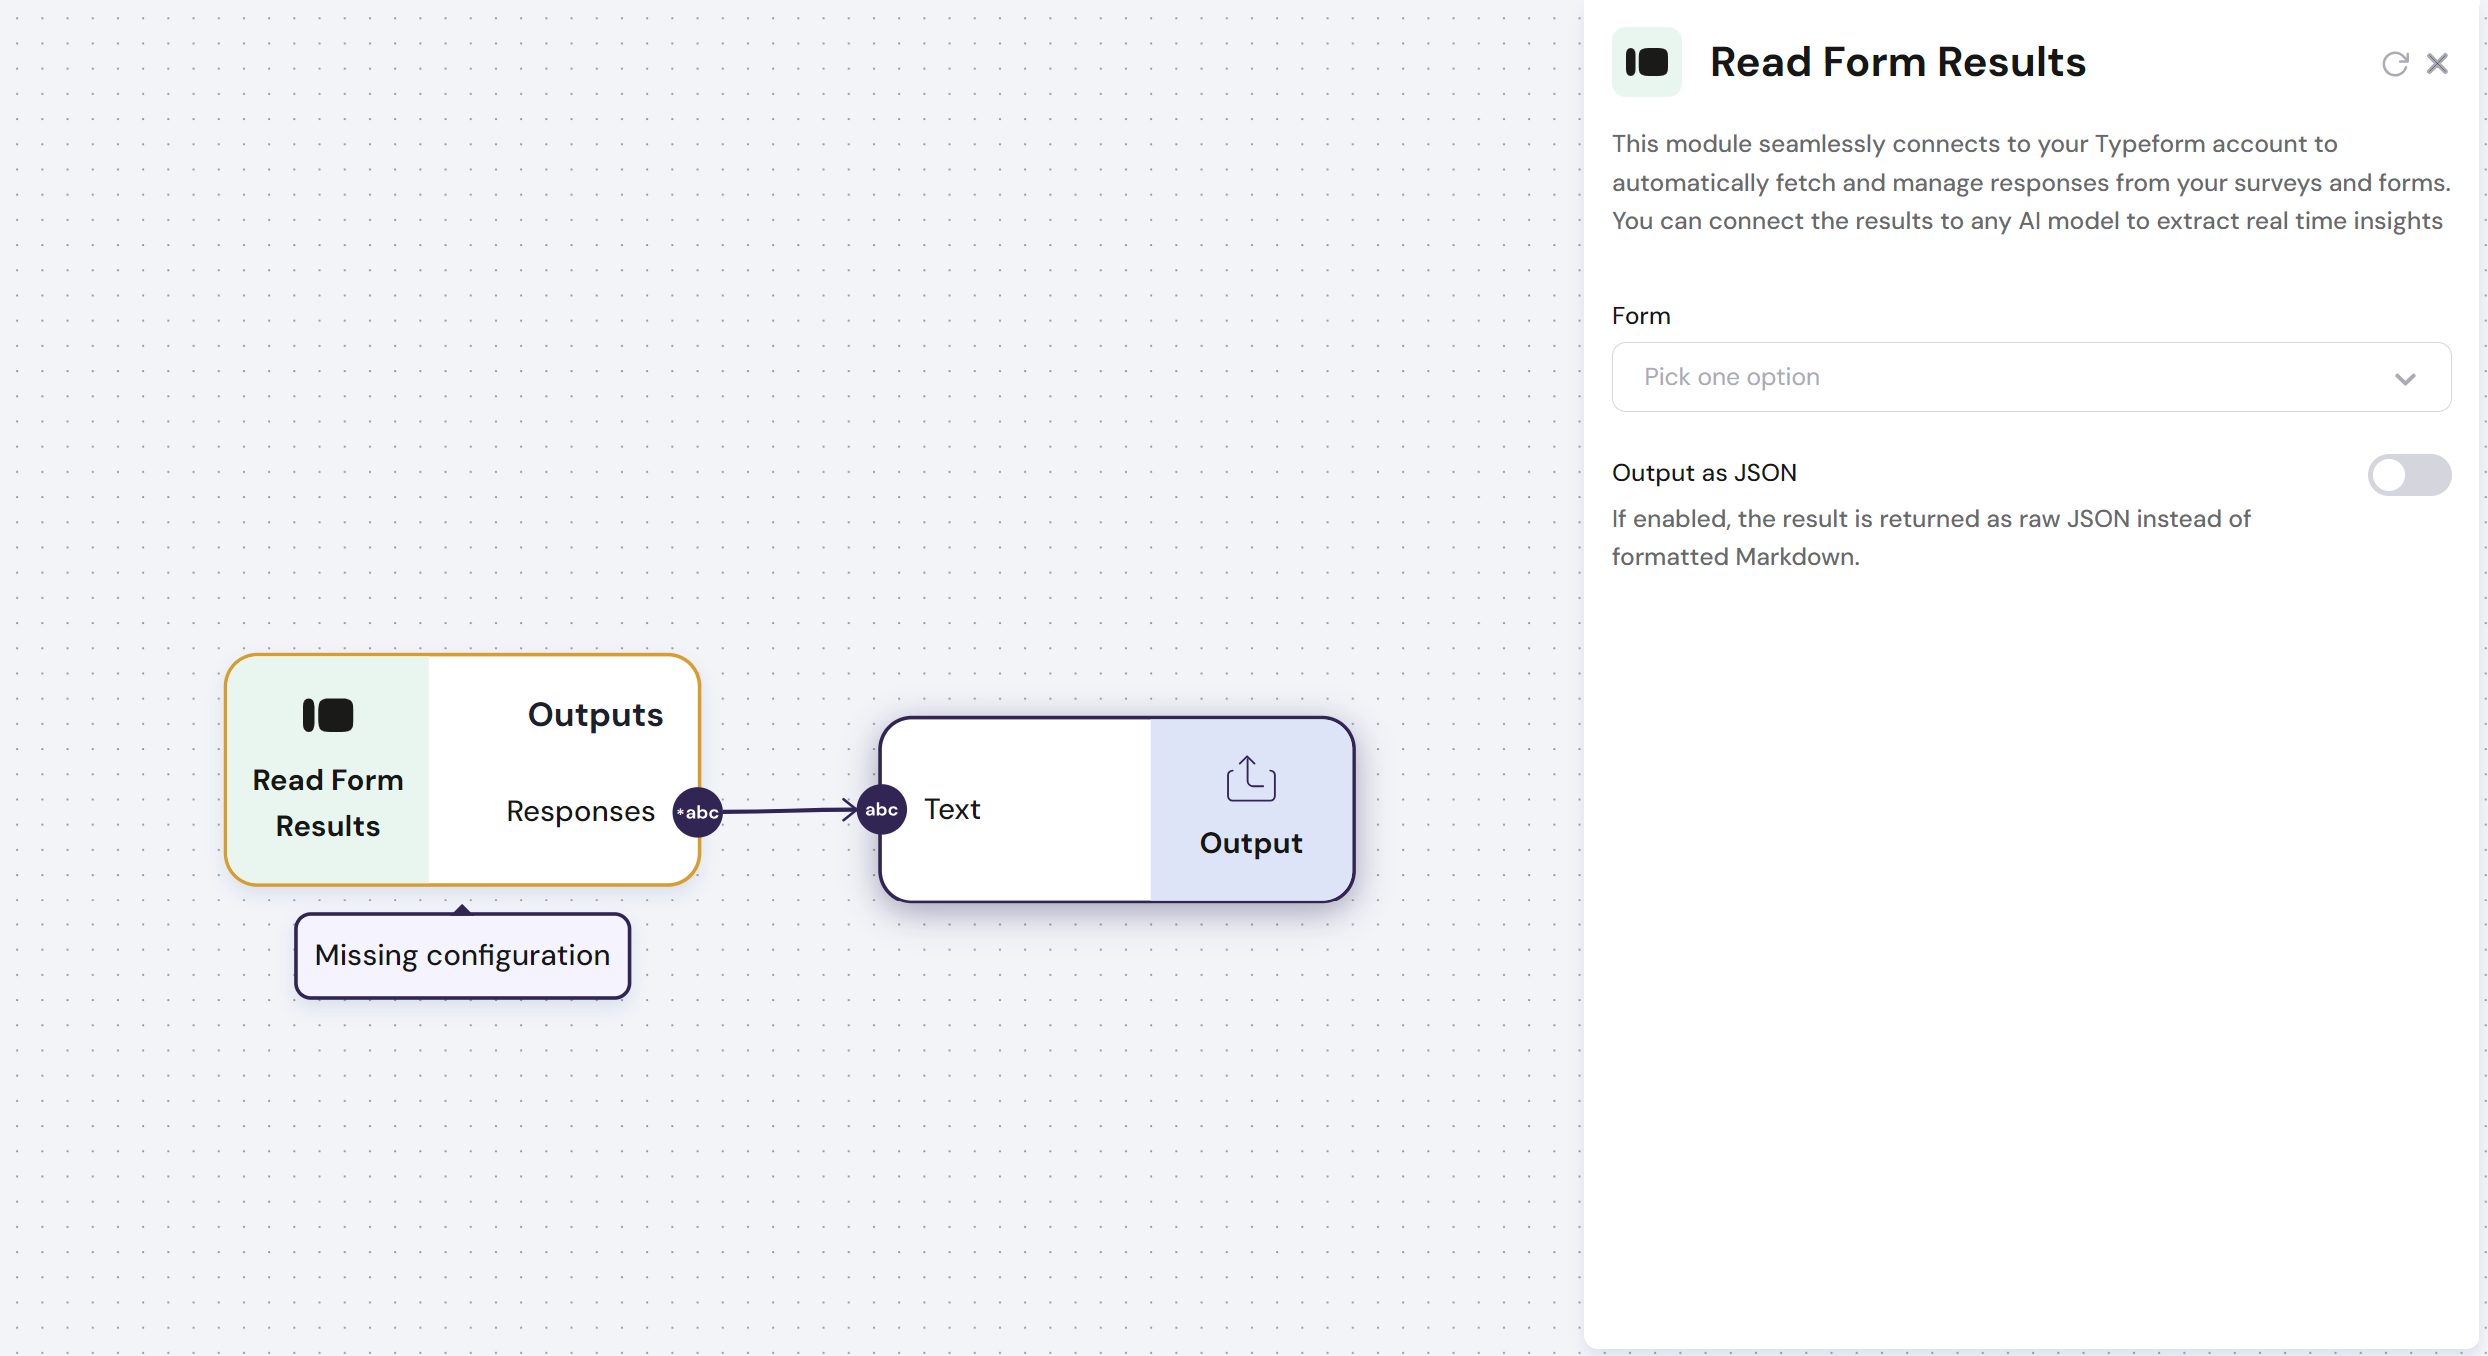
The `Typeform - Read Form Results` module seamlessly connects to your Typeform account to automatically fetches and manages responses from your surveys and forms. You can connect the results to any AI model to extract real time insights
The `Typeform - Read Form Results` module has **one output**:
- **Output**: Responses from the typeform form
Find below an example of how to use this module:
\n=== Documentation/Integration Modules/ReadTypeform.mdx ===
---
title: "Typeform - Read Form Results"
description: "Retrieves the results of a typeform"
---
> **This Module requires that you connect your account to the `Linked Accounts` page. Go to Settings to get this done.**
The `Typeform - Read Form Results` module seamlessly connects to your Typeform account to automatically fetches and manages responses from your surveys and forms. You can connect the results to any AI model to extract real time insights
The `Typeform - Read Form Results` module has **one output**:
- **Output**: Responses from the typeform form
Find below an example of how to use this module:
 \n=== Documentation/Integration Modules/SlackReader.mdx ===
---
title: "Slack - Read Messages"
description: "Read messages from a slack channel ."
---
> **This Module requires that you connect your account to the `Linked Accounts` page. Go to Settings to get this done.**
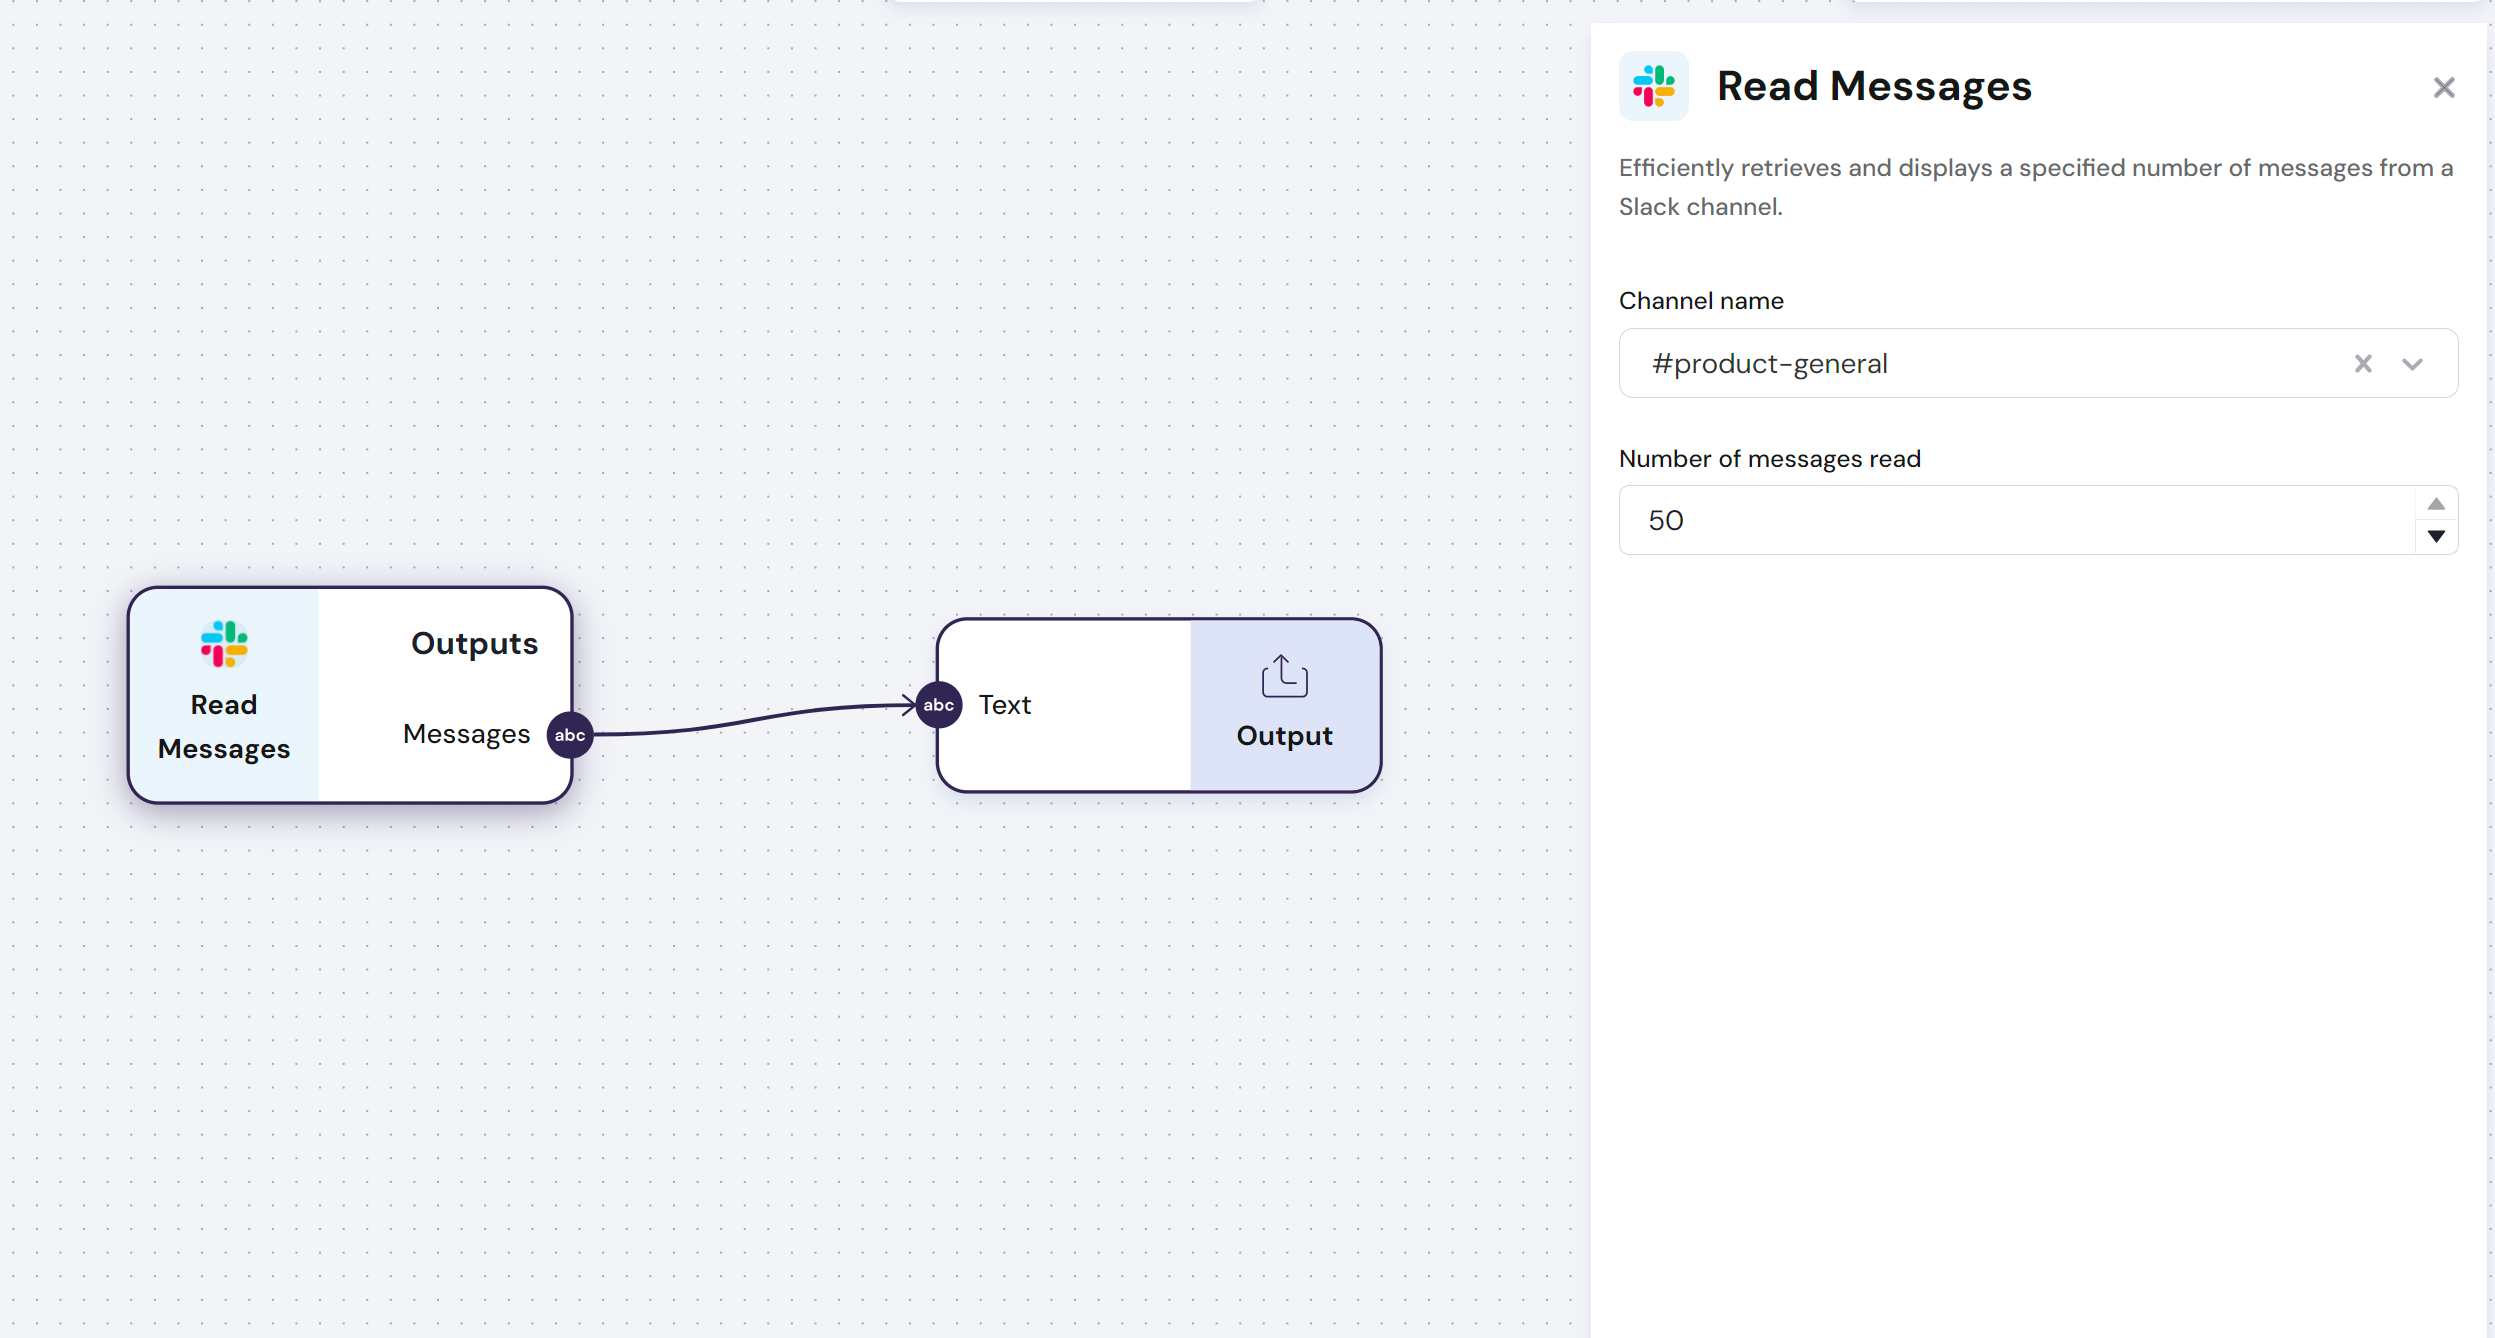
The `Slack - Read Messages` module allows you to read messages from a slack channel.
> **Note: This module is particularly useful if you want to build an agent for your Slack. It ensures that all the historical messages are given as context.**
> **To build a Slack agent you should use a slack trigger, in order to activate the workflow on every message**
The `Slack - Read Messages` module has **one output**:
- **Outputs**: Text contained in the messages of a slack channel
- **Config**:
- **Channel name**: The name of the slack channel to write messages in
- **Smart Formatting**: When enabled, will format the output messages and optimize them for Slack
Find below an example of how you use this module:
\n=== Documentation/Integration Modules/SlackReader.mdx ===
---
title: "Slack - Read Messages"
description: "Read messages from a slack channel ."
---
> **This Module requires that you connect your account to the `Linked Accounts` page. Go to Settings to get this done.**
The `Slack - Read Messages` module allows you to read messages from a slack channel.
> **Note: This module is particularly useful if you want to build an agent for your Slack. It ensures that all the historical messages are given as context.**
> **To build a Slack agent you should use a slack trigger, in order to activate the workflow on every message**
The `Slack - Read Messages` module has **one output**:
- **Outputs**: Text contained in the messages of a slack channel
- **Config**:
- **Channel name**: The name of the slack channel to write messages in
- **Smart Formatting**: When enabled, will format the output messages and optimize them for Slack
Find below an example of how you use this module:
 \n=== Documentation/Integration Modules/NWriteDatabase.mdx ===
---
title: "Notion - Write Database"
description: "Write data directly to a Notion Database."
---
> **This Module requires that you connect your account to the `Linked Accounts` page. Go to Settings to get this done.**
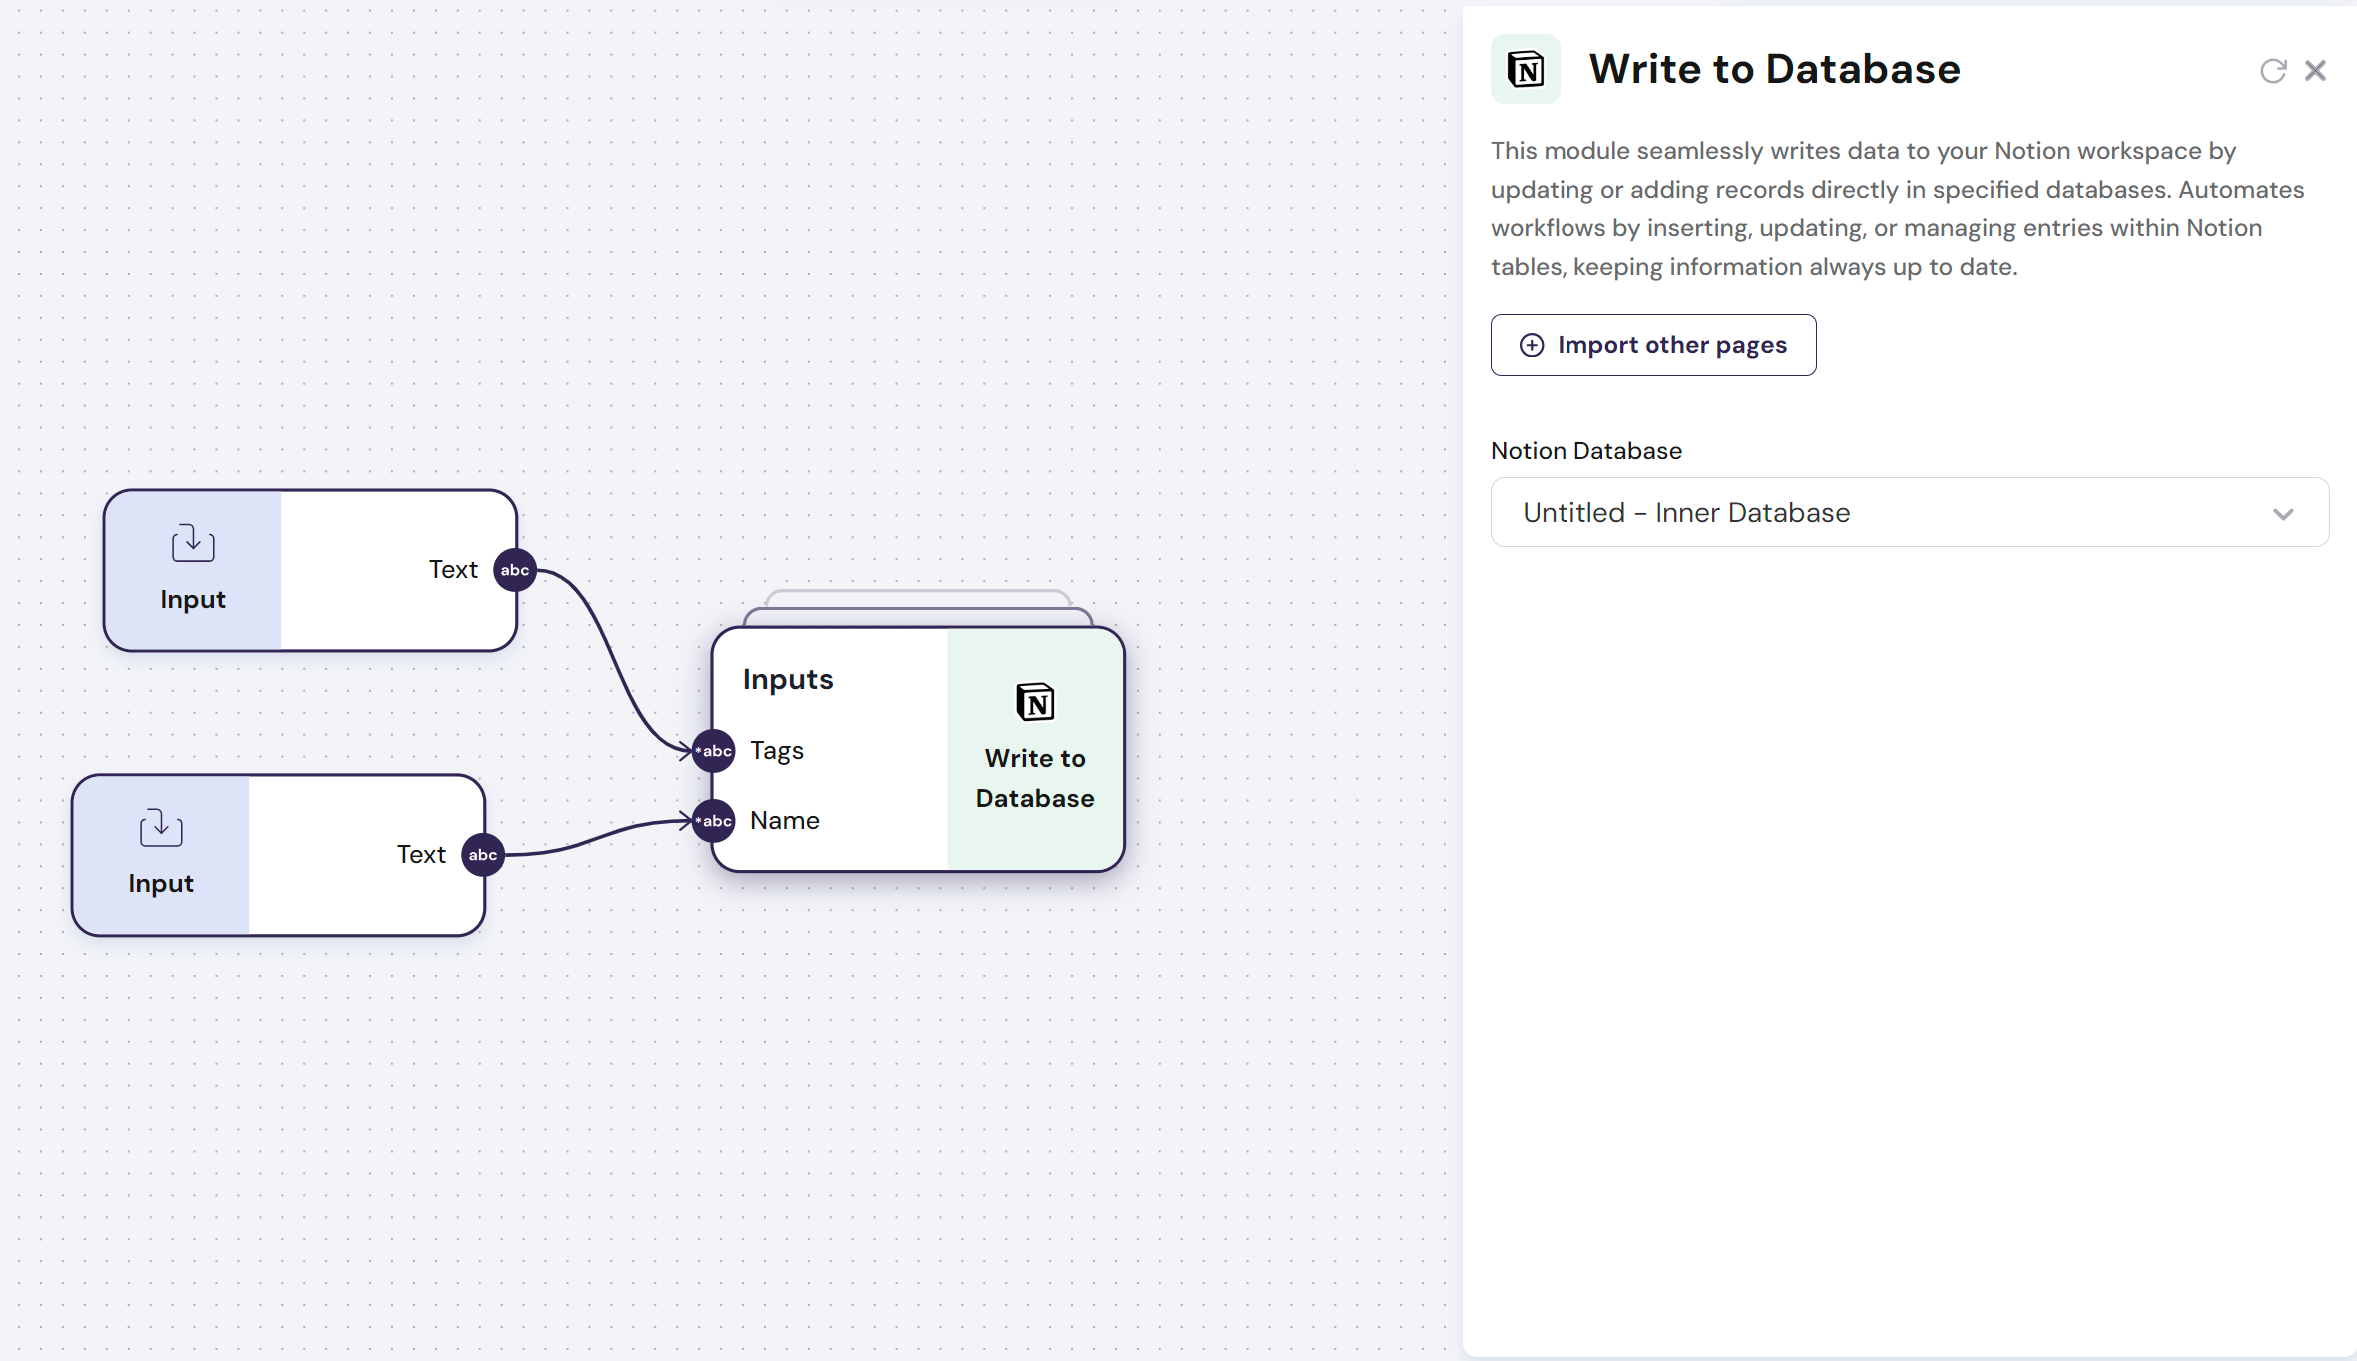
The `Notion - Write Database` module seamlessly writes data to your Notion workspace by updating or adding records directly in specified databases. Automates workflows by inserting, updating, or managing entries within Notion tables, keeping information always up to date.
The `Notion - Write Database` module has **variable inputs**:
- **Outputs**: Each column header in the first row of the Notion represents a `variable input` that receives a list to be written in each database column.
- **Config**: The Notion Page from the Notion workspace can be selected from the dropdown of approved access pages. If a page is not available in the drop-down, use the button `Import other pages`
Find below an example of how you use this module:
\n=== Documentation/Integration Modules/NWriteDatabase.mdx ===
---
title: "Notion - Write Database"
description: "Write data directly to a Notion Database."
---
> **This Module requires that you connect your account to the `Linked Accounts` page. Go to Settings to get this done.**
The `Notion - Write Database` module seamlessly writes data to your Notion workspace by updating or adding records directly in specified databases. Automates workflows by inserting, updating, or managing entries within Notion tables, keeping information always up to date.
The `Notion - Write Database` module has **variable inputs**:
- **Outputs**: Each column header in the first row of the Notion represents a `variable input` that receives a list to be written in each database column.
- **Config**: The Notion Page from the Notion workspace can be selected from the dropdown of approved access pages. If a page is not available in the drop-down, use the button `Import other pages`
Find below an example of how you use this module:
 \n=== Documentation/Integration Modules/Google Docs Reader.mdx ===
---
title: "Google Docs - Read Document"
description: "Read and return the text content from a Google Docs file."
---
> **This Module requires that you connect your account to the `Linked Accounts` page. Go to Settings to get this done.**
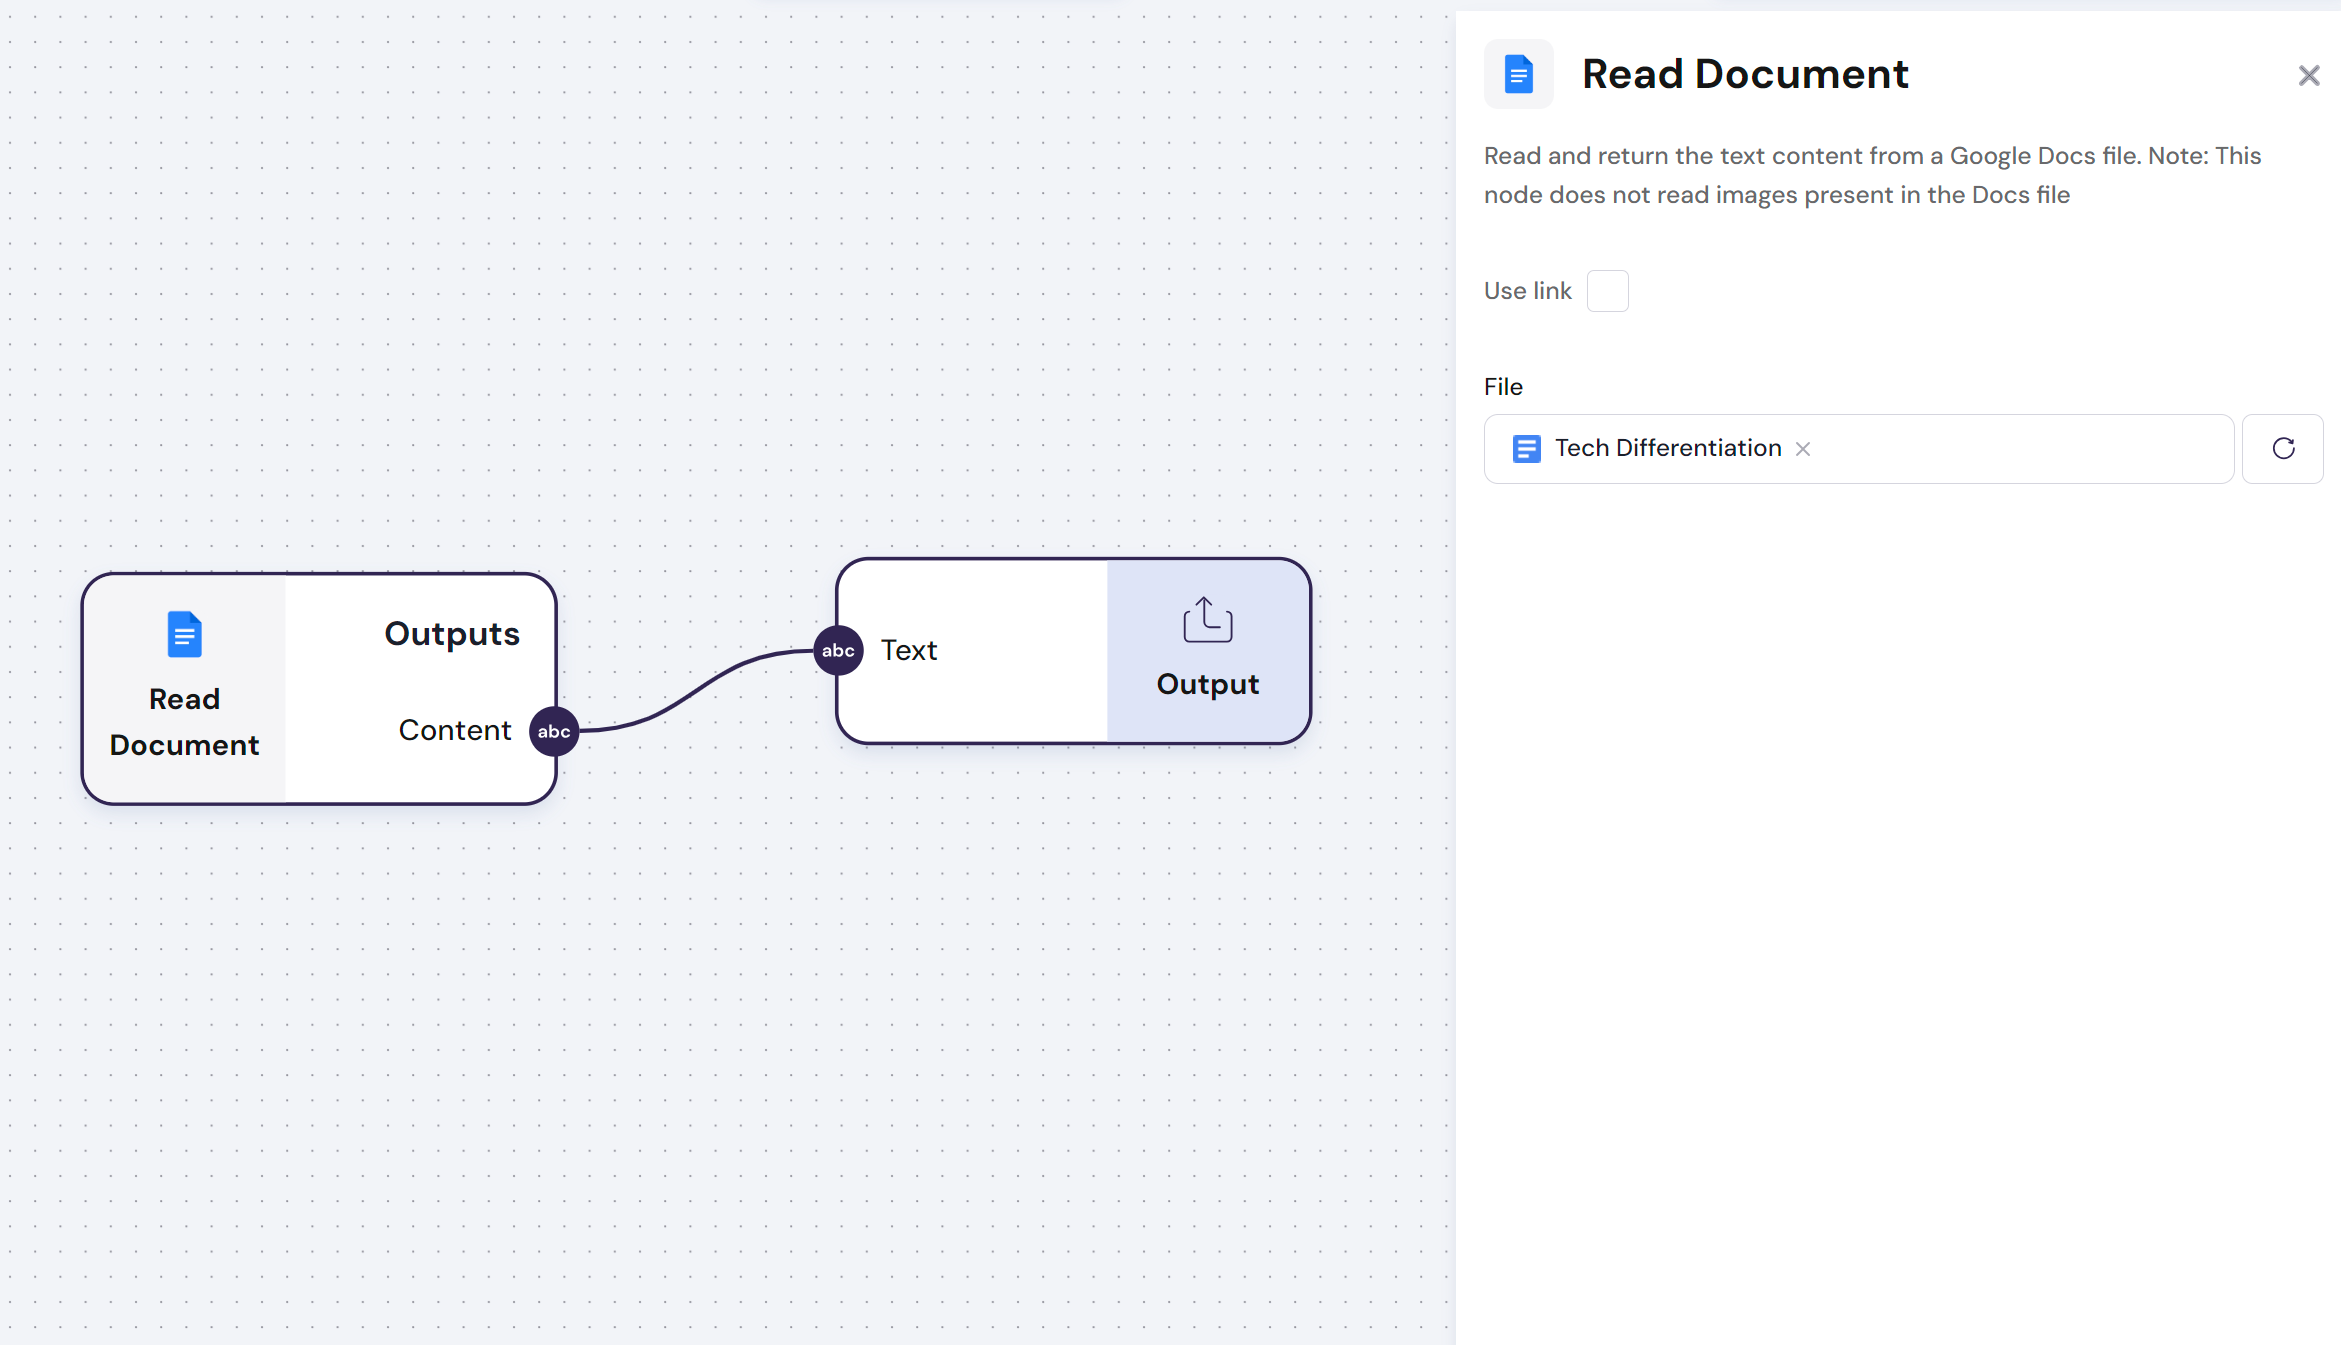
The `Google Docs - Read Document` module allows you to read text content from a google docs file.
**Note: This node does not read images present in the Docs file**
The `Google Docs - Read Document` module has **one output**:
- **Outputs**: Text contained in the Google Docs file
- **Config**: The Google Docs file can be loaded with a link or via the Google Finder
Find below an example of how you can upload a Google Docs:
\n=== Documentation/Integration Modules/Google Docs Reader.mdx ===
---
title: "Google Docs - Read Document"
description: "Read and return the text content from a Google Docs file."
---
> **This Module requires that you connect your account to the `Linked Accounts` page. Go to Settings to get this done.**
The `Google Docs - Read Document` module allows you to read text content from a google docs file.
**Note: This node does not read images present in the Docs file**
The `Google Docs - Read Document` module has **one output**:
- **Outputs**: Text contained in the Google Docs file
- **Config**: The Google Docs file can be loaded with a link or via the Google Finder
Find below an example of how you can upload a Google Docs:
 \n=== Documentation/Integration Modules/IReadProfile.mdx ===
---
title: "Instagram - Read Profile"
description: "Enter an Instagram handle to extract a profile summary and its recent Posts"
---
> **This Module requires that you connect your account to the `Linked Accounts` page. Go to Settings to get this done.**
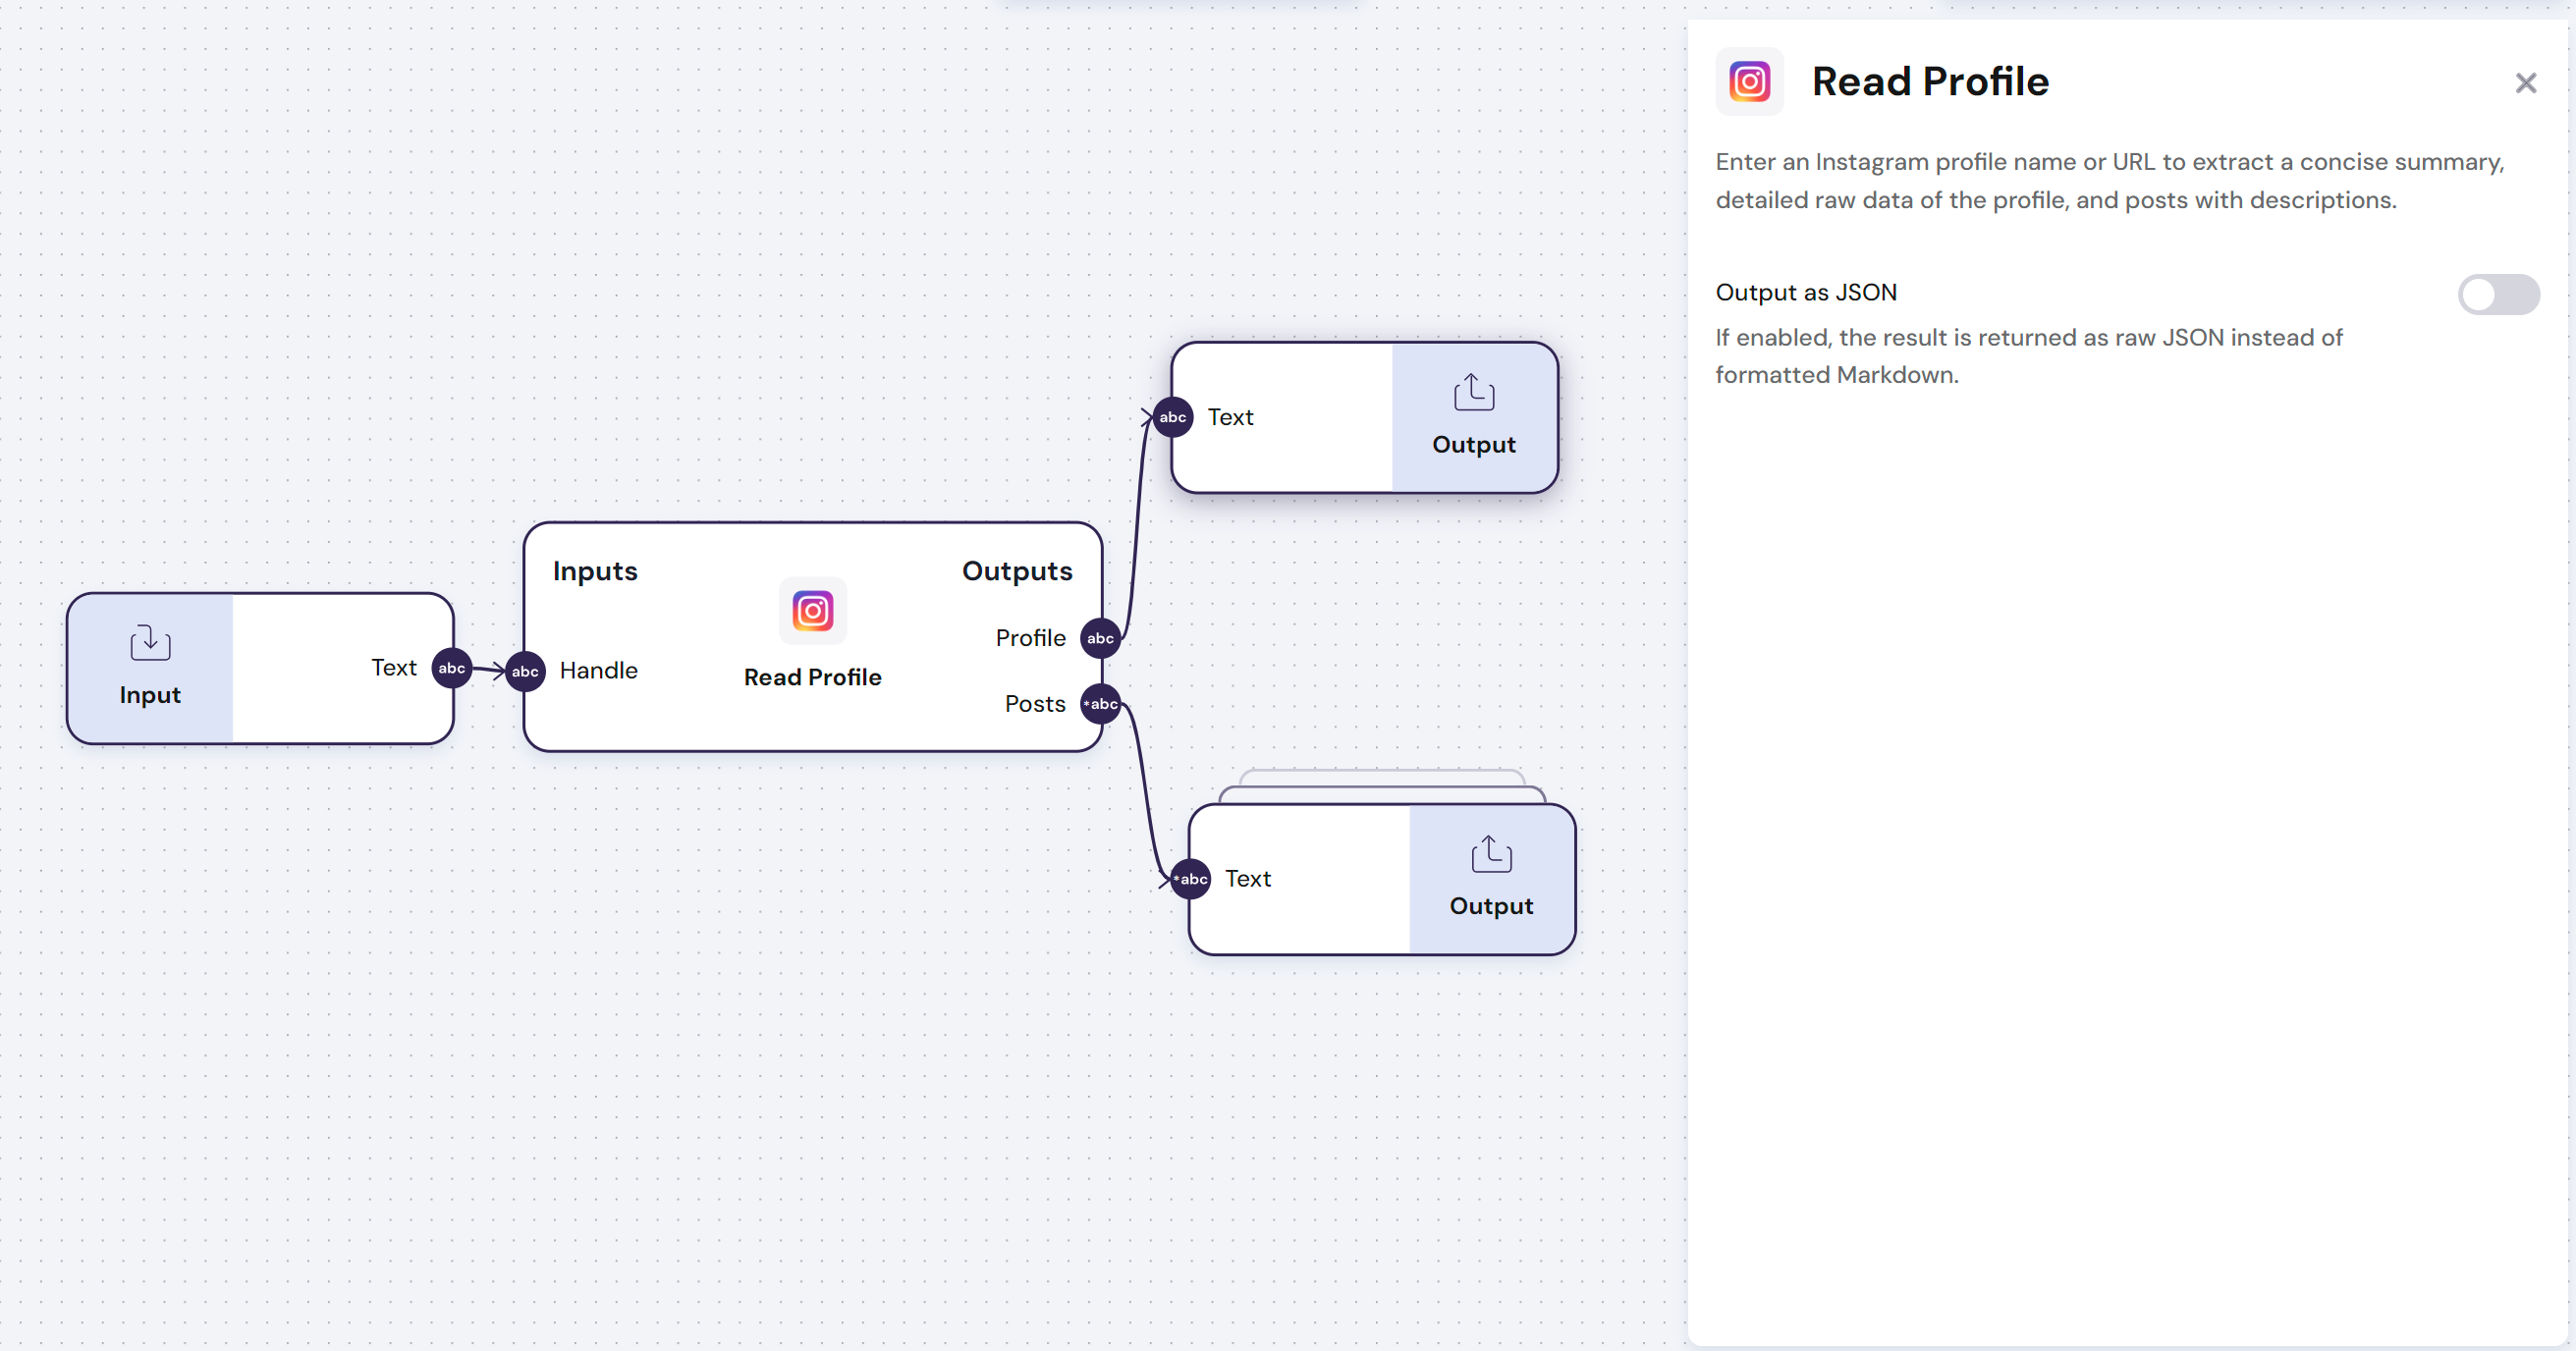
The `Instagram - Read Profile` module uses an Instagram handle to extract a concise profile summary and the most recent posts.
The `Instagram - Read Profile` module has **one input** and **two outputs**:
- **Input**:
- Instagram handle for the profile to be read
- **Output**:
- Complete profile with all the information extracted from Instagram
- **Config**:
- `Output as JSON` - If enabled, the result is returned as raw JSON instead of formatted Markdown.
Find below an example of how to use this module:
\n=== Documentation/Integration Modules/IReadProfile.mdx ===
---
title: "Instagram - Read Profile"
description: "Enter an Instagram handle to extract a profile summary and its recent Posts"
---
> **This Module requires that you connect your account to the `Linked Accounts` page. Go to Settings to get this done.**
The `Instagram - Read Profile` module uses an Instagram handle to extract a concise profile summary and the most recent posts.
The `Instagram - Read Profile` module has **one input** and **two outputs**:
- **Input**:
- Instagram handle for the profile to be read
- **Output**:
- Complete profile with all the information extracted from Instagram
- **Config**:
- `Output as JSON` - If enabled, the result is returned as raw JSON instead of formatted Markdown.
Find below an example of how to use this module:
 \n=== Documentation/introduction.mdx ===
---
title: Introduction
description: '[Noxus](www.getNoxus.io) is a no-code platform that enables you to automate workflows and build AI tools effortlessly. Enhance your workflows by integrating a variety of powerful tools.'
---
This documentation provides all the information you need to become a master at Noxus. Below, you will find all the most important sections of the documentation. In the navigation bar on the left, you can find even more information about every module on the platform.
\n=== Documentation/Agents/WCA.mdx ===
---
title: "Website Q&A"
description: "Website Q&A navigates and does an in-depth analysis of websites"
---
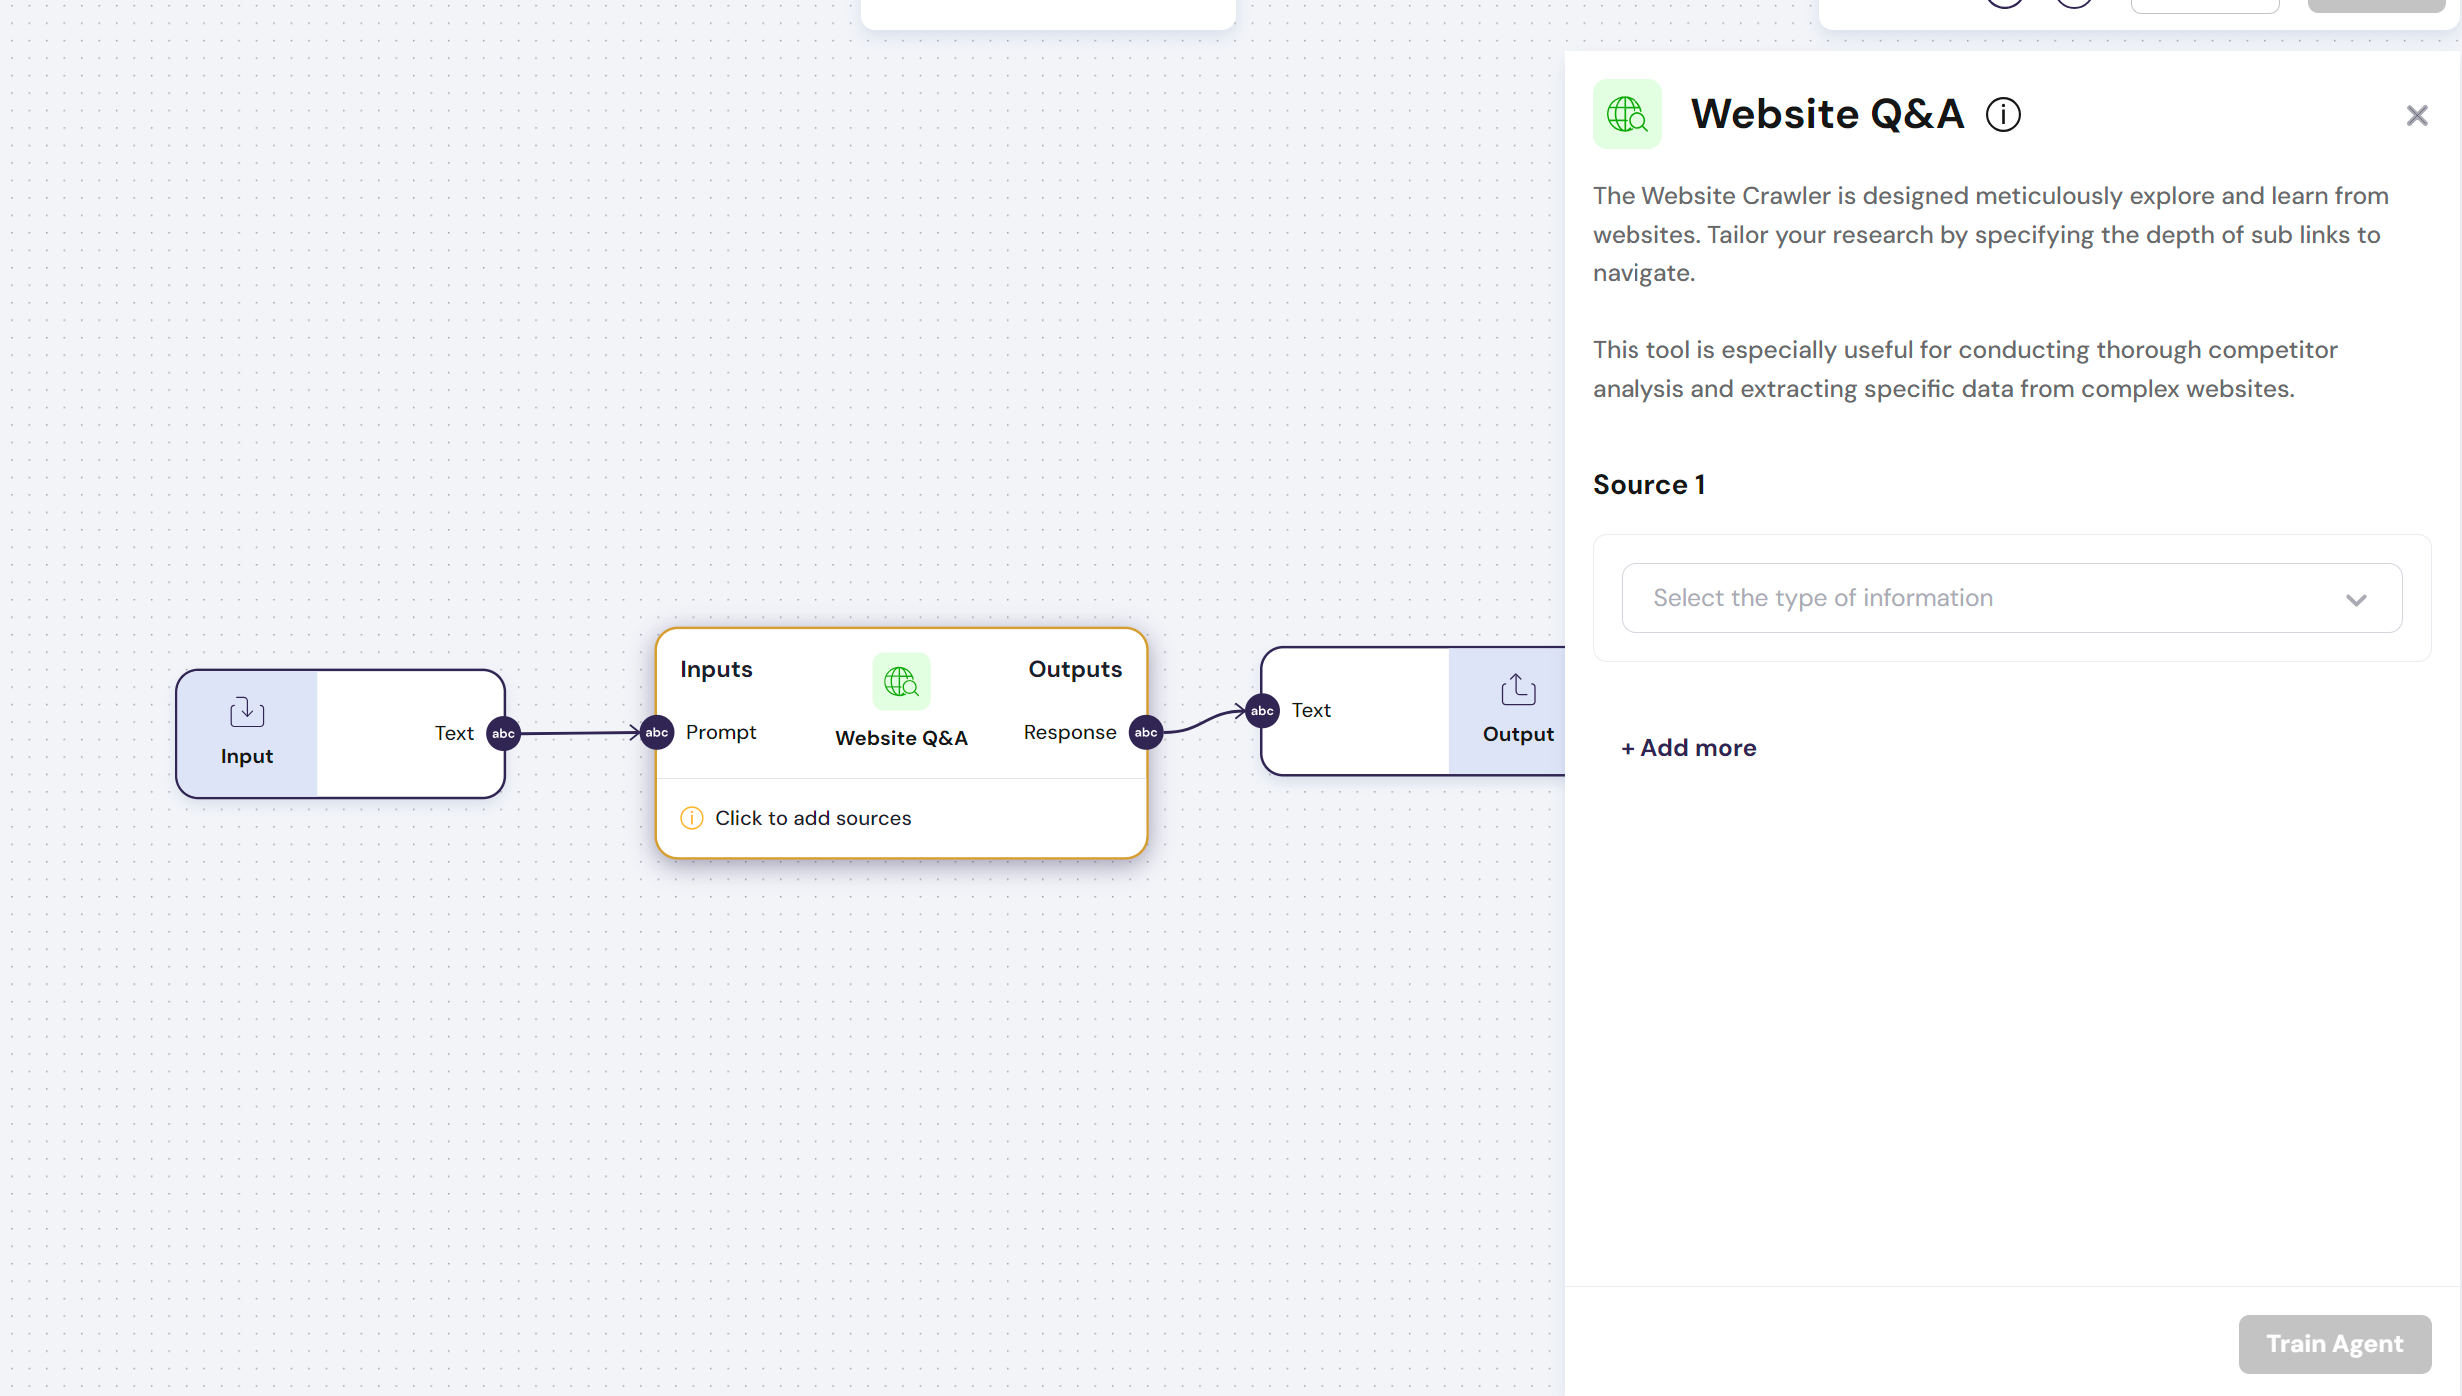
The `Website Q&A` is designed to explore and learn from websites meticulously.
It can swiftly build reports, summaries and provide insights into complex websites.
> **This AI module is especially useful for conducting thorough competitor analysis and extracting specific data from complex websites.**
The `Website Q&A` module has **one input** and **one output**:
- **Input**: Can receive an input of type `text` with a prompt to be answered according to the data sources provided to the AI module
- **Output**: The output is of type `text` and answers to the prompt question in the input variable
- **Config**: In the configurations menu, you can train the AI module on any website link that doesn't have scrapping protections.
\n=== Documentation/introduction.mdx ===
---
title: Introduction
description: '[Noxus](www.getNoxus.io) is a no-code platform that enables you to automate workflows and build AI tools effortlessly. Enhance your workflows by integrating a variety of powerful tools.'
---
This documentation provides all the information you need to become a master at Noxus. Below, you will find all the most important sections of the documentation. In the navigation bar on the left, you can find even more information about every module on the platform.
\n=== Documentation/Agents/WCA.mdx ===
---
title: "Website Q&A"
description: "Website Q&A navigates and does an in-depth analysis of websites"
---
The `Website Q&A` is designed to explore and learn from websites meticulously.
It can swiftly build reports, summaries and provide insights into complex websites.
> **This AI module is especially useful for conducting thorough competitor analysis and extracting specific data from complex websites.**
The `Website Q&A` module has **one input** and **one output**:
- **Input**: Can receive an input of type `text` with a prompt to be answered according to the data sources provided to the AI module
- **Output**: The output is of type `text` and answers to the prompt question in the input variable
- **Config**: In the configurations menu, you can train the AI module on any website link that doesn't have scrapping protections.
 \n=== Documentation/Agents/WebRA.mdx ===
---
title: "Web Research"
description: "Searches the web with a goal and compiles a report."
---
The `Web Research` module searches multiple websites to compile a report on a particular topic.
**You can use this module to provide live contextual information from a particular topic or even to perform a report that an LLM can use to improve its results**
The `Web Research` module has **one input** and **one output**:
- **Input**: `Goal`, this is a text input describing your objective with the research
- **Output**: `Summary`, an analysis based on the web research
- **Configs**:
- `Depth`, defines the level of depth of the research, the more in-depth the research, the longer the node will take
- `Context`, The `Context` describes the behavioral information in detail. This will help the researcher select the right information and present it in a more relevant way
- `Time Awareness`, When enabled, the node will automatically convert mentions of time periods (e.g., 'next week', 'next month') into specific dates, ensuring higher accuracy and reliability.
\n=== Documentation/Agents/WebRA.mdx ===
---
title: "Web Research"
description: "Searches the web with a goal and compiles a report."
---
The `Web Research` module searches multiple websites to compile a report on a particular topic.
**You can use this module to provide live contextual information from a particular topic or even to perform a report that an LLM can use to improve its results**
The `Web Research` module has **one input** and **one output**:
- **Input**: `Goal`, this is a text input describing your objective with the research
- **Output**: `Summary`, an analysis based on the web research
- **Configs**:
- `Depth`, defines the level of depth of the research, the more in-depth the research, the longer the node will take
- `Context`, The `Context` describes the behavioral information in detail. This will help the researcher select the right information and present it in a more relevant way
- `Time Awareness`, When enabled, the node will automatically convert mentions of time periods (e.g., 'next week', 'next month') into specific dates, ensuring higher accuracy and reliability.
 \n=== Documentation/Agents/DA.mdx ===
---
title: "Document Q&A"
description: "This AI module answers any question by learning from any text based source you give it."
---
The `Document Q&A` is designed to effortlessly learn from various sources, including Google Drive text files and PDFs.
It can swiftly respond to your queries, providing insights and finding specific information within these complex data sources.
> **This AI action is particularly useful when you want to build a workflow that is capable of answering complete questions from long books or documents**
The `Document Q&A` module has **one input** and **one output**:
- **Input**: Can receive an input of type `text` with a prompt to be answered according to the data sources provided to the AI action
- **Output**: The output is of type `text` and answers to the prompt question in the input variable
- **Config**: In the configurations menu, the model can be trained on PDFs and files located on Google Drive or a website.
In the example below, you can find an AI action before being trained on a PDF and during its training:
\n=== Documentation/Agents/DA.mdx ===
---
title: "Document Q&A"
description: "This AI module answers any question by learning from any text based source you give it."
---
The `Document Q&A` is designed to effortlessly learn from various sources, including Google Drive text files and PDFs.
It can swiftly respond to your queries, providing insights and finding specific information within these complex data sources.
> **This AI action is particularly useful when you want to build a workflow that is capable of answering complete questions from long books or documents**
The `Document Q&A` module has **one input** and **one output**:
- **Input**: Can receive an input of type `text` with a prompt to be answered according to the data sources provided to the AI action
- **Output**: The output is of type `text` and answers to the prompt question in the input variable
- **Config**: In the configurations menu, the model can be trained on PDFs and files located on Google Drive or a website.
In the example below, you can find an AI action before being trained on a PDF and during its training:

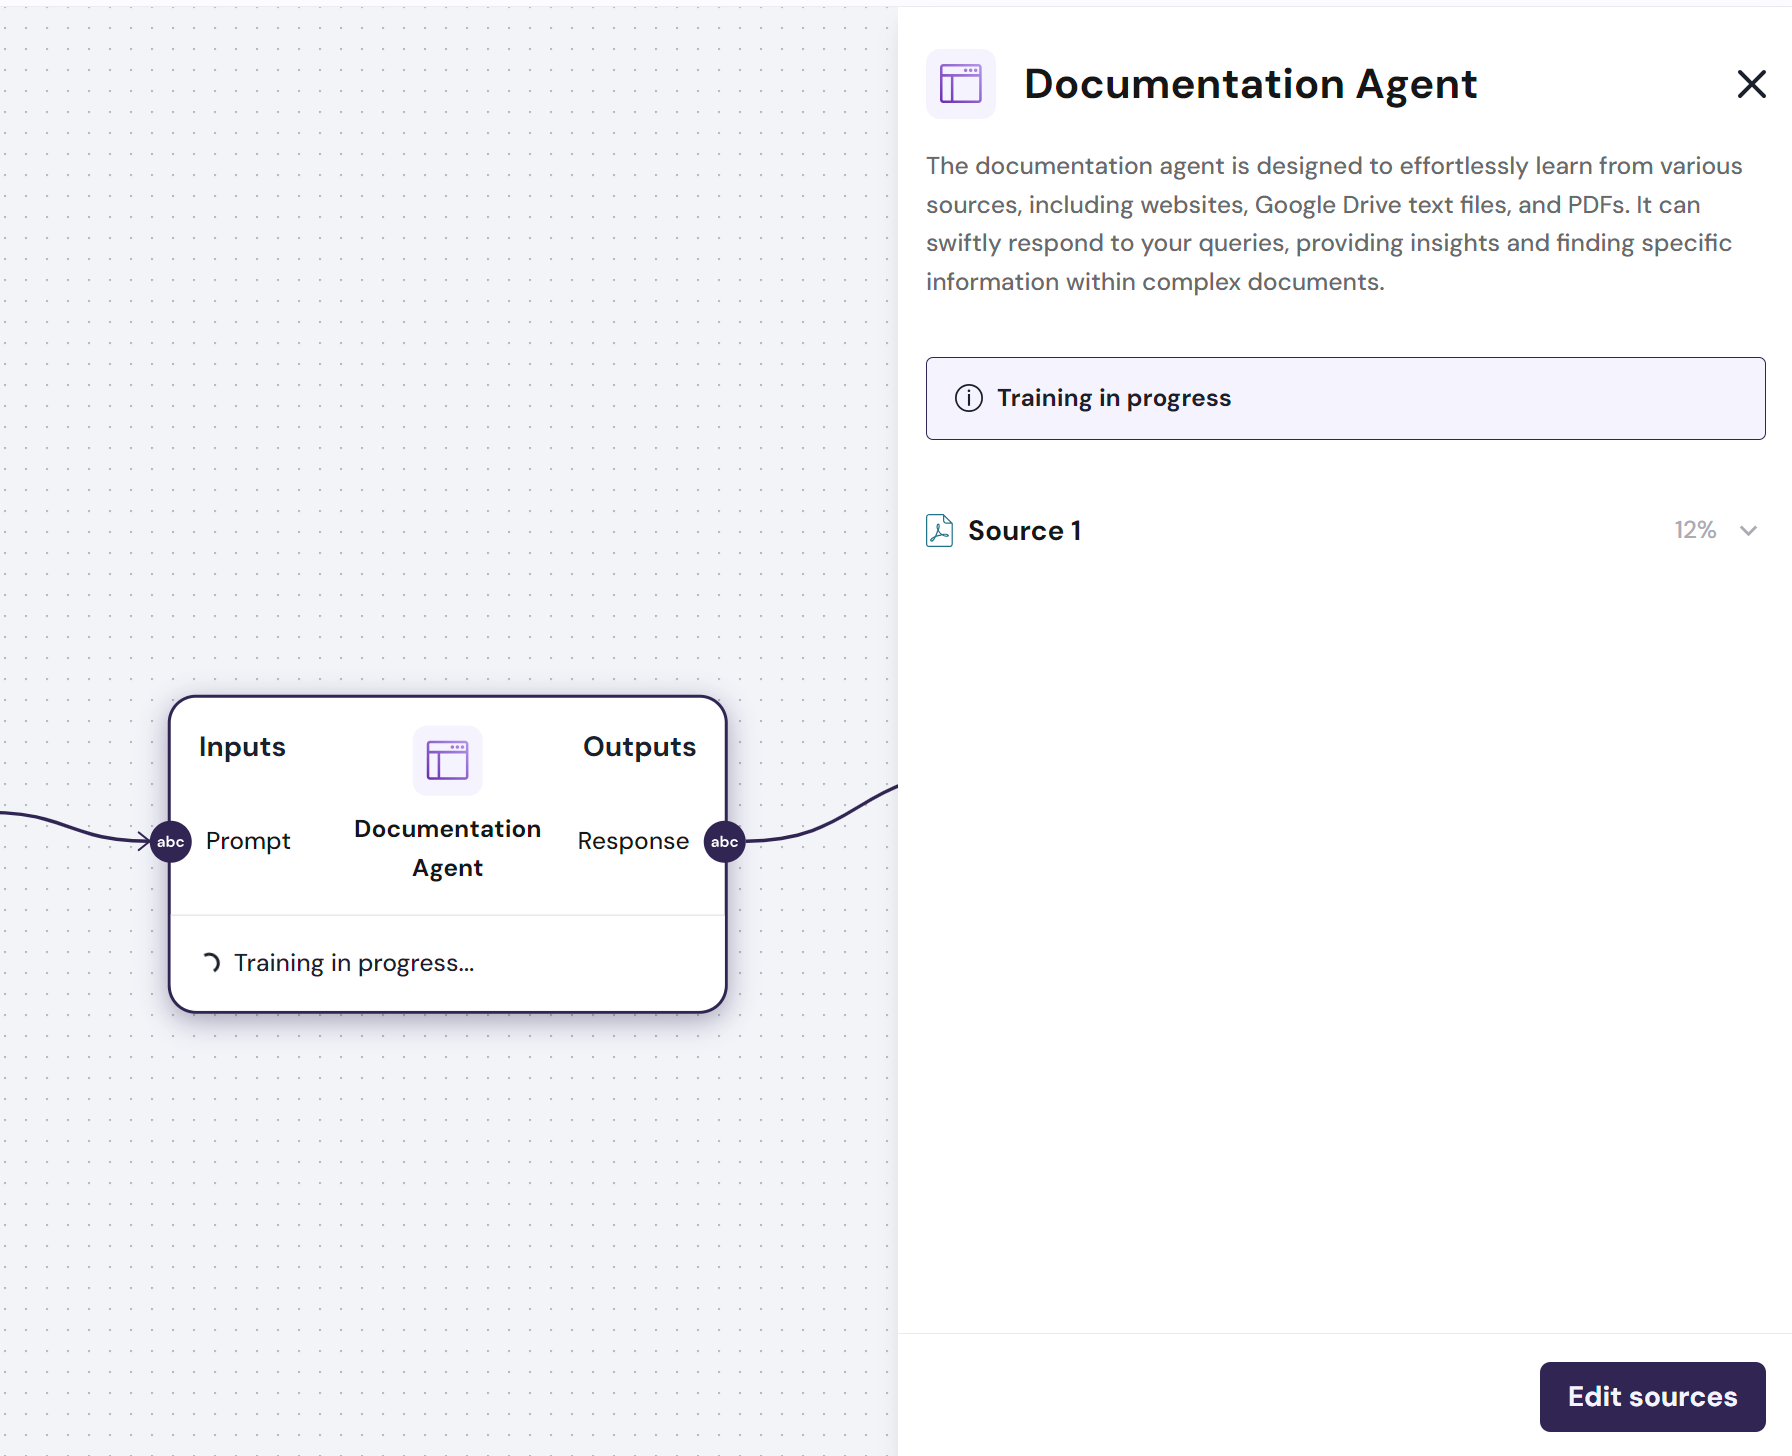 > **AI actions must always be trained until the message below is shown. You can train your AI action by clicking the button `Train`**
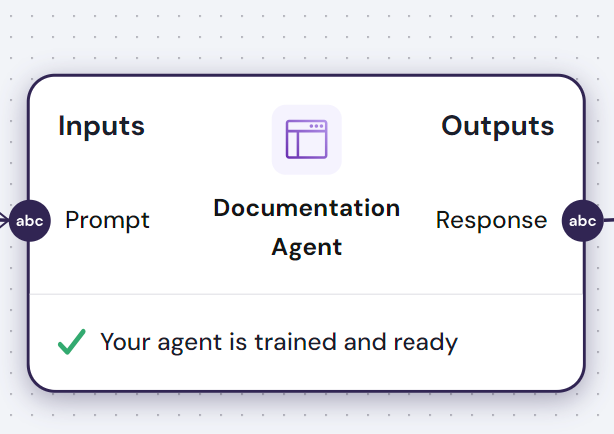 \n=== Documentation/Logic Modules/Single2list.mdx ===
---
title: "Single Value to List"
description: "Transform a list into a single value separated by a paragraph or a selected character."
---
The `List to single value` module is a logic module that allows you to convert a single value into a list of text entries. This node takes a single input value and splits it into a list based on a specified delimiter or paragraph. The delimiter can be any character, such as a comma, space, or custom string.
The module has **one input** and **one output**:
- **Input**: `Text`, the concatenation of the provided list according to the defined separation character
- **Output**: `list of text`, receives a list of text inputs
In the image below, the text list is being transformed into a single output separated by a `-`
\n=== Documentation/Logic Modules/Single2list.mdx ===
---
title: "Single Value to List"
description: "Transform a list into a single value separated by a paragraph or a selected character."
---
The `List to single value` module is a logic module that allows you to convert a single value into a list of text entries. This node takes a single input value and splits it into a list based on a specified delimiter or paragraph. The delimiter can be any character, such as a comma, space, or custom string.
The module has **one input** and **one output**:
- **Input**: `Text`, the concatenation of the provided list according to the defined separation character
- **Output**: `list of text`, receives a list of text inputs
In the image below, the text list is being transformed into a single output separated by a `-`
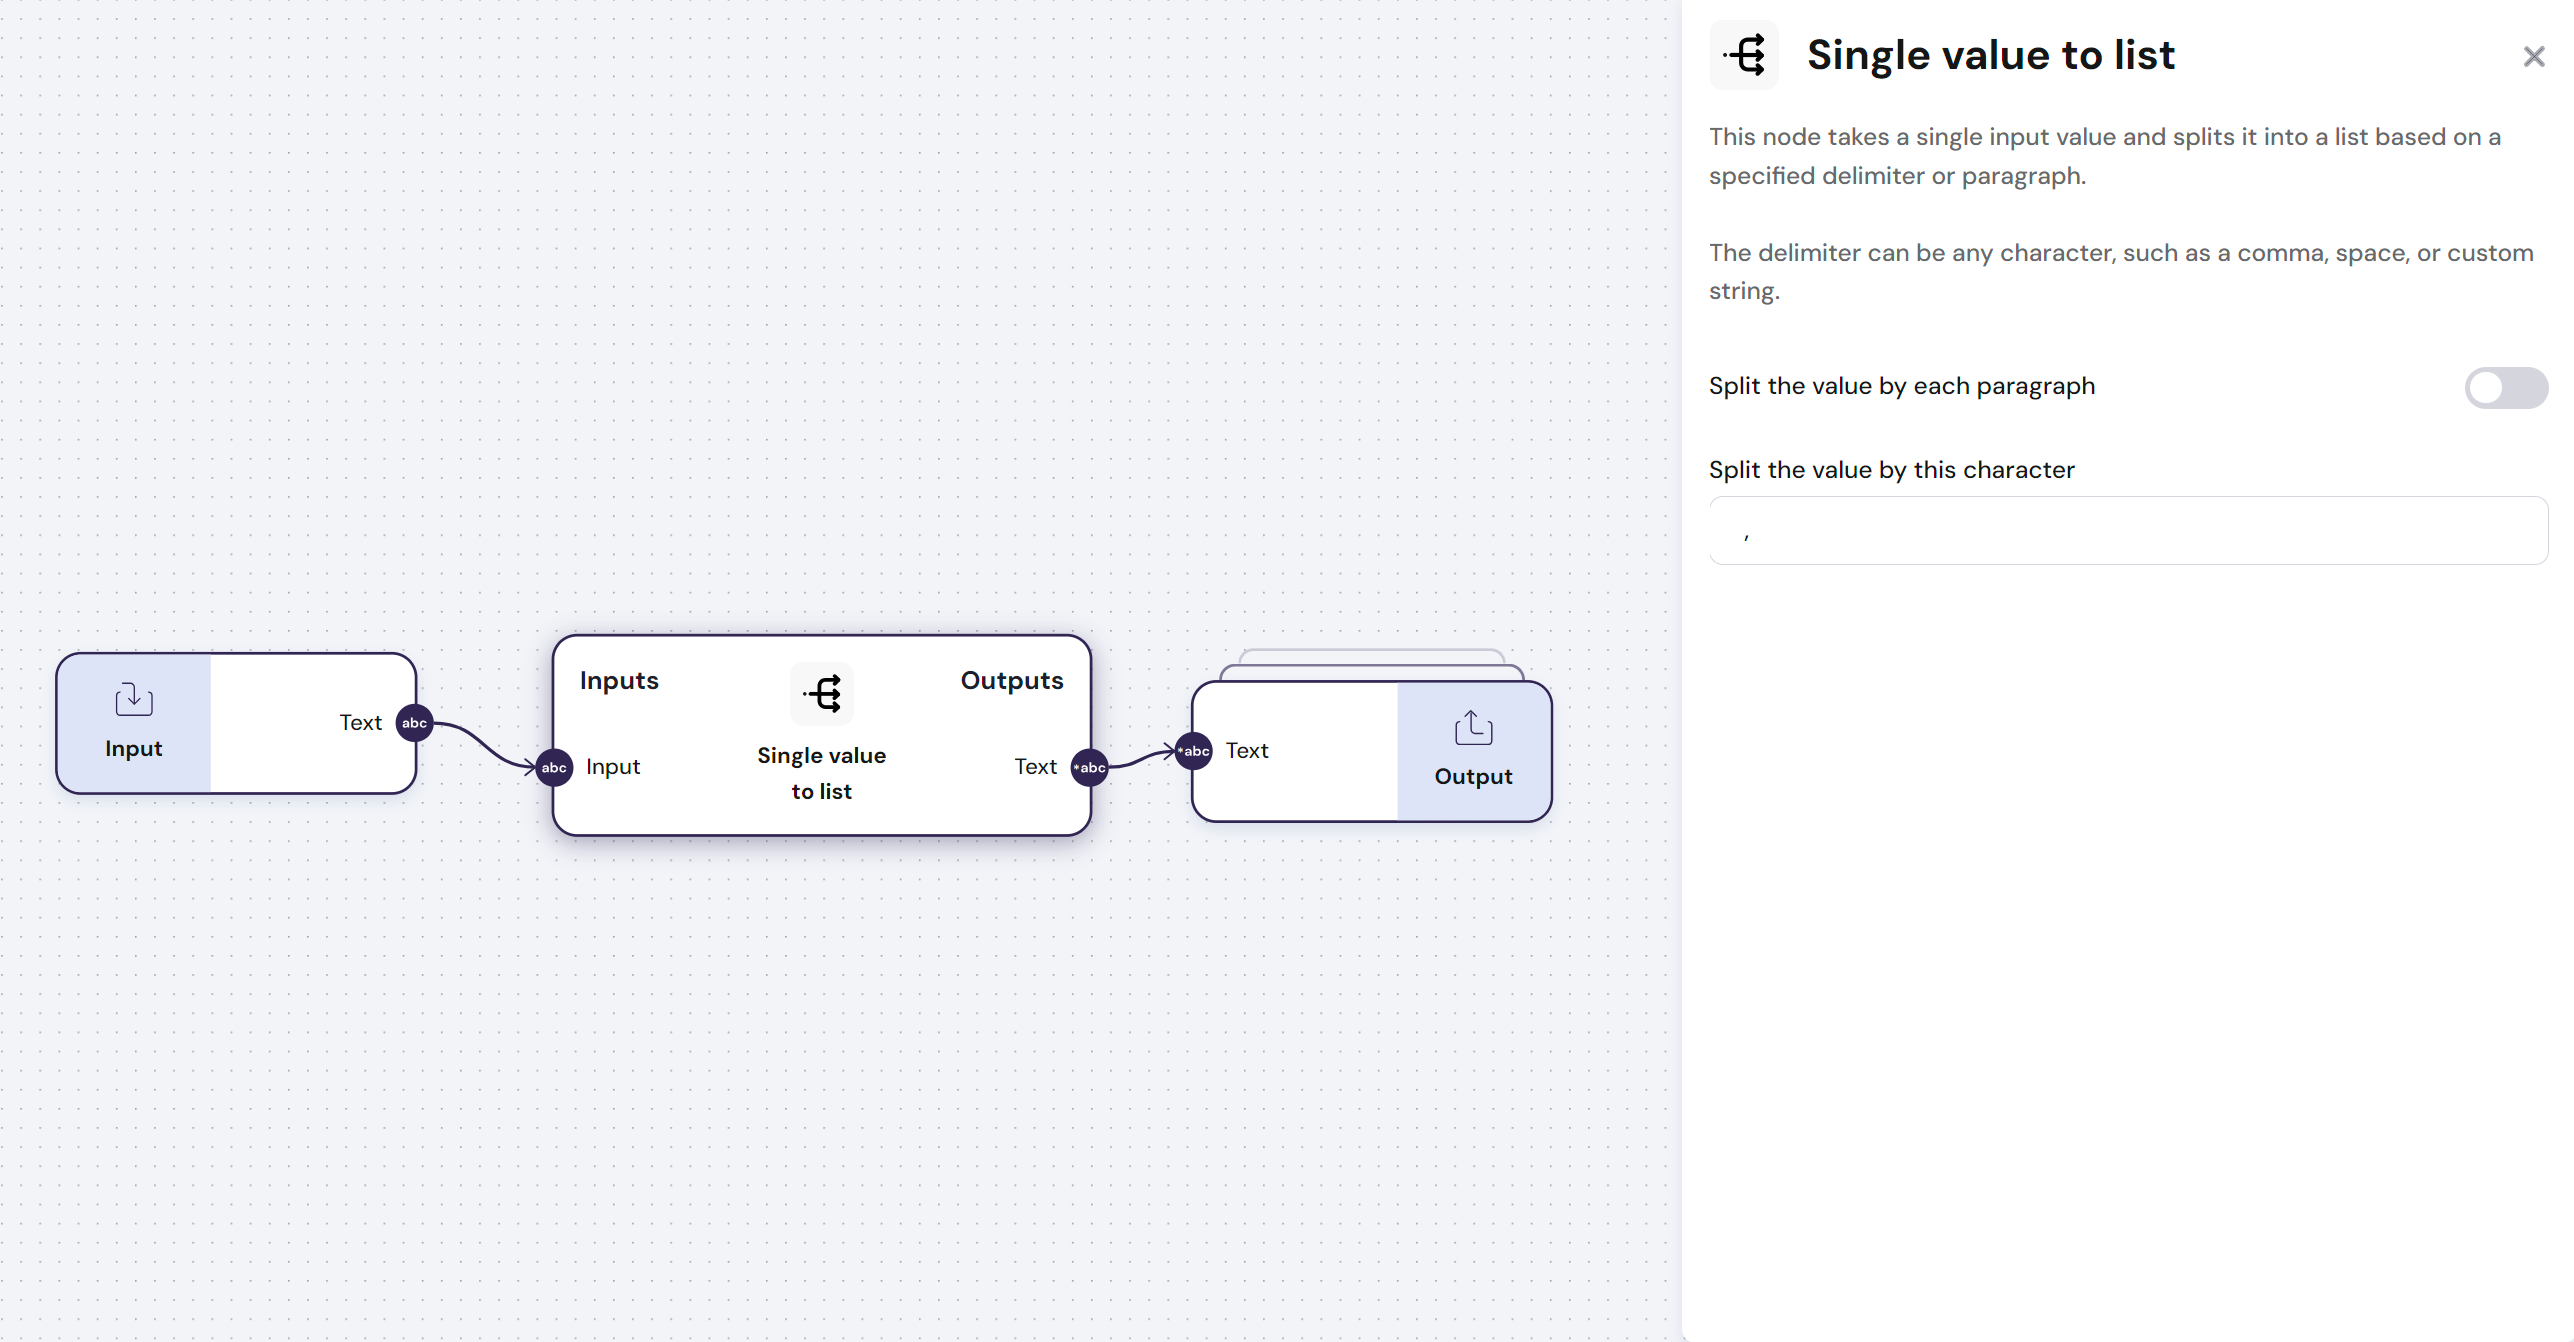 \n=== Documentation/Logic Modules/Condition.mdx ===
---
title: "Condition"
description: "Filter values base on a specific condition or ask AI to filter it for you."
---
The `Condition` node is a logic module that can Filter values based on a specific condition or ask AI to filter it for you. This module is particularly useful, for example, when removing content from a list that fits a certain condition.
The `Condition` node has the following configurations:
- **AI Condition**: This allows you to use AI to separate elements that meet a given condition, or not. All you have to do is describe the condition that you want to be true, `E.g. value has at least two words.`
- **Condition**
- Take into example the following condition:
-
\n=== Documentation/Logic Modules/Condition.mdx ===
---
title: "Condition"
description: "Filter values base on a specific condition or ask AI to filter it for you."
---
The `Condition` node is a logic module that can Filter values based on a specific condition or ask AI to filter it for you. This module is particularly useful, for example, when removing content from a list that fits a certain condition.
The `Condition` node has the following configurations:
- **AI Condition**: This allows you to use AI to separate elements that meet a given condition, or not. All you have to do is describe the condition that you want to be true, `E.g. value has at least two words.`
- **Condition**
- Take into example the following condition:
- 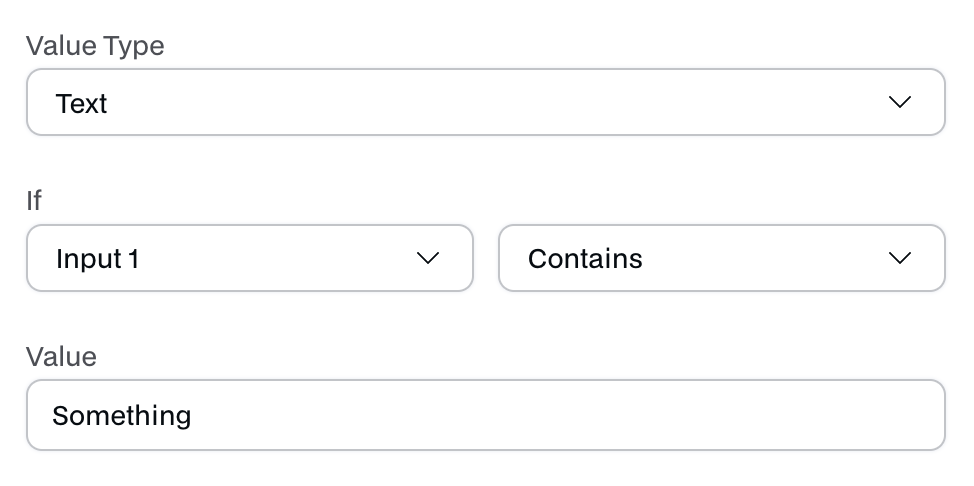 - It reads like the following: If Input 1 contains the word 'Something', then return true. If not, return false.
- **When true return**
- This is the output when the condition above is true
- **When false return**
- This is the output when the condition above is false
- It reads like the following: If Input 1 contains the word 'Something', then return true. If not, return false.
- **When true return**
- This is the output when the condition above is true
- **When false return**
- This is the output when the condition above is false
The `Condition` module has **one input** and **two output**: - **Input**: - `Variable Inputs`, receives any number of inputs - **Output**: - `When true` gives the true condition - `When false` gives the false condition
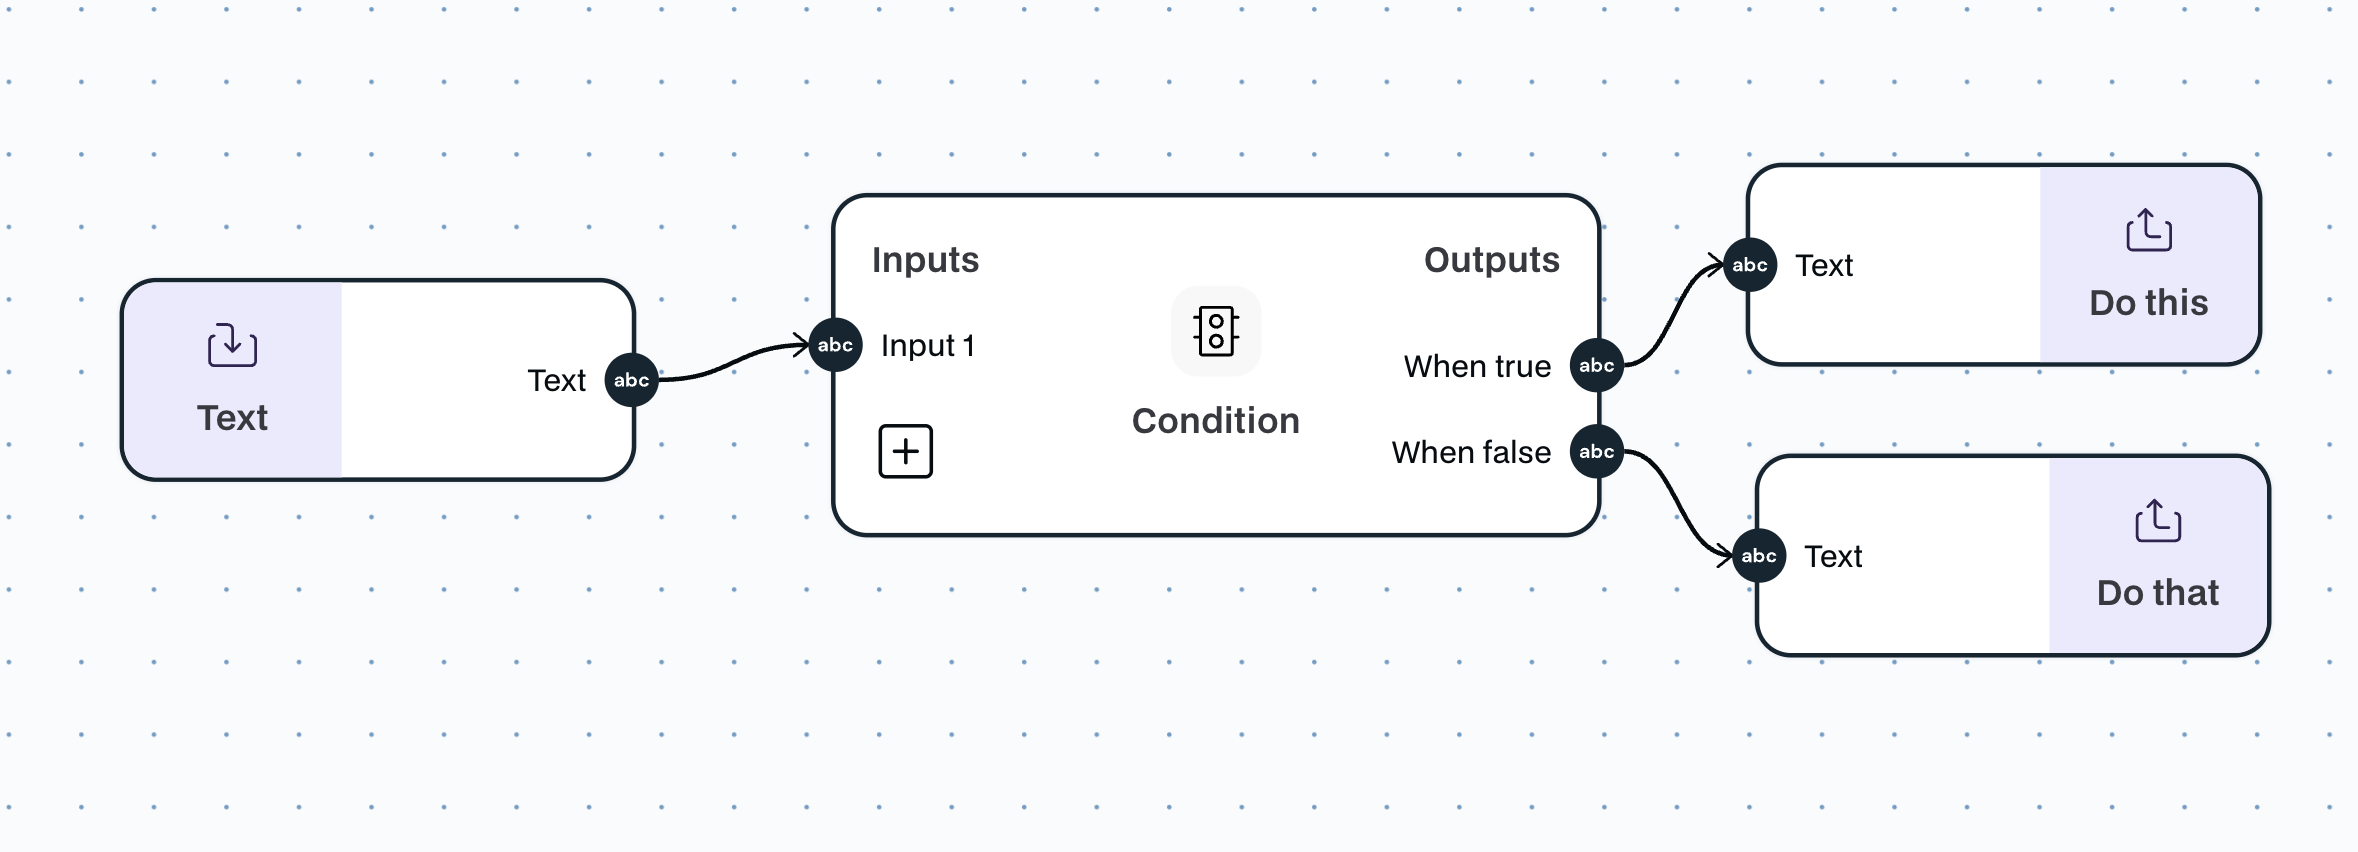 \n=== Documentation/Logic Modules/Combine Text.mdx ===
---
title: "Combine Text"
description: "Combine multiple text inputs in one text output."
---
Combine the text of the multiple source inputs as you like.
The `Combine Text` module has **variable inputs** and **one output**:
- **Input**: Can receive multiple inputs of type `text`; these can be used as a dynamic input inside the prompt of the Combine Text module.
- **Output**: `text`, the output is the prompt combined with the dynamic inputs.
The inputs will be available as chips on top of the text configuration. Don't forget to add them!
\n=== Documentation/Logic Modules/Combine Text.mdx ===
---
title: "Combine Text"
description: "Combine multiple text inputs in one text output."
---
Combine the text of the multiple source inputs as you like.
The `Combine Text` module has **variable inputs** and **one output**:
- **Input**: Can receive multiple inputs of type `text`; these can be used as a dynamic input inside the prompt of the Combine Text module.
- **Output**: `text`, the output is the prompt combined with the dynamic inputs.
The inputs will be available as chips on top of the text configuration. Don't forget to add them!
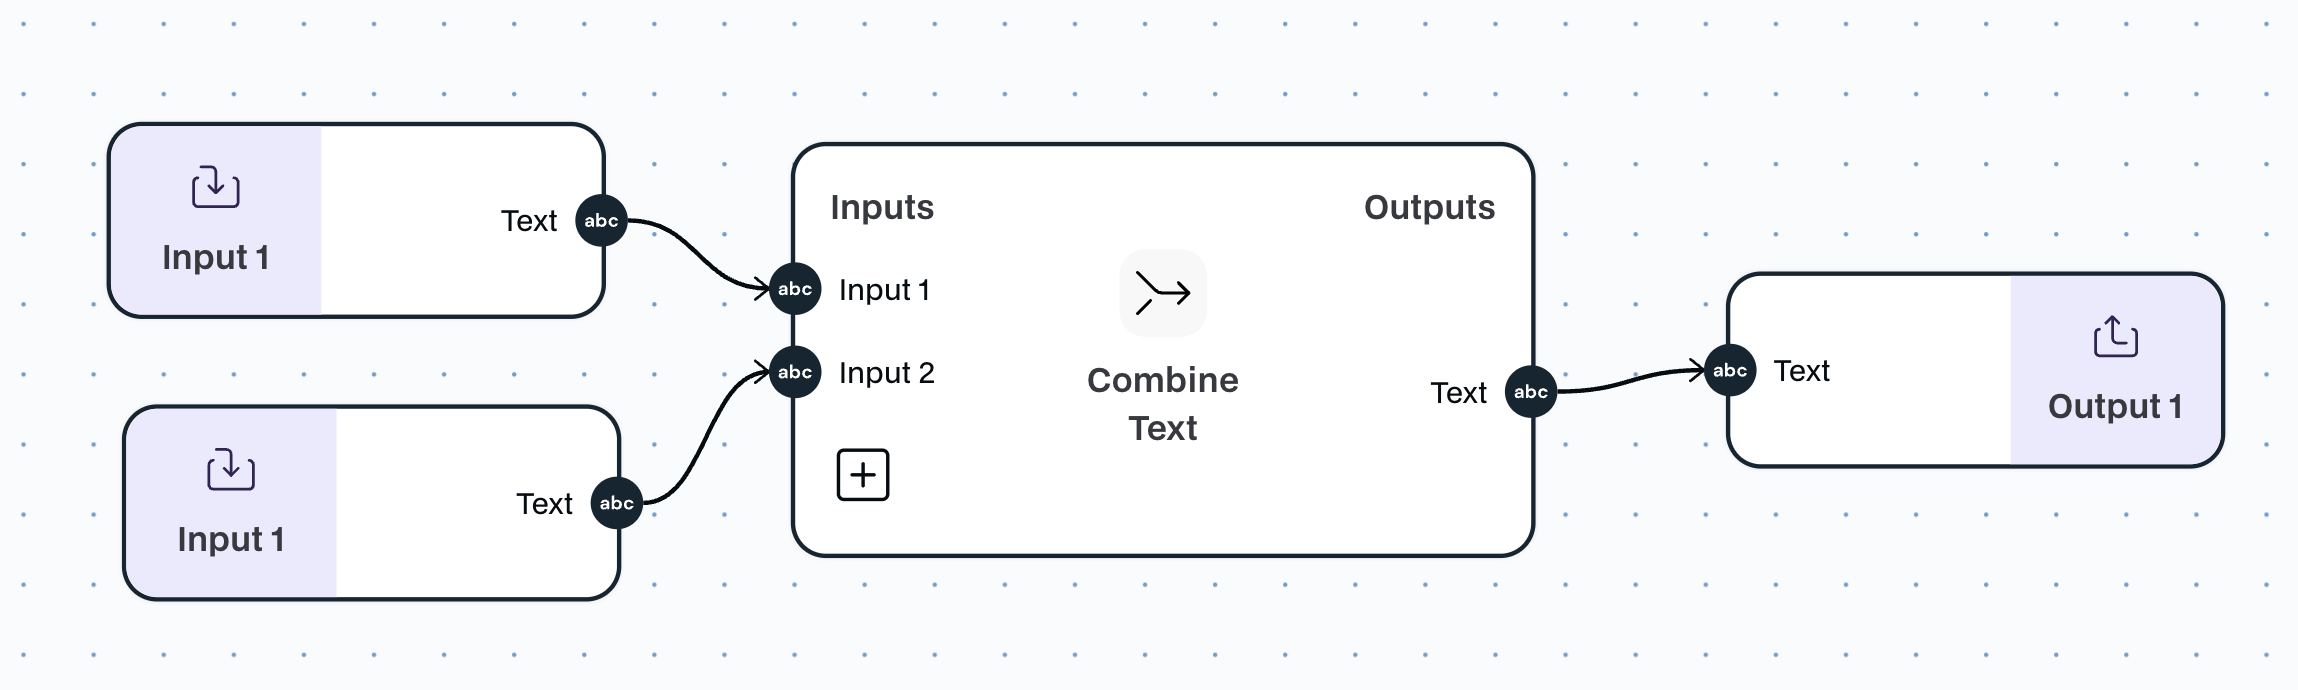 \n=== Documentation/Logic Modules/JoinPaths.mdx ===
---
title: "Join paths"
description: "Use this node after a conditional node to allow you to merge different execution paths"
---
Merges different execution paths after a conditional node and outputs the first complete value that it receives.
The `Join Paths` module has **variable inputs** and **one output**:
- **Input**: Can receive multiple inputs of type `text`;
- **Output**: is the first value from the inputs that has an actual value and is not empty.
Picture the image below, where after a conditional you have 2 paths, and then you merge them together to continue the flow.
\n=== Documentation/Logic Modules/JoinPaths.mdx ===
---
title: "Join paths"
description: "Use this node after a conditional node to allow you to merge different execution paths"
---
Merges different execution paths after a conditional node and outputs the first complete value that it receives.
The `Join Paths` module has **variable inputs** and **one output**:
- **Input**: Can receive multiple inputs of type `text`;
- **Output**: is the first value from the inputs that has an actual value and is not empty.
Picture the image below, where after a conditional you have 2 paths, and then you merge them together to continue the flow.
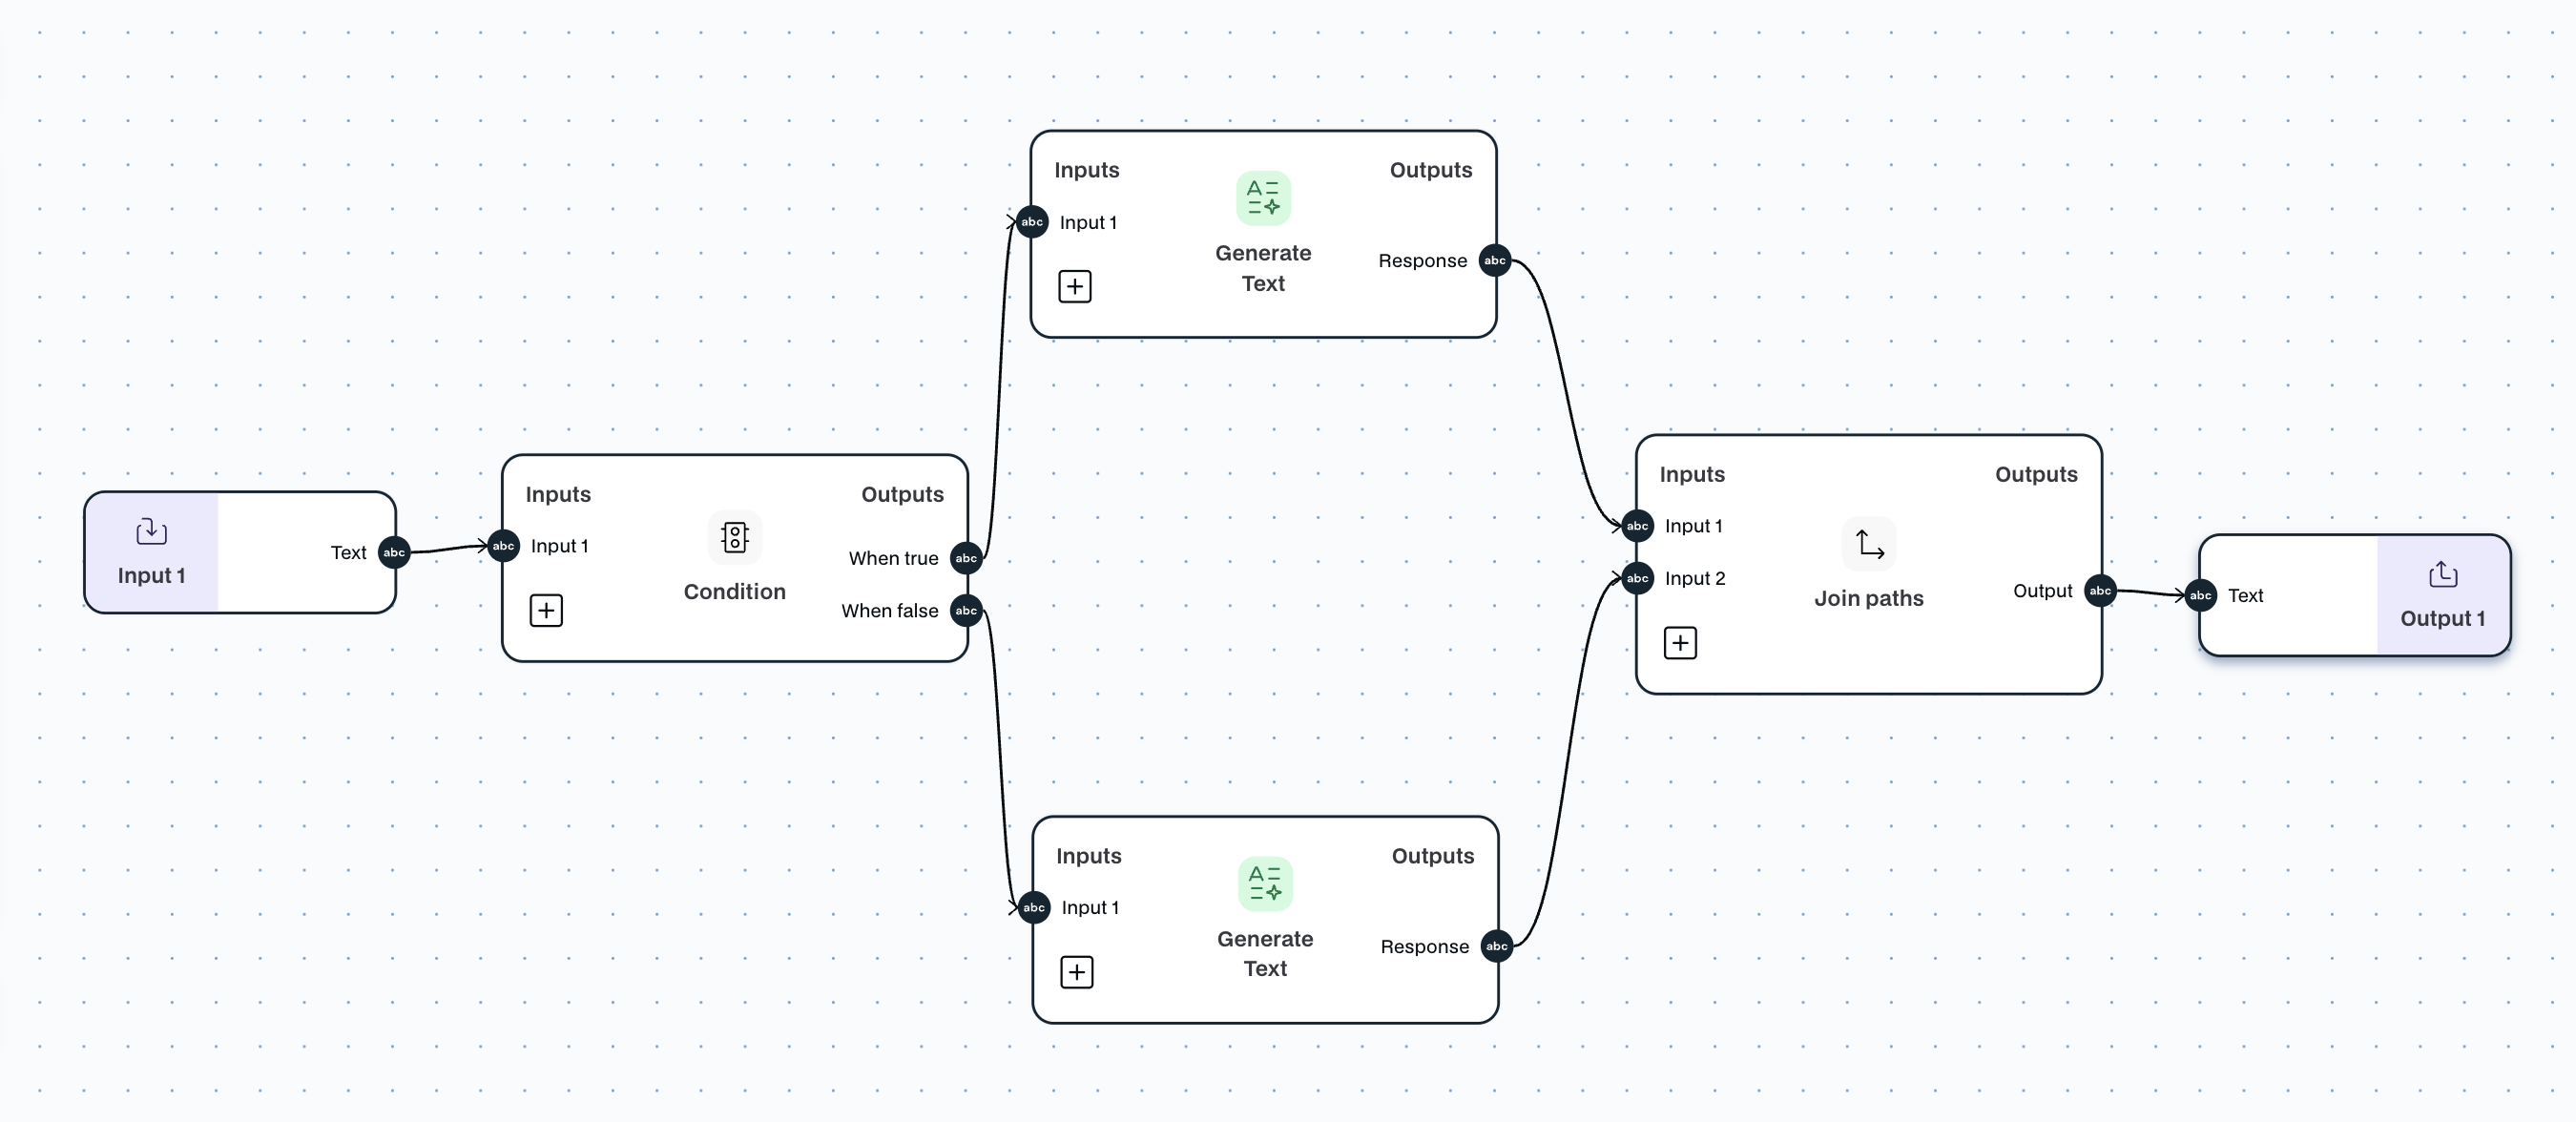 \n=== Documentation/Logic Modules/Filterlist.mdx ===
---
title: "Filter List Values"
description: "Filter values base on a specific condition or ask AI to filter it for you."
---
The `Filter List` module is a logic module that can Filter values based on a specific condition or ask AI to filter it for you. This module is particularly useful when removing content from a list that fits a certain condition.
The `Filter List` module has **one input** and **one output**:
- **Input**: `list`, receives any list
- **Output**: `list`, the list filtered out according to the defined condition.
In this module, there are two `Configurations`:
- **AI Condition**: This allows you to use AI to filter your values. All you have to do is describe the filter condition, `E.g., Exclude all values written in Portuguese.`
- **Value Type**: This allows you to select the type of value you are filtering, whether it is `Number` or `Text`, and apply specific conditions to each type
\n=== Documentation/Logic Modules/Filterlist.mdx ===
---
title: "Filter List Values"
description: "Filter values base on a specific condition or ask AI to filter it for you."
---
The `Filter List` module is a logic module that can Filter values based on a specific condition or ask AI to filter it for you. This module is particularly useful when removing content from a list that fits a certain condition.
The `Filter List` module has **one input** and **one output**:
- **Input**: `list`, receives any list
- **Output**: `list`, the list filtered out according to the defined condition.
In this module, there are two `Configurations`:
- **AI Condition**: This allows you to use AI to filter your values. All you have to do is describe the filter condition, `E.g., Exclude all values written in Portuguese.`
- **Value Type**: This allows you to select the type of value you are filtering, whether it is `Number` or `Text`, and apply specific conditions to each type
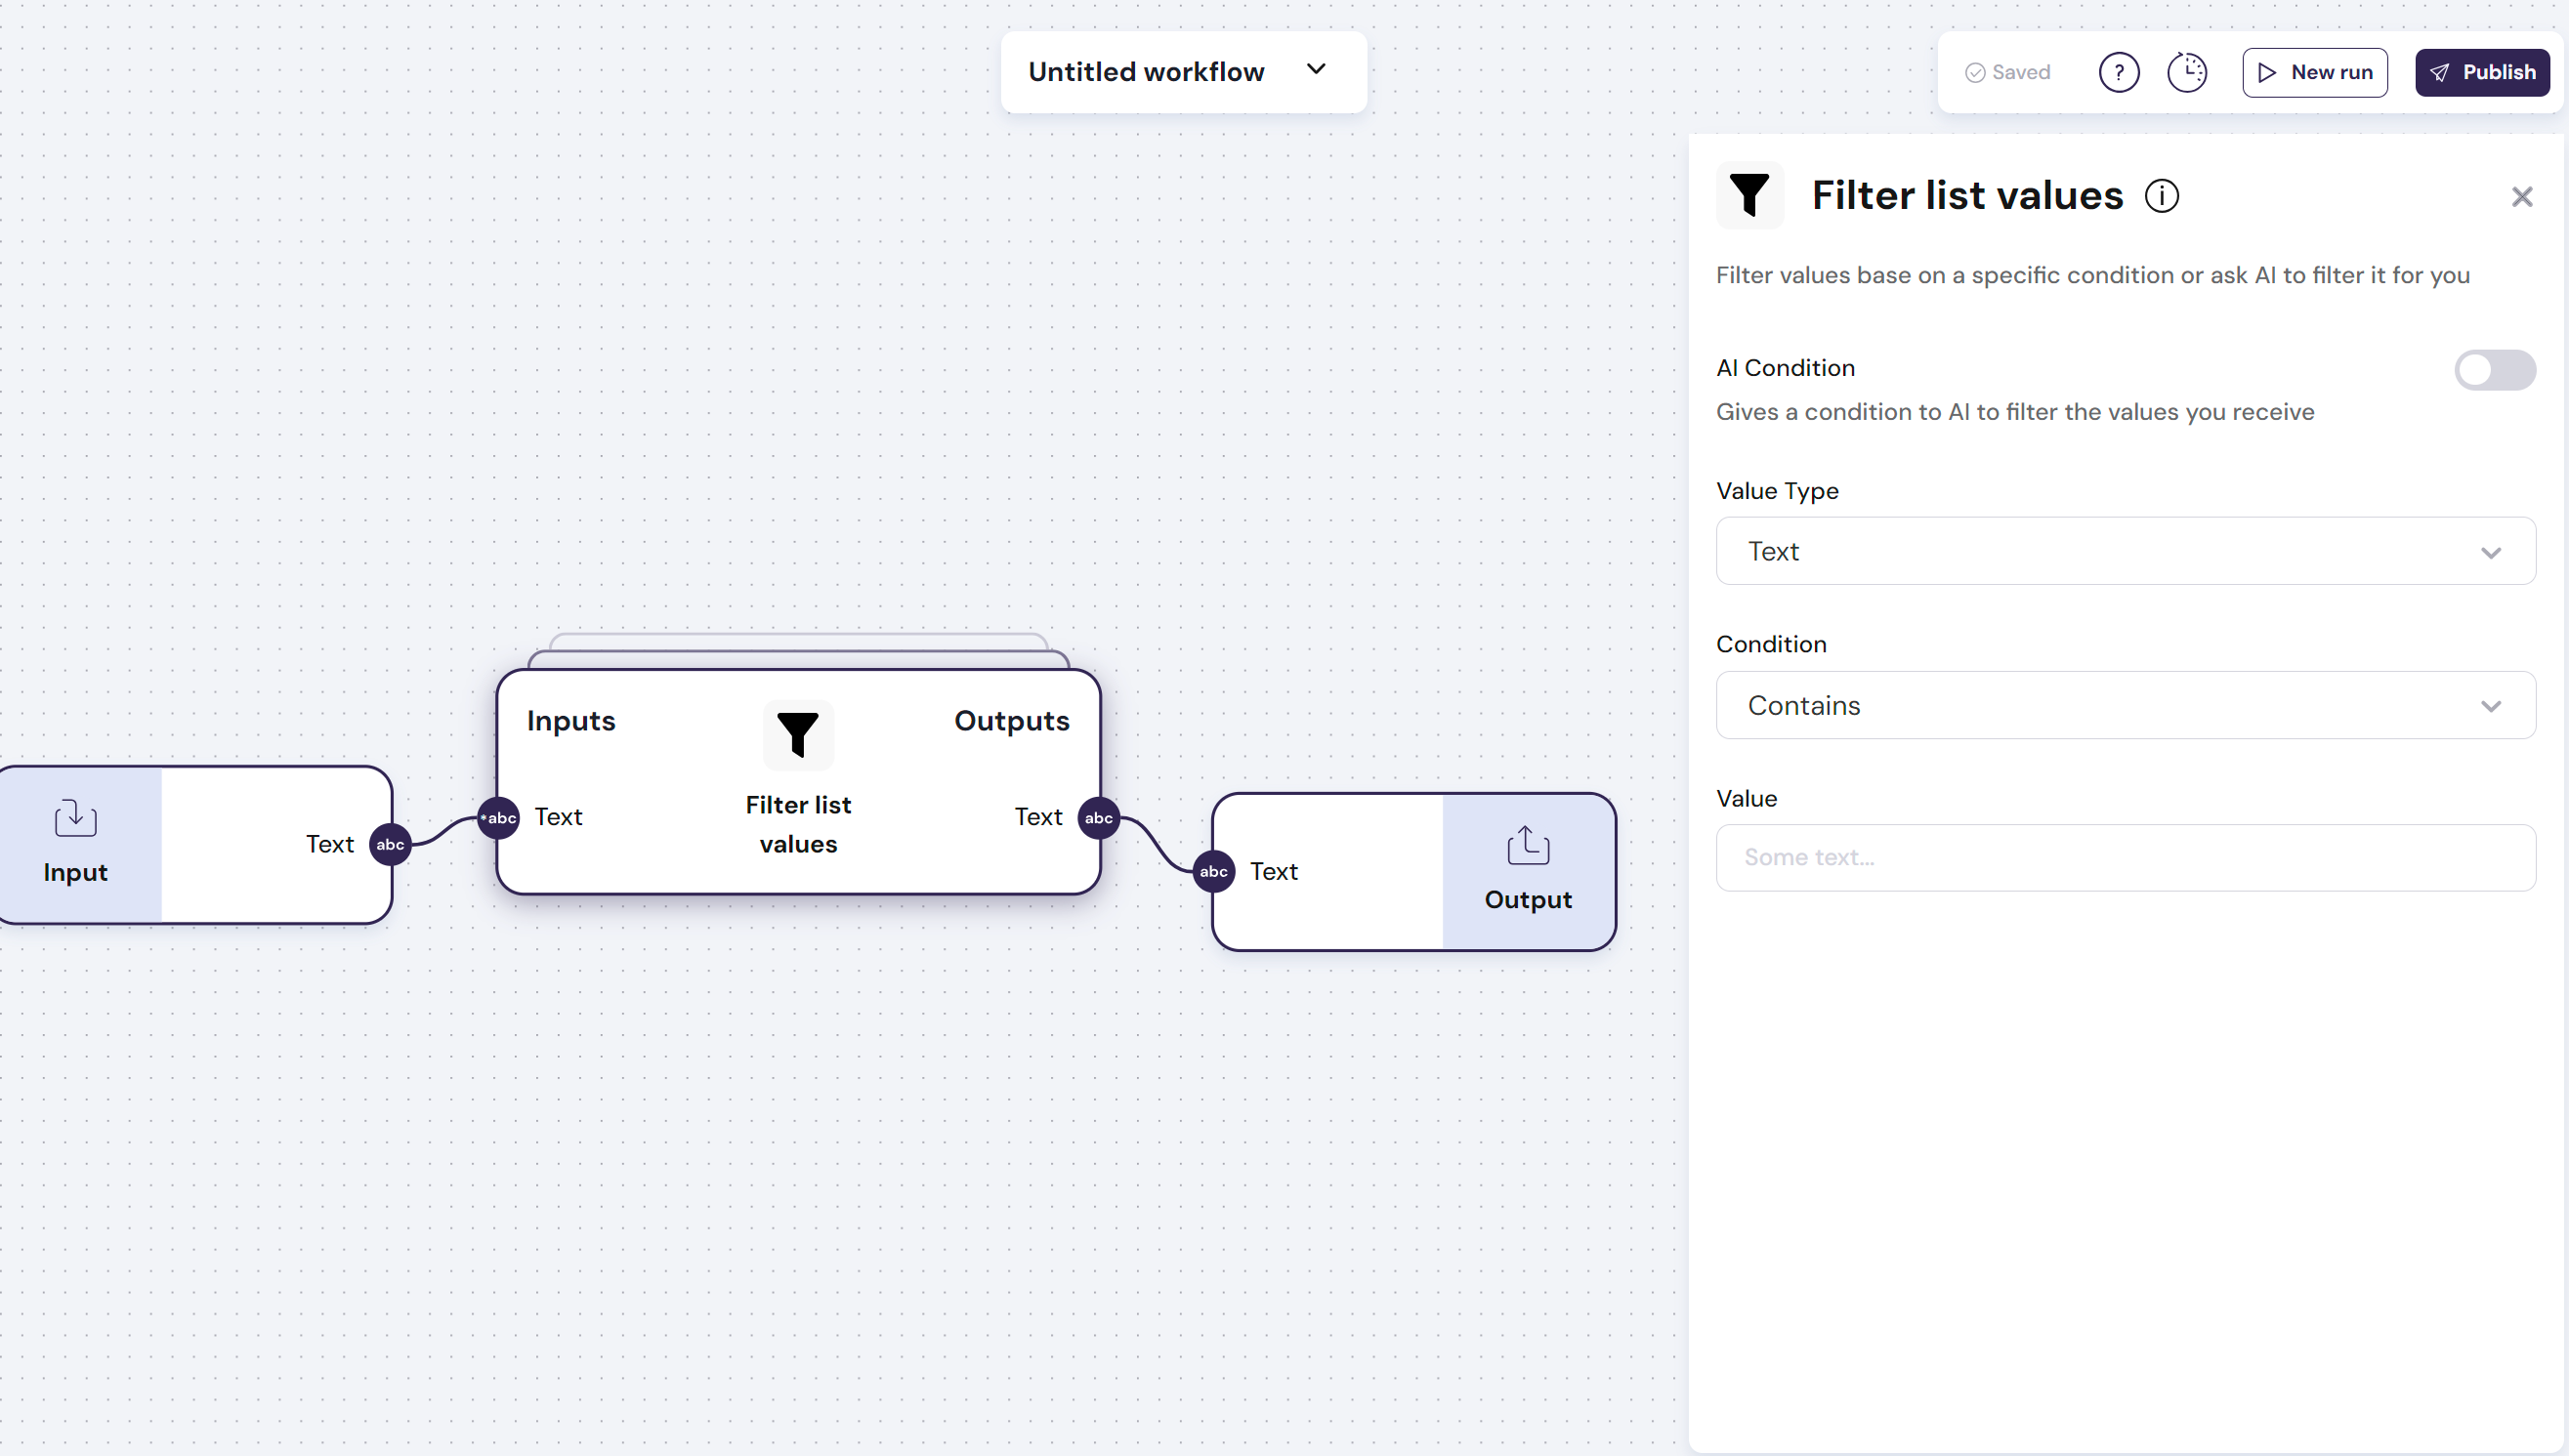 \n=== Documentation/Logic Modules/List2value.mdx ===
---
title: "List to Single Value"
description: "Transform a list into a single value separated by a paragraph or a selected character."
---
The `List to single value` module is a logic module that allows you to convert a list of text entries into a single value. This module is particularly useful for transforming a list of text read from a Google sheet into a text you can pass in a single prompt.
The module has **one input** and **one output**:
- **Input**: `list of text`, receives a list of text inputs
- **Output**: `Text`, the concatenation of the provided list according to the defined separation character
In the image below, the text list is being transformed into a single output separated by a `-`
\n=== Documentation/Logic Modules/List2value.mdx ===
---
title: "List to Single Value"
description: "Transform a list into a single value separated by a paragraph or a selected character."
---
The `List to single value` module is a logic module that allows you to convert a list of text entries into a single value. This module is particularly useful for transforming a list of text read from a Google sheet into a text you can pass in a single prompt.
The module has **one input** and **one output**:
- **Input**: `list of text`, receives a list of text inputs
- **Output**: `Text`, the concatenation of the provided list according to the defined separation character
In the image below, the text list is being transformed into a single output separated by a `-`
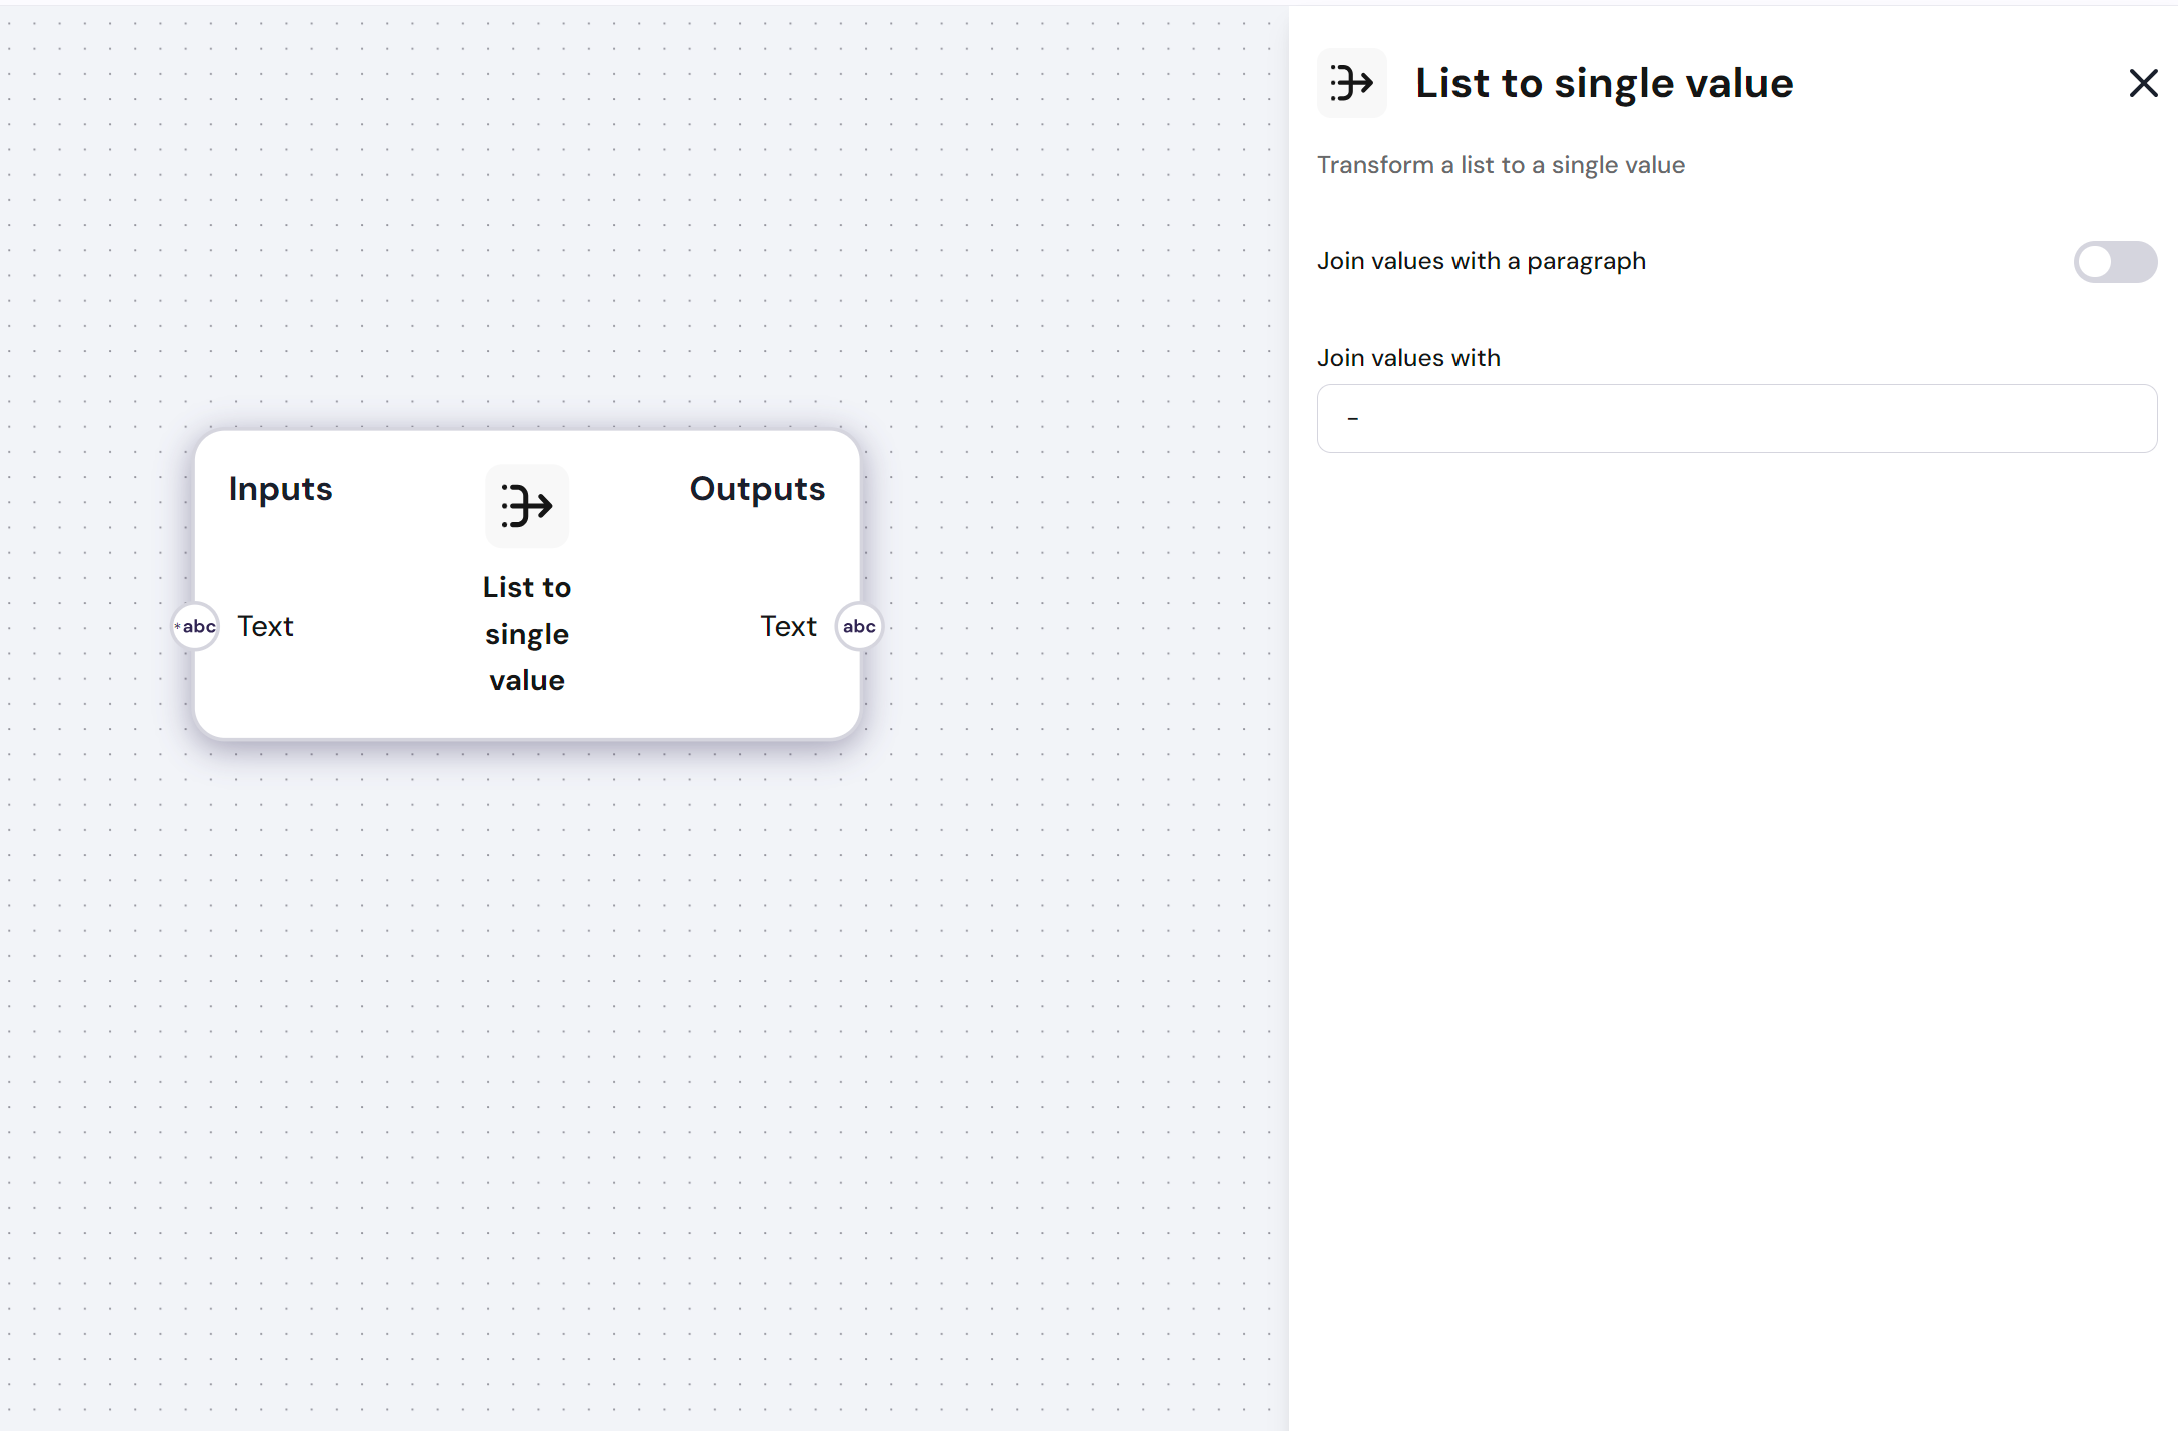 \n=== Documentation/Logic Modules/File to Text.mdx ===
---
title: 'File to Text TODO'
description: 'Reads a file format input and extracts its text.'
---
The `Read Webpage` module is a data module that can extract the text from a specific URL.
**You can use this module to provide live contextual information from a specific web page to an AI model.**
The `Read Webpage` module has **one input** and **one output**:
- **Input**: `URL`, the link to the webpage you want to scrape
- **Output**: `Text`, the text that was extracted from the webpage\n=== Documentation/Logic Modules/Extract Fields.mdx ===
---
title: "Extract Fields"
description: "Use AI to extract fields from a text and turn them into outputs"
---
The `Extract fields` module is a logic module that can extract important information from a text block. This module is particularly useful when extracting key variables from a text to store in a spreadsheet or database.
**You can use this module to parse a complex output and extract relevant information for the workflow**
This module has multiple configurations:
- **Outputs**
- Each output is one thing you want to take from the input and each one has
- **Field** - This is the name of the output for you to see in the workflow
- **Description** - **This is where you should explain what you want.**
- Eg. Let's say you want to find the date of when a document was emmited. In `Field` you write "Date", and in the `Description` you put "Date of emission"
- **Extracts as list**
- Enabling will extract values in a list
- **Extract first only**
- Enable if you want the module to only retrieve the first found value
The `Extract Information` module has **one input** and **variable outputs**:
- **Input**:
- `Text`, receives any text input
- **Output**:
- `Text`, can have unlimited text outputs; each output requires a proper description as those are leveraged by the AI agent to find the right information.
In this module, you can also use `Advanced Options` to select the AI model you want to use.
In the image below, the input is a file, which is tranformed to text in the File to Text node, and afterwards, we take the Date (Description: Date of emission) and Company (Description: Company responsible for the document) from the text.
\n=== Documentation/Logic Modules/File to Text.mdx ===
---
title: 'File to Text TODO'
description: 'Reads a file format input and extracts its text.'
---
The `Read Webpage` module is a data module that can extract the text from a specific URL.
**You can use this module to provide live contextual information from a specific web page to an AI model.**
The `Read Webpage` module has **one input** and **one output**:
- **Input**: `URL`, the link to the webpage you want to scrape
- **Output**: `Text`, the text that was extracted from the webpage\n=== Documentation/Logic Modules/Extract Fields.mdx ===
---
title: "Extract Fields"
description: "Use AI to extract fields from a text and turn them into outputs"
---
The `Extract fields` module is a logic module that can extract important information from a text block. This module is particularly useful when extracting key variables from a text to store in a spreadsheet or database.
**You can use this module to parse a complex output and extract relevant information for the workflow**
This module has multiple configurations:
- **Outputs**
- Each output is one thing you want to take from the input and each one has
- **Field** - This is the name of the output for you to see in the workflow
- **Description** - **This is where you should explain what you want.**
- Eg. Let's say you want to find the date of when a document was emmited. In `Field` you write "Date", and in the `Description` you put "Date of emission"
- **Extracts as list**
- Enabling will extract values in a list
- **Extract first only**
- Enable if you want the module to only retrieve the first found value
The `Extract Information` module has **one input** and **variable outputs**:
- **Input**:
- `Text`, receives any text input
- **Output**:
- `Text`, can have unlimited text outputs; each output requires a proper description as those are leveraged by the AI agent to find the right information.
In this module, you can also use `Advanced Options` to select the AI model you want to use.
In the image below, the input is a file, which is tranformed to text in the File to Text node, and afterwards, we take the Date (Description: Date of emission) and Company (Description: Company responsible for the document) from the text.
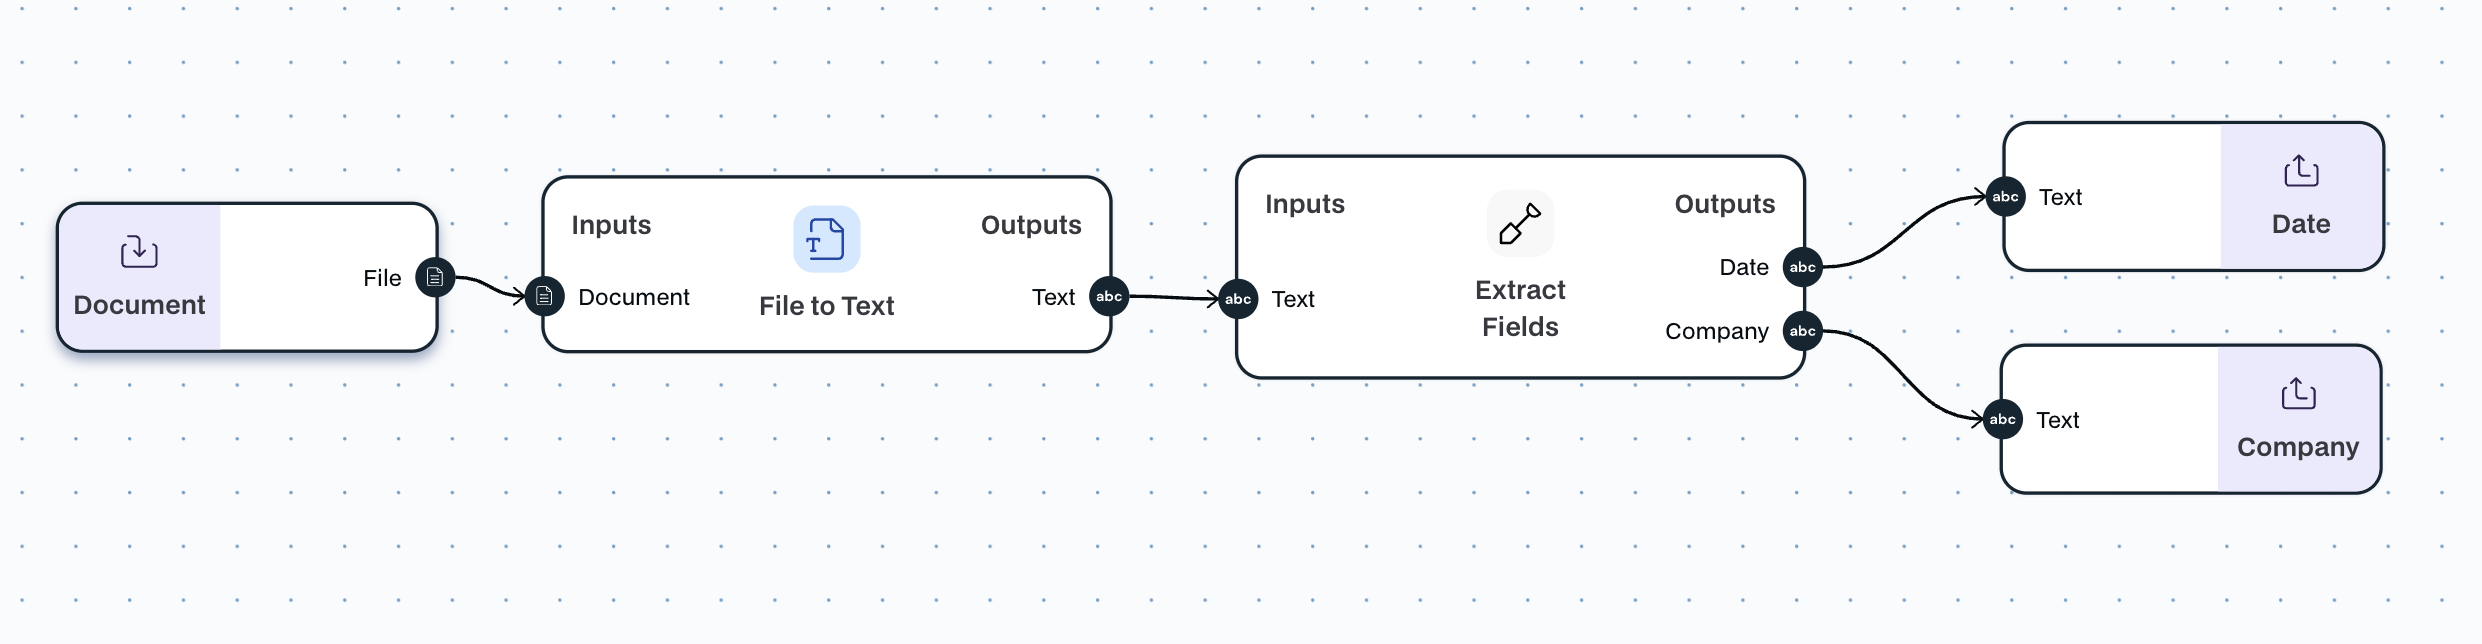 \n=== Documentation/Prompt/EnrichCompany.mdx ===
---
title: "Enrich Company"
description: "Extract relevant insights about an organization and its leadership"
---
The `Enrich Company` module allows you to enter the company's name and domain to automatically gather detailed insights, including an overview, key employees, funding rounds, and more.
> **if selecting 'Key People' as output, specify desired roles in the 'Key Positions to Search' input, otherwise co-founders will be searched.**
The `Enrich Company` module has **variable inputs** and **variable outputs**:
- **Inputs**: The module has to receive the `website domain` of the organization, the name of the organization and (optionally) the positions of the key people that you want to find
- **Output**:
- Report: An extensive report on the organization
- Incremental ouputs can be added with unique information on the organization: Industry, Country, City, Linkedin URL, Number of employees, Total funding, Funding rounds, Key People
- **Configs**:
- `Output as JSON`: If enabled, returns the result as a raw JSON result instead of a formatted markdown
- `Use Linkedin URL`, the search will be made via Linkedin URL instead of Website domain and name of the company
- `Key People As List`, Outputs all the key people found with the provided position in list format
\n=== Documentation/Prompt/EnrichCompany.mdx ===
---
title: "Enrich Company"
description: "Extract relevant insights about an organization and its leadership"
---
The `Enrich Company` module allows you to enter the company's name and domain to automatically gather detailed insights, including an overview, key employees, funding rounds, and more.
> **if selecting 'Key People' as output, specify desired roles in the 'Key Positions to Search' input, otherwise co-founders will be searched.**
The `Enrich Company` module has **variable inputs** and **variable outputs**:
- **Inputs**: The module has to receive the `website domain` of the organization, the name of the organization and (optionally) the positions of the key people that you want to find
- **Output**:
- Report: An extensive report on the organization
- Incremental ouputs can be added with unique information on the organization: Industry, Country, City, Linkedin URL, Number of employees, Total funding, Funding rounds, Key People
- **Configs**:
- `Output as JSON`: If enabled, returns the result as a raw JSON result instead of a formatted markdown
- `Use Linkedin URL`, the search will be made via Linkedin URL instead of Website domain and name of the company
- `Key People As List`, Outputs all the key people found with the provided position in list format
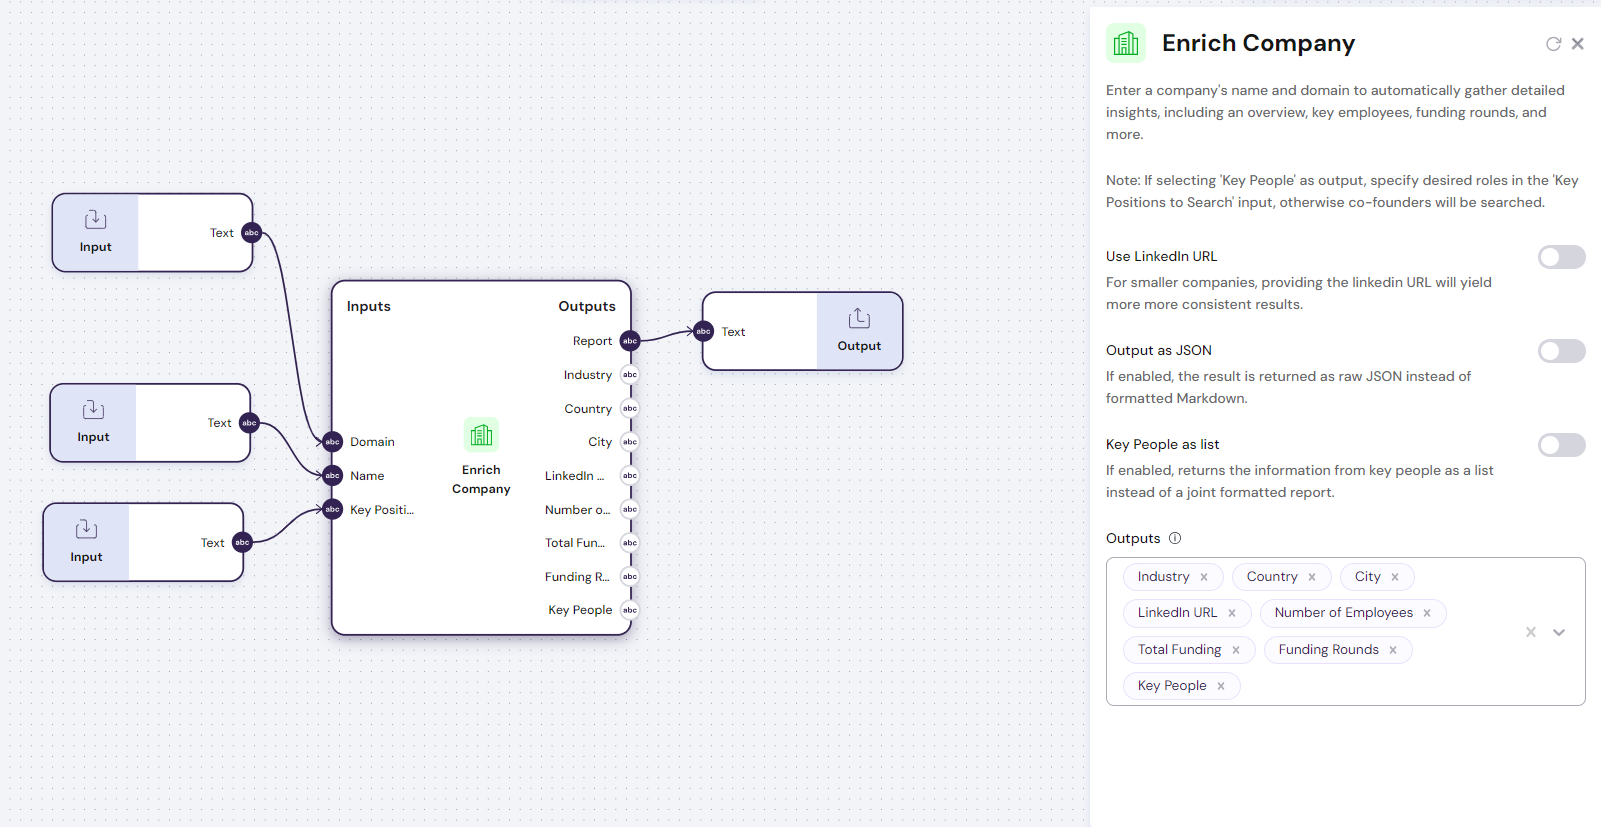 \n=== Documentation/Prompt/Select-model.mdx ===
---
title: "Select the right model"
---
Choosing the appropriate AI model is crucial to achieving the best results for your specific tasks.
Our platform offers a diverse range of models, each optimized for different use cases based on key metrics such as quality, output speed, and token window size. This guide will help you understand these metrics and select the most suitable model for your needs.
## Key Metrics to Consider
- **Quality:** Determines how well the model performs the task, including the accuracy and relevance of its responses.
- **Output Speed:** Refers to how quickly the model generates responses, which can be critical for time-sensitive applications.
- **Token Window Size:** The maximum number of tokens (words or characters) the model can process in a single prompt. Larger token windows allow the model to handle more extensive and complex inputs.
## How to Choose the Right Model
### 1. Assess Your Task Requirements
- **Complexity:** More complex tasks, such as in-depth analysis or multi-step problem-solving, may require models with higher quality and larger token windows.
- **Volume of Data:** Tasks involving large datasets or long-form content benefit from models with extended token windows.
- **Response Time:** If your application demands quick responses, prioritize models known for faster output speeds.
### 2. Match Metrics to Task Needs
- **High Quality & Large Token Window:** Ideal for comprehensive reports, detailed analyses, and tasks requiring nuanced understanding.
- **Balanced Quality & Speed:** Suitable for everyday applications like customer support, content generation, and interactive chatbots.
- **Fast Output & Smaller Token Window:** Best for simple queries, real-time interactions, and applications where speed is more critical than depth.
### 3. Utilize Platform Features
\n=== Documentation/Prompt/Select-model.mdx ===
---
title: "Select the right model"
---
Choosing the appropriate AI model is crucial to achieving the best results for your specific tasks.
Our platform offers a diverse range of models, each optimized for different use cases based on key metrics such as quality, output speed, and token window size. This guide will help you understand these metrics and select the most suitable model for your needs.
## Key Metrics to Consider
- **Quality:** Determines how well the model performs the task, including the accuracy and relevance of its responses.
- **Output Speed:** Refers to how quickly the model generates responses, which can be critical for time-sensitive applications.
- **Token Window Size:** The maximum number of tokens (words or characters) the model can process in a single prompt. Larger token windows allow the model to handle more extensive and complex inputs.
## How to Choose the Right Model
### 1. Assess Your Task Requirements
- **Complexity:** More complex tasks, such as in-depth analysis or multi-step problem-solving, may require models with higher quality and larger token windows.
- **Volume of Data:** Tasks involving large datasets or long-form content benefit from models with extended token windows.
- **Response Time:** If your application demands quick responses, prioritize models known for faster output speeds.
### 2. Match Metrics to Task Needs
- **High Quality & Large Token Window:** Ideal for comprehensive reports, detailed analyses, and tasks requiring nuanced understanding.
- **Balanced Quality & Speed:** Suitable for everyday applications like customer support, content generation, and interactive chatbots.
- **Fast Output & Smaller Token Window:** Best for simple queries, real-time interactions, and applications where speed is more critical than depth.
### 3. Utilize Platform Features
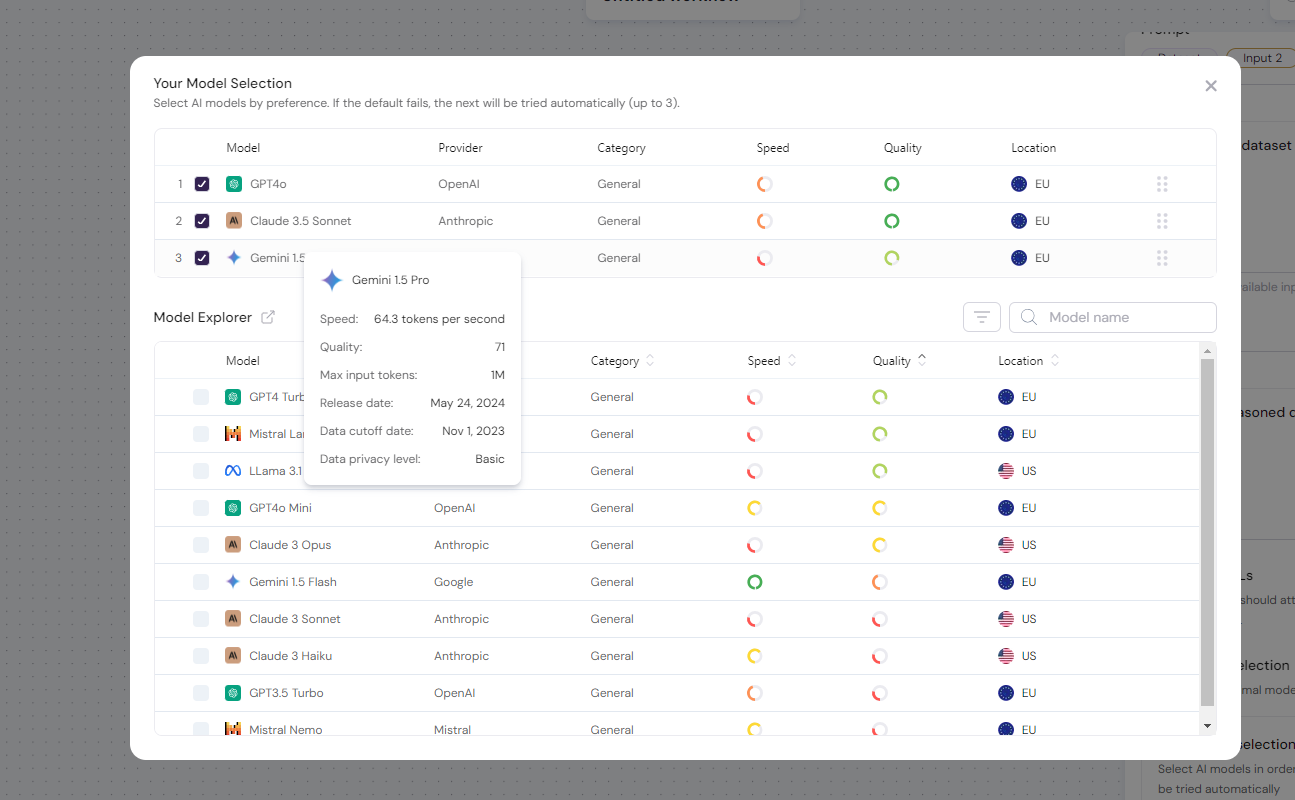 \n=== Documentation/Prompt/Multishot.mdx ===
---
title: 'Examples to Guide the AI'
---
Including examples in your prompts is a powerful technique to steer AI models toward producing the outputs you desire. By providing a few well-chosen examples, you can significantly enhance the accuracy, consistency, and quality of the AI's responses.
This method, often referred to as **few-shot** or **multishot prompting**, is especially effective for tasks that require the AI to follow specific formats or produce structured content.
\n=== Documentation/Prompt/Multishot.mdx ===
---
title: 'Examples to Guide the AI'
---
Including examples in your prompts is a powerful technique to steer AI models toward producing the outputs you desire. By providing a few well-chosen examples, you can significantly enhance the accuracy, consistency, and quality of the AI's responses.
This method, often referred to as **few-shot** or **multishot prompting**, is especially effective for tasks that require the AI to follow specific formats or produce structured content.
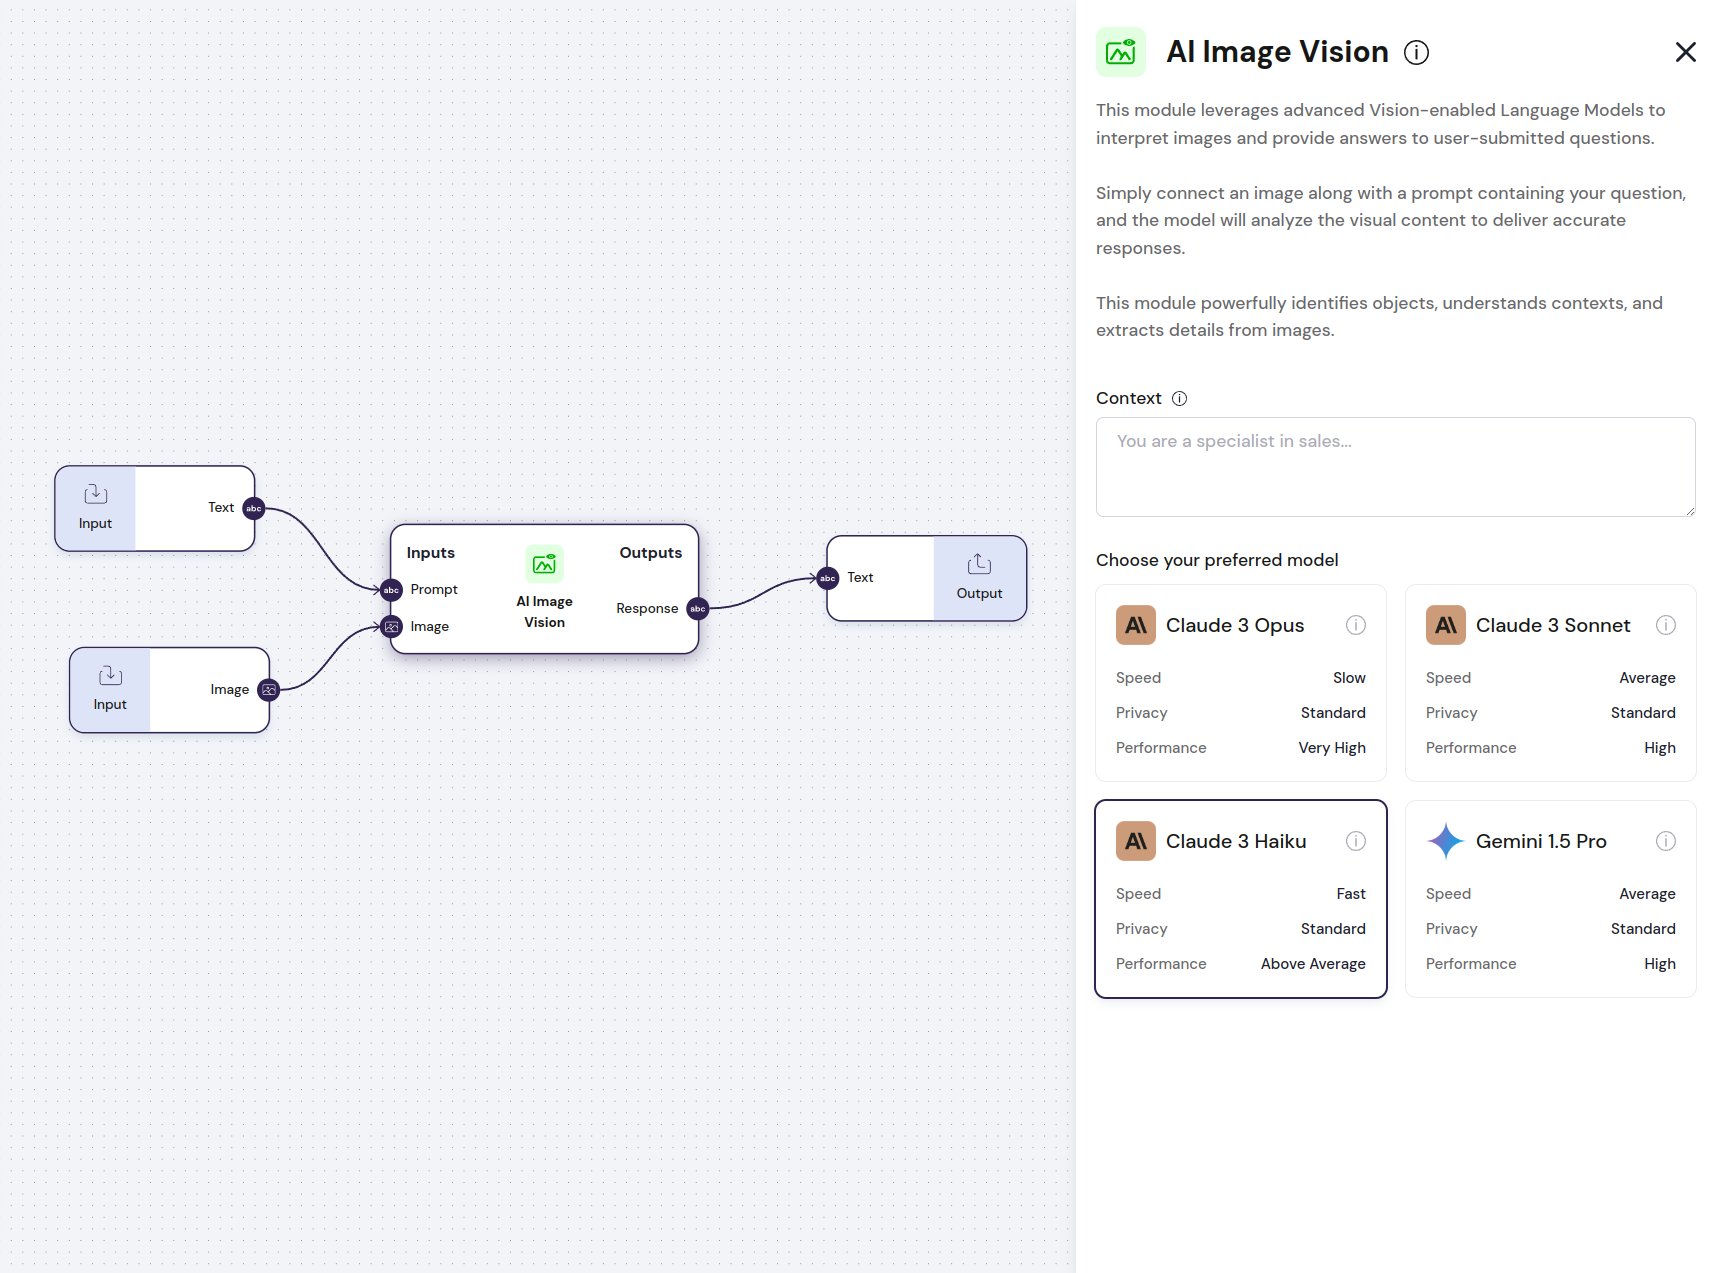 \n=== Documentation/Prompt/Overview.mdx ===
---
title: "Overview"
---
Welcome to our comprehensive guide on **Prompt Engineering** — your essential resource for effectively communicating with AI language models like GPT, Gemini, Claude and others. Whether you're an educator, professional, creative, or simply curious about AI, this guide is designed to help you harness the potential of AI without needing technical expertise.
## What is Prompt Engineering?
Prompt engineering is the practice of crafting questions or instructions (prompts) that guide AI models to produce the most helpful and relevant responses. It's akin to asking the right questions to get the best answers from a knowledgeable friend.
## Why Does Prompt Engineering Matter?
The quality of the AI's response is heavily influenced by how you frame your prompt. By mastering prompt engineering, you can:
- **Enhance Clarity:** Receive precise and accurate answers.
- **Boost Productivity:** Save time on tasks like content creation, brainstorming, and problem-solving.
- **Unlock Creativity:** Generate innovative ideas and solutions.
## How to Use This Guide
We've organized the prompt engineering techniques from the most universally effective to more specialized methods. When aiming to improve AI performance, we recommend trying these techniques in order, though their impact may vary based on your specific needs.
### Prompt Engineering Techniques:
1. [**Clear and Concise Language**](/Documentation/Prompt/CCT)
2. [**Few-Shot Prompting**](/Documentation/Prompt/Multishot)
3. [**Let the AI Think**](/Documentation/Prompt/let-the-ai-think)
4. [**Assign a Role to the AI**](/Documentation/Prompt/assign-role-to-ai)
5. [**Selecting the right AI Model**](/Documentation/Prompt/Select-model)
## Our Goal
By the end of this guide, you'll be able to:
- Craft effective prompts that yield useful and accurate AI responses.
- Troubleshoot and refine prompts to improve outcomes.
- Utilize AI as a powerful tool to enhance your personal and professional life.
\n=== Documentation/Prompt/AI Image Transformation.mdx ===
---
title: "Transform Image"
description: "Generate or transform images using source images and advanced techniques such as style transfer or conditional generation."
---
The `Transform Image` module can use any of the state-of-the-art AI models to generate images from another image and a prompt instruction.
**You can use this module to change the style of your photos, create alternative images of your face, and much more**
The `Transform Image` module has **two inputs** and **one output**:
- **Input**: `Prompt`, describes the image the model should generate, including artistic references and styles.
- **Output**: `Image`, returns the output from the AI model based on the `Prompt` inputs provided.
- **Configs**: `width` and `height` of the image generated
\n=== Documentation/Prompt/Overview.mdx ===
---
title: "Overview"
---
Welcome to our comprehensive guide on **Prompt Engineering** — your essential resource for effectively communicating with AI language models like GPT, Gemini, Claude and others. Whether you're an educator, professional, creative, or simply curious about AI, this guide is designed to help you harness the potential of AI without needing technical expertise.
## What is Prompt Engineering?
Prompt engineering is the practice of crafting questions or instructions (prompts) that guide AI models to produce the most helpful and relevant responses. It's akin to asking the right questions to get the best answers from a knowledgeable friend.
## Why Does Prompt Engineering Matter?
The quality of the AI's response is heavily influenced by how you frame your prompt. By mastering prompt engineering, you can:
- **Enhance Clarity:** Receive precise and accurate answers.
- **Boost Productivity:** Save time on tasks like content creation, brainstorming, and problem-solving.
- **Unlock Creativity:** Generate innovative ideas and solutions.
## How to Use This Guide
We've organized the prompt engineering techniques from the most universally effective to more specialized methods. When aiming to improve AI performance, we recommend trying these techniques in order, though their impact may vary based on your specific needs.
### Prompt Engineering Techniques:
1. [**Clear and Concise Language**](/Documentation/Prompt/CCT)
2. [**Few-Shot Prompting**](/Documentation/Prompt/Multishot)
3. [**Let the AI Think**](/Documentation/Prompt/let-the-ai-think)
4. [**Assign a Role to the AI**](/Documentation/Prompt/assign-role-to-ai)
5. [**Selecting the right AI Model**](/Documentation/Prompt/Select-model)
## Our Goal
By the end of this guide, you'll be able to:
- Craft effective prompts that yield useful and accurate AI responses.
- Troubleshoot and refine prompts to improve outcomes.
- Utilize AI as a powerful tool to enhance your personal and professional life.
\n=== Documentation/Prompt/AI Image Transformation.mdx ===
---
title: "Transform Image"
description: "Generate or transform images using source images and advanced techniques such as style transfer or conditional generation."
---
The `Transform Image` module can use any of the state-of-the-art AI models to generate images from another image and a prompt instruction.
**You can use this module to change the style of your photos, create alternative images of your face, and much more**
The `Transform Image` module has **two inputs** and **one output**:
- **Input**: `Prompt`, describes the image the model should generate, including artistic references and styles.
- **Output**: `Image`, returns the output from the AI model based on the `Prompt` inputs provided.
- **Configs**: `width` and `height` of the image generated
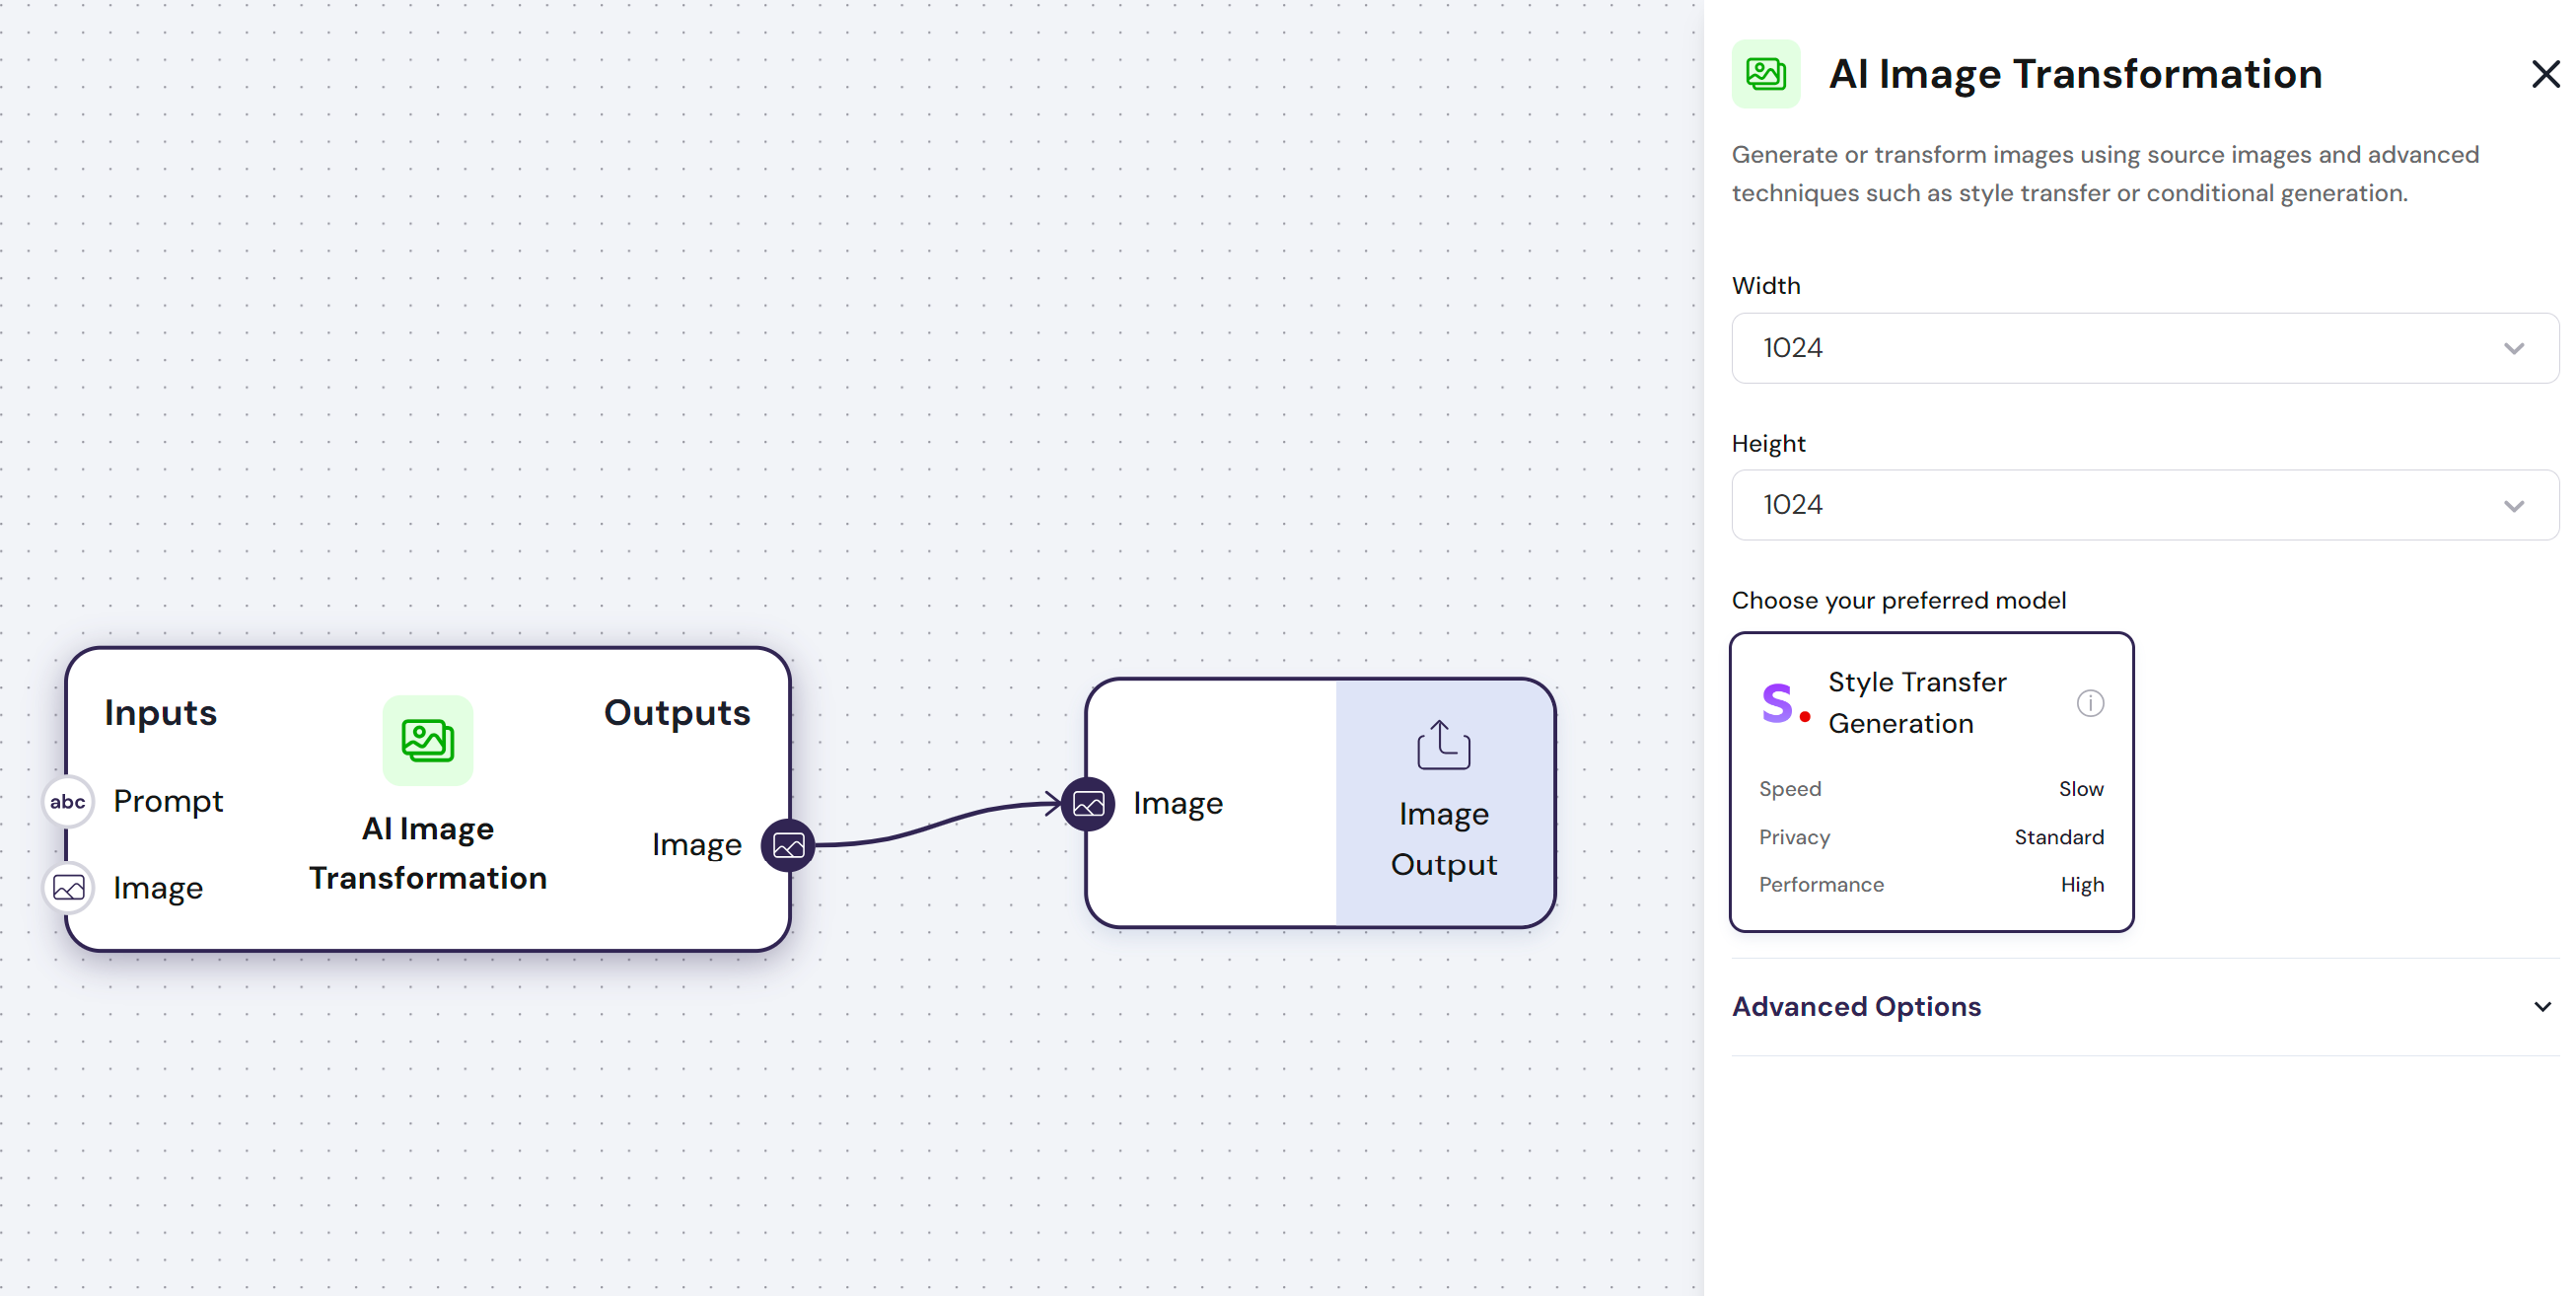 \n=== Documentation/Prompt/AI Text Creation.mdx ===
---
title: "Generate Text"
description: "Generate text using any of the state-of-the-art AI models"
---
The `Generate Text` module can use any of the state-of-the-art AI models to generate text.
**You can use this module to perform intelligent tasks in your workflow**
The `Generate Text` module has **variable inputs** and **one output**:
- **Inputs**: The module can receive any number of inputs that can be used to create a `Prompt`, The `Prompt` contains the instruction for the AI model. For example, a `Prompt` can be: “Classify these AI models according to pricing criteria and performance,” along with the list of AI models to classify.
- **Output**: `Response`, The `Response` returns the output from the AI model based on the `Context` and `Prompt` inputs provided.
- **Configs**:
- `Read Image URLs`, the LLM will attempt to read the images when presented with an image URL
- `Context`, The `Context` describes the behavioral information in detail. You can reference the profession, personality traits, or behaviors you expect. For example, “you are an AI expert.”
- `AI Models`, This module can be tested with all the best models in the market, or the ones that work best for a specific use case.
\n=== Documentation/Prompt/AI Text Creation.mdx ===
---
title: "Generate Text"
description: "Generate text using any of the state-of-the-art AI models"
---
The `Generate Text` module can use any of the state-of-the-art AI models to generate text.
**You can use this module to perform intelligent tasks in your workflow**
The `Generate Text` module has **variable inputs** and **one output**:
- **Inputs**: The module can receive any number of inputs that can be used to create a `Prompt`, The `Prompt` contains the instruction for the AI model. For example, a `Prompt` can be: “Classify these AI models according to pricing criteria and performance,” along with the list of AI models to classify.
- **Output**: `Response`, The `Response` returns the output from the AI model based on the `Context` and `Prompt` inputs provided.
- **Configs**:
- `Read Image URLs`, the LLM will attempt to read the images when presented with an image URL
- `Context`, The `Context` describes the behavioral information in detail. You can reference the profession, personality traits, or behaviors you expect. For example, “you are an AI expert.”
- `AI Models`, This module can be tested with all the best models in the market, or the ones that work best for a specific use case.
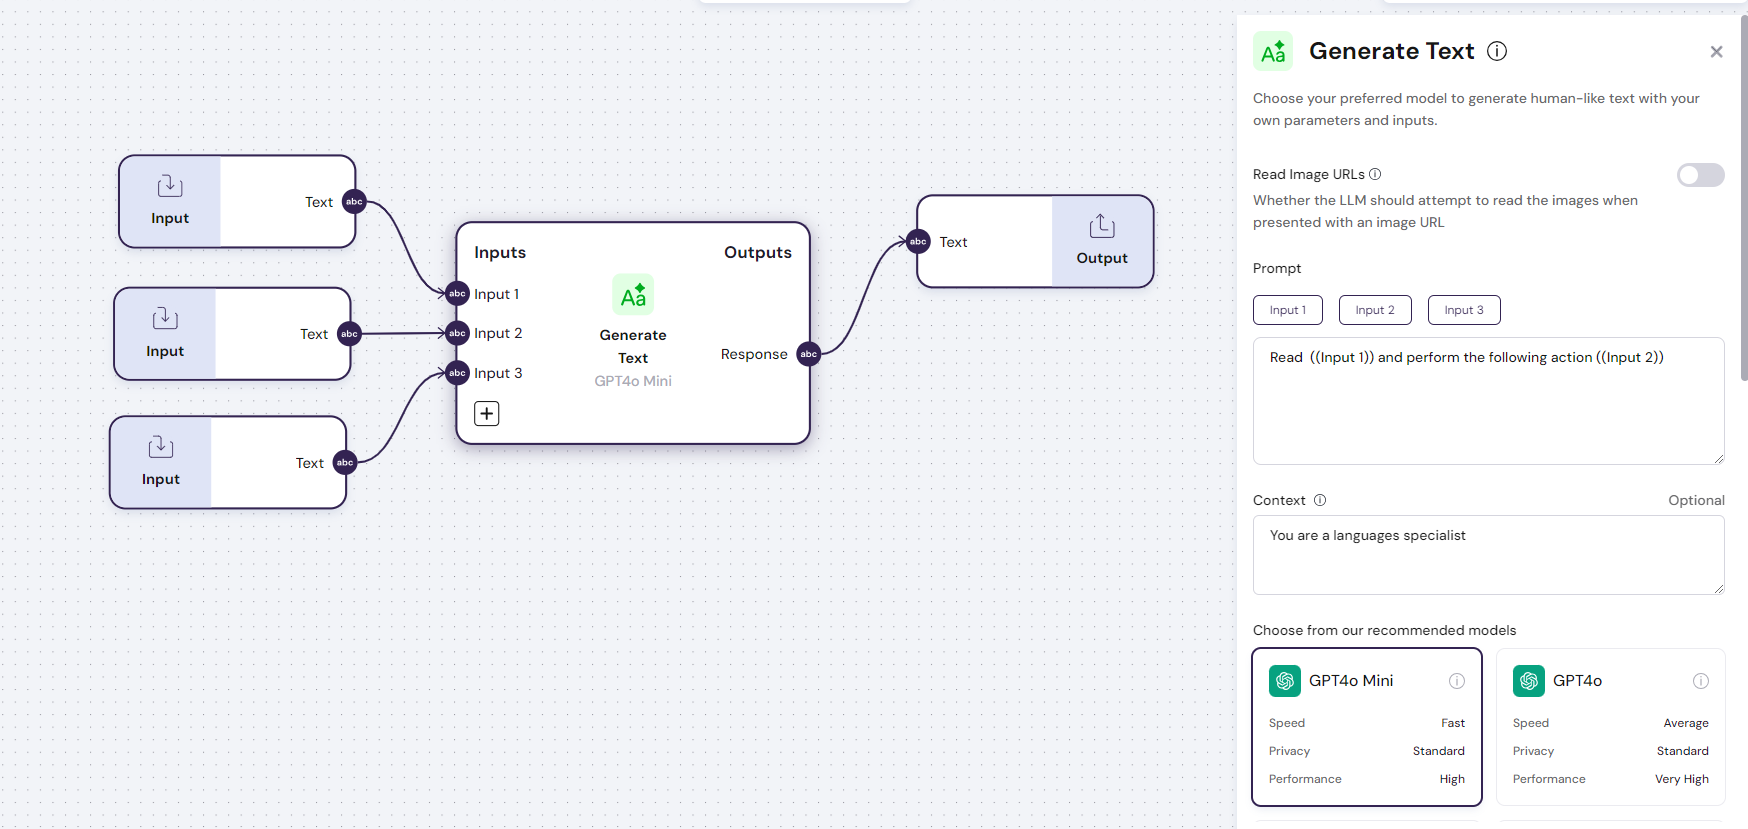 \n=== Documentation/Prompt/CCT.mdx ===
---
title: 'Clear and Concise Language'
---
To achieve the best results when working with AI models, it's essential to use clear and specific language in your prompts. Imagine the AI as a skilled assistant who requires detailed instructions to perform effectively. The more unambiguous and straightforward your prompts are, the better the AI can understand and fulfill your requests.
\n=== Documentation/Prompt/CCT.mdx ===
---
title: 'Clear and Concise Language'
---
To achieve the best results when working with AI models, it's essential to use clear and specific language in your prompts. Imagine the AI as a skilled assistant who requires detailed instructions to perform effectively. The more unambiguous and straightforward your prompts are, the better the AI can understand and fulfill your requests.
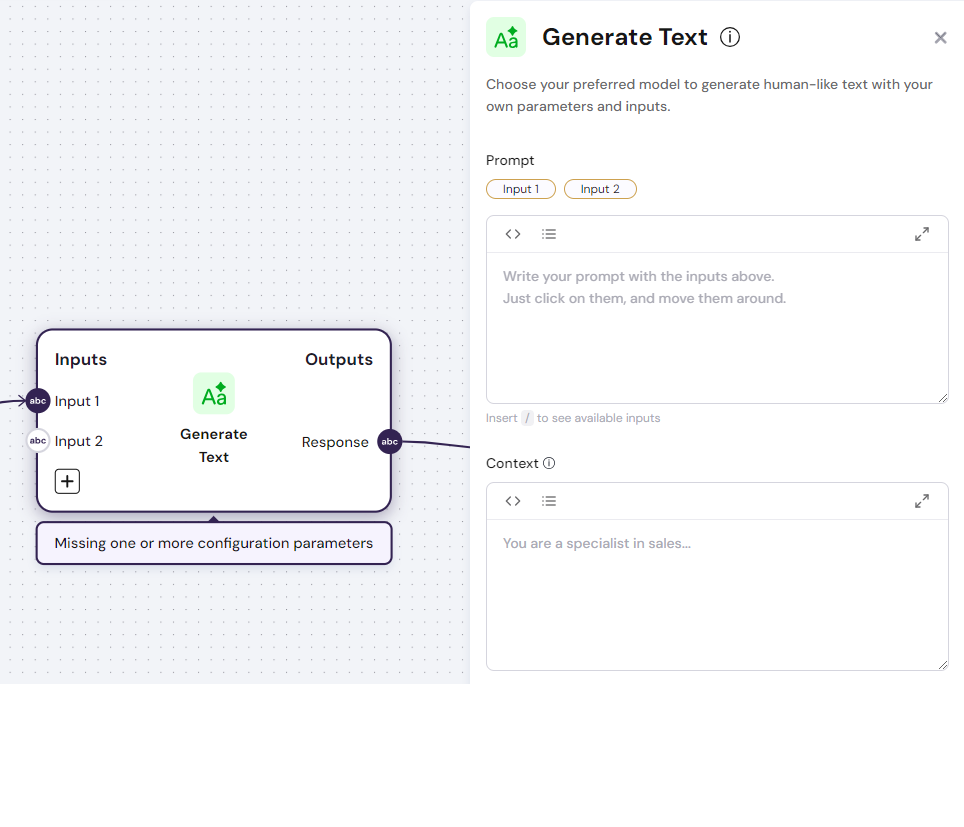 ## Example Setup
1. **Access the Context Box:** Navigate to your AI node and locate the **Context** text box.
2. **Define the Role:** Enter a clear and specific role prompt that outlines the AI's expertise and perspective.
**Example:**
## Example Setup
1. **Access the Context Box:** Navigate to your AI node and locate the **Context** text box.
2. **Define the Role:** Enter a clear and specific role prompt that outlines the AI's expertise and perspective.
**Example:**
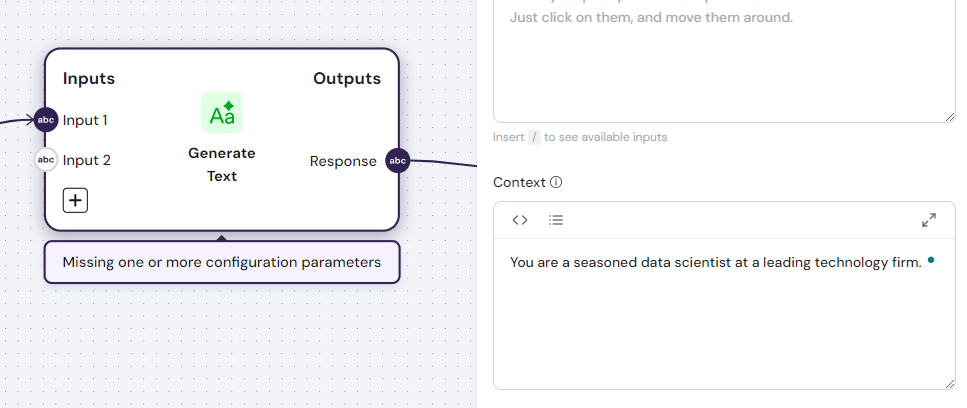 3. **Add Task-Specific Instructions:** In the Prompt text box, provide the specific instructions for the AI to follow.
**Example:**
3. **Add Task-Specific Instructions:** In the Prompt text box, provide the specific instructions for the AI to follow.
**Example:**
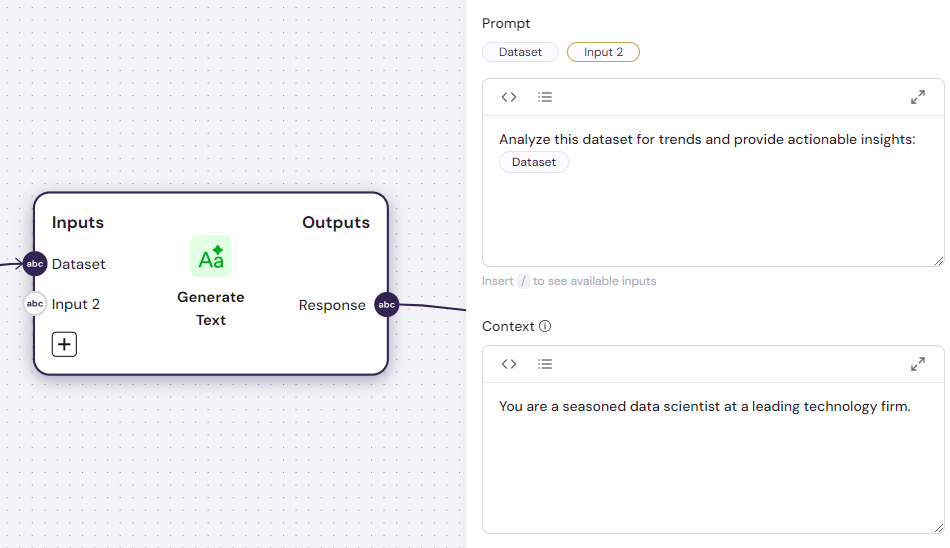
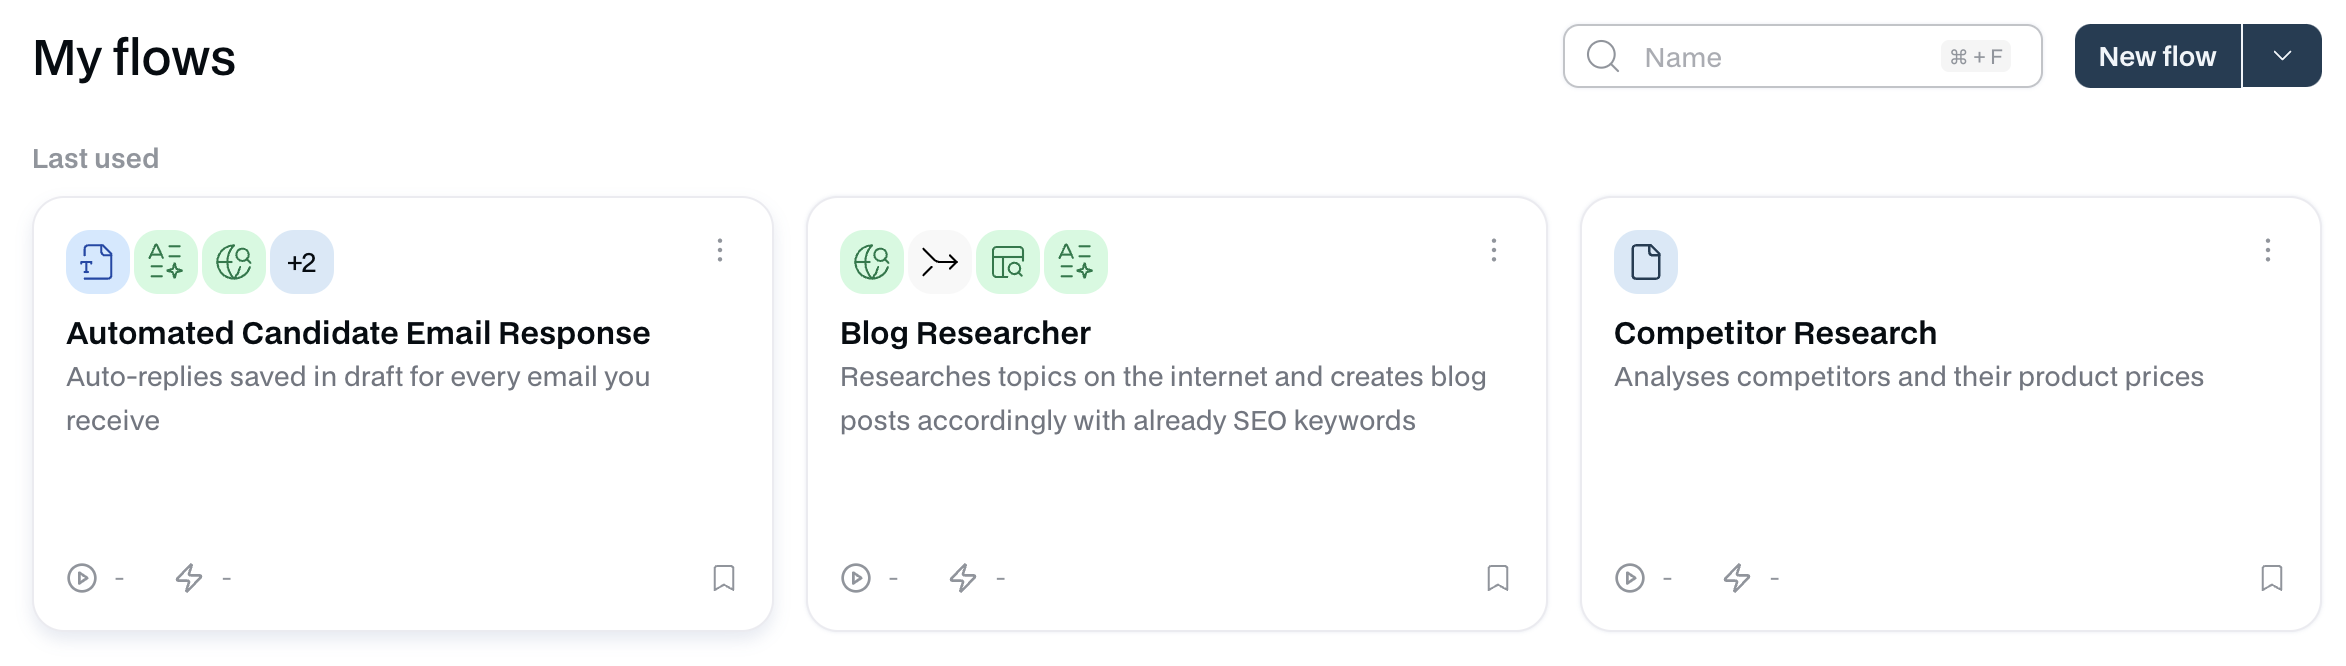 The workflow builder comprises the **Navigation Bar**, on the left, where you can find all the nodes to build your workflow - and the **Top Bar** - where you can Run and see past runs of your workflow.
 ## 2. Navigation Bar
The Navigation Bar is the library of modules aggregated by key functionality. Each module in the workflow builder is documented with a detailed explanation of their behavior.
- **Data Modules** 🗂️: These modules allow you to transform and import data of multiple types and sources
- **Logic Modules** 🧩: These modules are designed to help you build more complex workflows by combining text from different nodes, extracting specific information, or running things in parallel
- **AI Modules** ✨: Includes state-of-the-art text, image and audio AI models
- **Integration Modules** 🔗: Including integrations with tools such as Gmail, Google Drive, Google Sheets, Google Docs, Airtable, Notion, Confluence, and others
- **Sub Flows** 🛠️: Use other Flows you have as a node. Great to simplify big workflows!
## 3. Builder canvas
The builder canvas is where you can let your creativity flourish and build automation that makes your life 10x more efficient and productive.
You can connect modules with the same data types together. Just take this very basic example:
## 2. Navigation Bar
The Navigation Bar is the library of modules aggregated by key functionality. Each module in the workflow builder is documented with a detailed explanation of their behavior.
- **Data Modules** 🗂️: These modules allow you to transform and import data of multiple types and sources
- **Logic Modules** 🧩: These modules are designed to help you build more complex workflows by combining text from different nodes, extracting specific information, or running things in parallel
- **AI Modules** ✨: Includes state-of-the-art text, image and audio AI models
- **Integration Modules** 🔗: Including integrations with tools such as Gmail, Google Drive, Google Sheets, Google Docs, Airtable, Notion, Confluence, and others
- **Sub Flows** 🛠️: Use other Flows you have as a node. Great to simplify big workflows!
## 3. Builder canvas
The builder canvas is where you can let your creativity flourish and build automation that makes your life 10x more efficient and productive.
You can connect modules with the same data types together. Just take this very basic example:
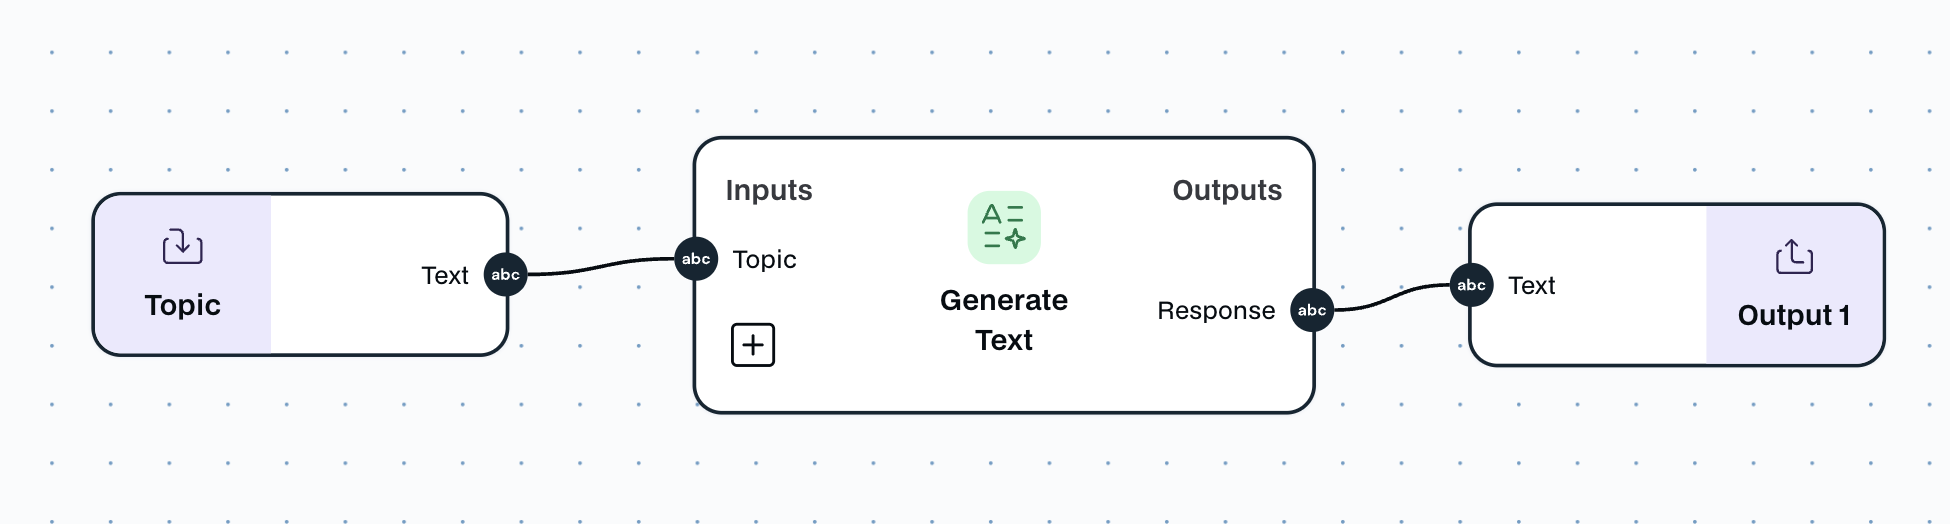 You can then take things further to build more advanced workflows that perform much better than traditional agents and models.
Take, for example, this more complex workflow that uses two different agents both, search a company's Linkedin profile, and also find all their relevant information online:
You can then take things further to build more advanced workflows that perform much better than traditional agents and models.
Take, for example, this more complex workflow that uses two different agents both, search a company's Linkedin profile, and also find all their relevant information online:
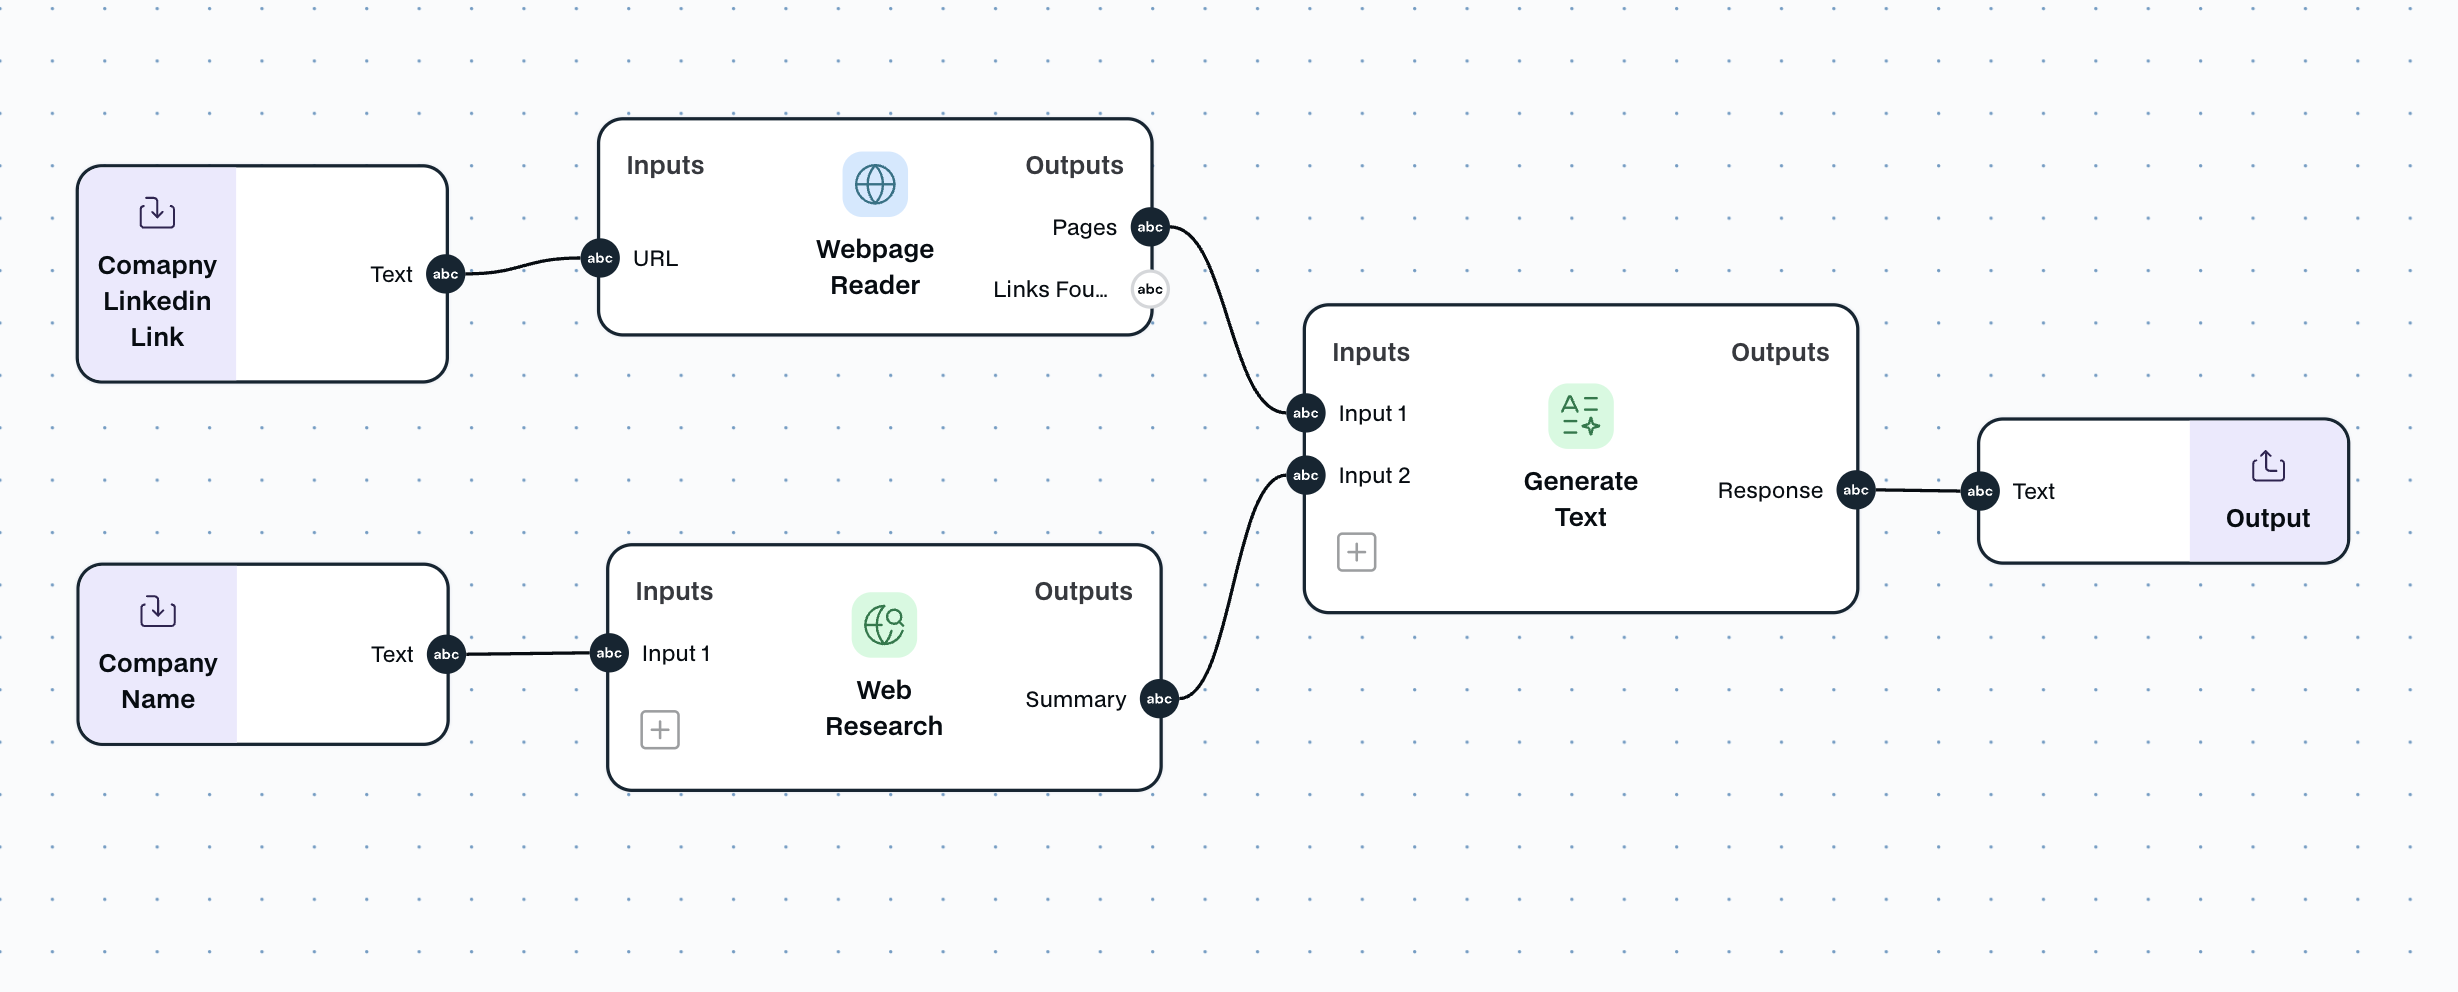 ## 4. Run
The Run page allows you to test your workflow and understand if it outputs the expected actions or results. Just fill the information on the left if necessary, press run, and see your nodes working their magic.
## 4. Run
The Run page allows you to test your workflow and understand if it outputs the expected actions or results. Just fill the information on the left if necessary, press run, and see your nodes working their magic.
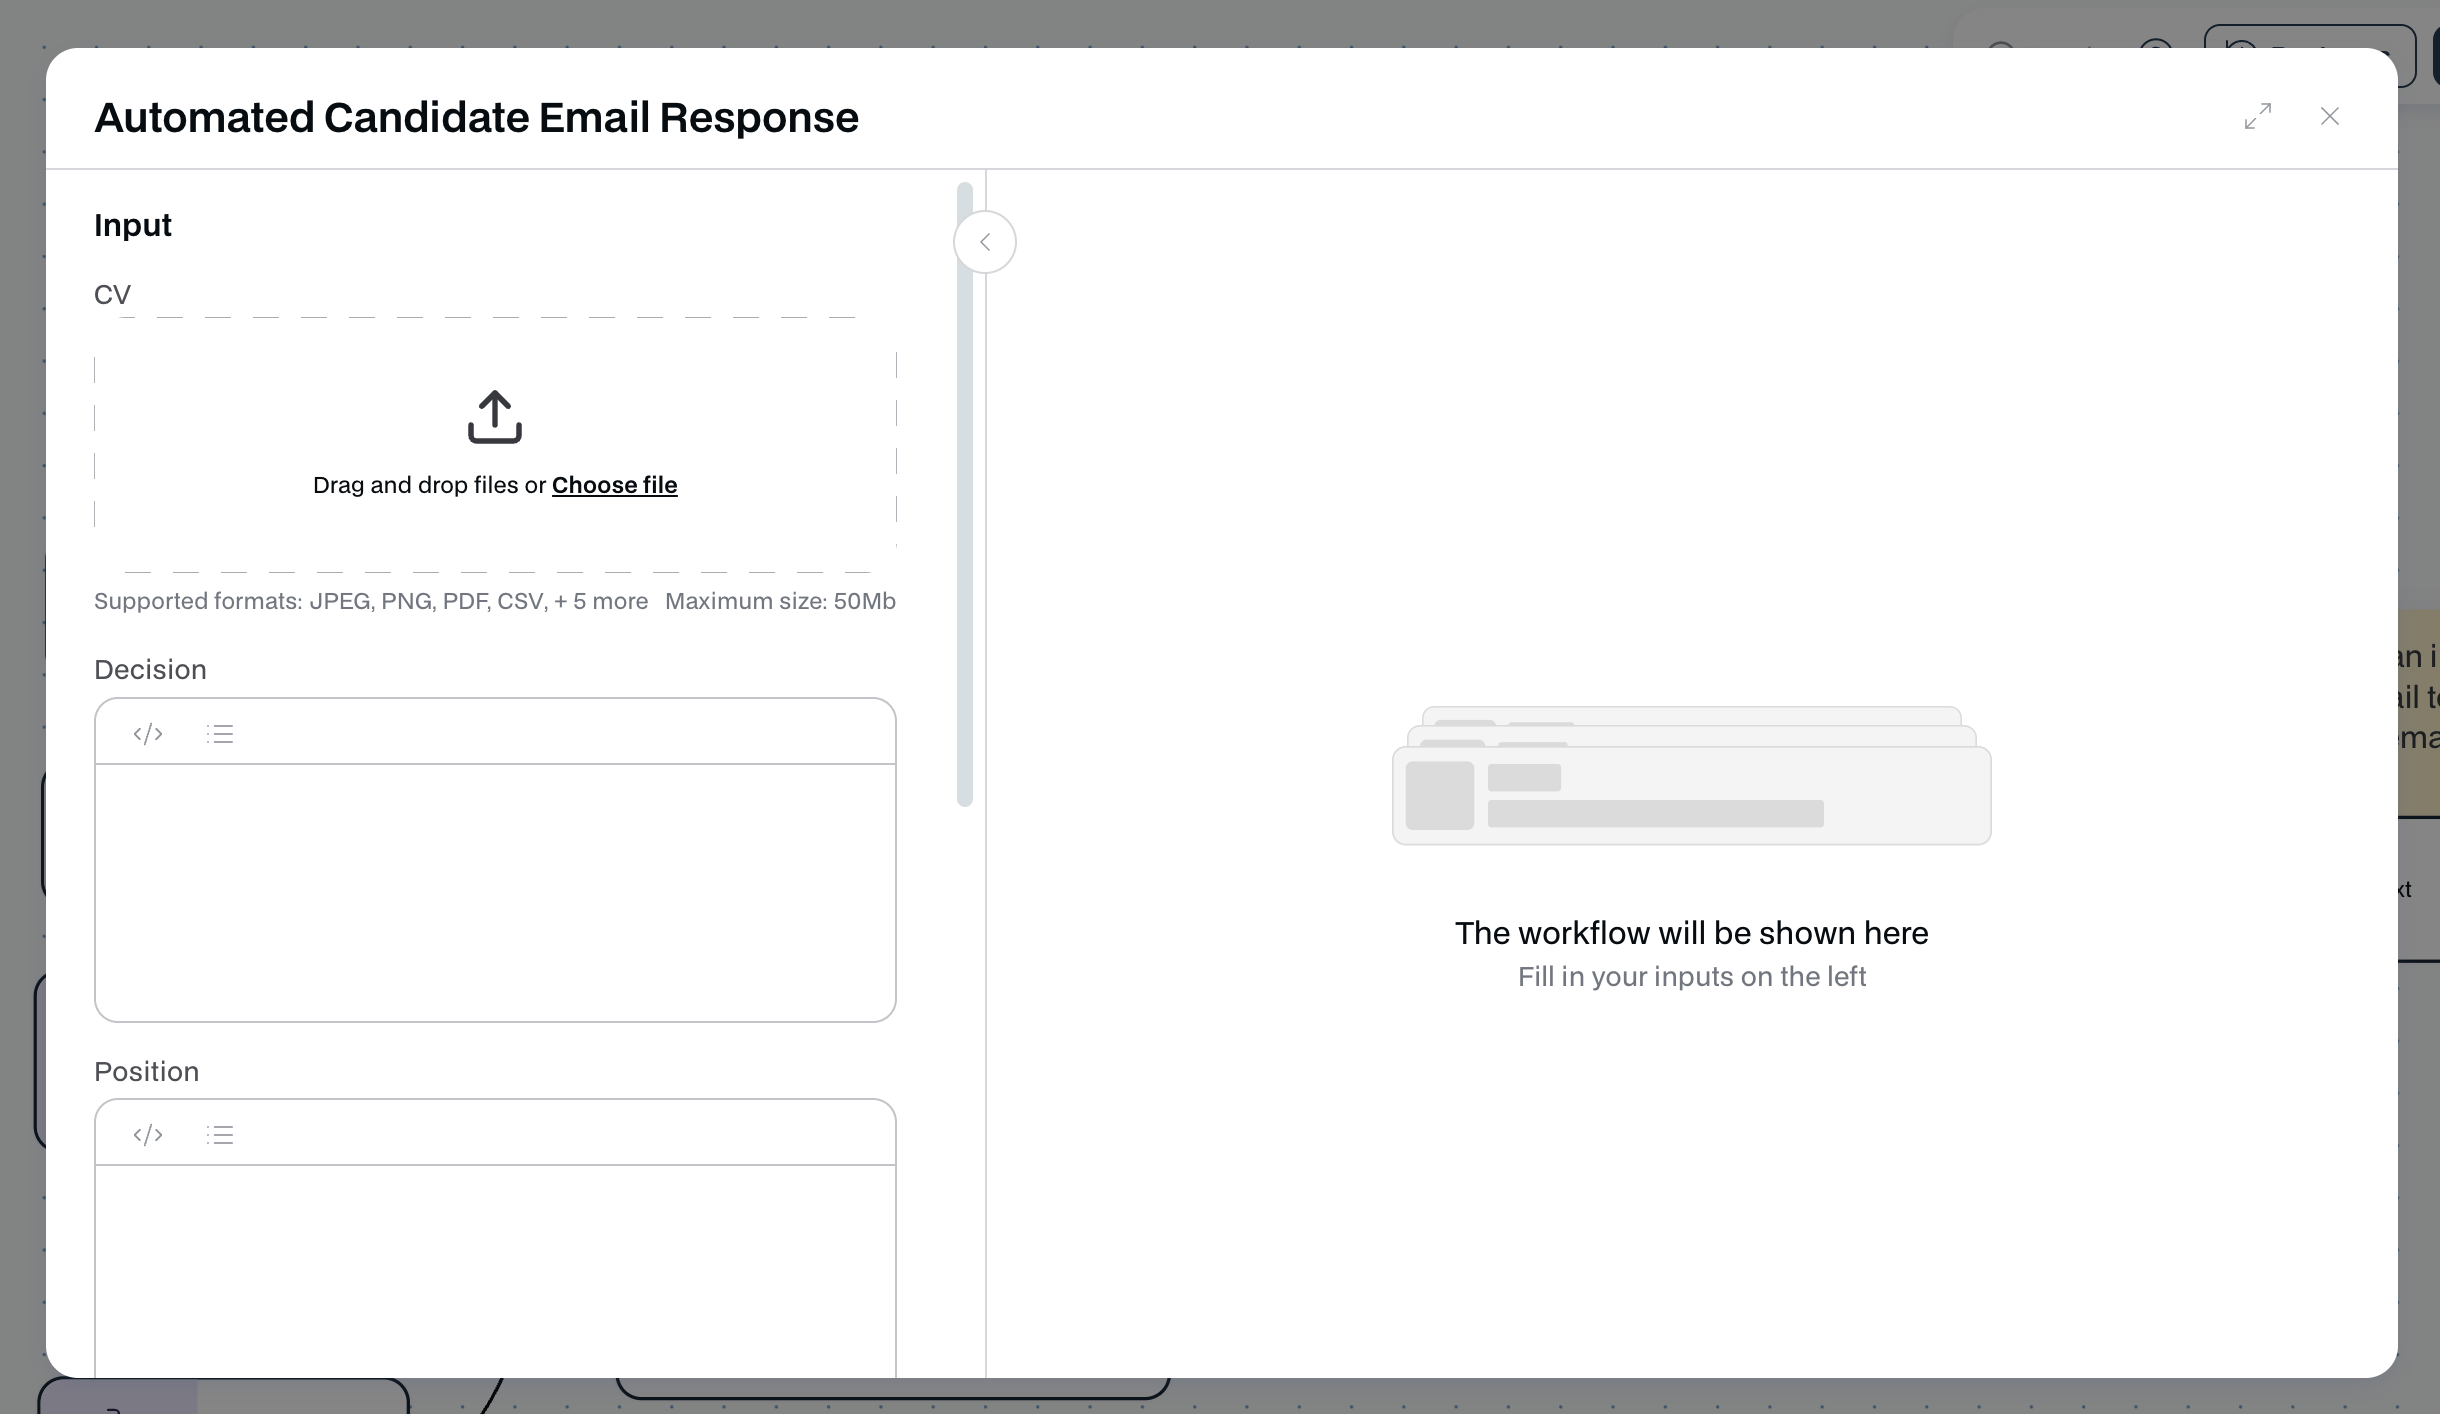 And that's it!
After building your workflow, consider using Triggers, that start your workflow automatically.\n=== Documentation/AI/EnrichCompany.mdx ===
---
title: "Enrich Company"
description: "Extract relevant insights about an organization and its leadership"
---
The `Enrich Company` module allows you to enter the company's name and domain to automatically gather detailed insights, including an overview, key employees, funding rounds, and more.
> **if selecting 'Key People' as output, specify desired roles in the 'Key Positions to Search' input, otherwise co-founders will be searched.**
The `Enrich Company` module has **variable inputs** and **variable outputs**:
- **Inputs**: The module has to receive the `website domain` of the organization, the name of the organization and (optionally) the positions of the key people that you want to find
- **Output**:
- Report: An extensive report on the organization
- Incremental ouputs can be added with unique information on the organization: Industry, Country, City, Linkedin URL, Number of employees, Total funding, Funding rounds, Key People
- **Configs**:
- `Output as JSON`: If enabled, returns the result as a raw JSON result instead of a formatted markdown
- `Use Linkedin URL`, the search will be made via Linkedin URL instead of Website domain and name of the company
- `Key People As List`, Outputs all the key people found with the provided position in list format
\n=== Documentation/AI/AI Image Generation.mdx ===
---
title: "Generate Image"
description: "Create images using any state-of-the-art image generation AI models."
---
The `Generate Image` module can use any of the state-of-the-art AI models to generate images.
**You can use this module to enhance your creativity and build logos, photos, and article images**
The `Generate Image` module has **one input** and **one output**:
- **Input**: `Prompt` describes the image the model should generate, including artistic references and styles.
- **Output**: `Image`, returns the output from the AI model based on the `Prompt` inputs provided.
- **Configs**: `width` and `height` of the image generated
And that's it!
After building your workflow, consider using Triggers, that start your workflow automatically.\n=== Documentation/AI/EnrichCompany.mdx ===
---
title: "Enrich Company"
description: "Extract relevant insights about an organization and its leadership"
---
The `Enrich Company` module allows you to enter the company's name and domain to automatically gather detailed insights, including an overview, key employees, funding rounds, and more.
> **if selecting 'Key People' as output, specify desired roles in the 'Key Positions to Search' input, otherwise co-founders will be searched.**
The `Enrich Company` module has **variable inputs** and **variable outputs**:
- **Inputs**: The module has to receive the `website domain` of the organization, the name of the organization and (optionally) the positions of the key people that you want to find
- **Output**:
- Report: An extensive report on the organization
- Incremental ouputs can be added with unique information on the organization: Industry, Country, City, Linkedin URL, Number of employees, Total funding, Funding rounds, Key People
- **Configs**:
- `Output as JSON`: If enabled, returns the result as a raw JSON result instead of a formatted markdown
- `Use Linkedin URL`, the search will be made via Linkedin URL instead of Website domain and name of the company
- `Key People As List`, Outputs all the key people found with the provided position in list format
\n=== Documentation/AI/AI Image Generation.mdx ===
---
title: "Generate Image"
description: "Create images using any state-of-the-art image generation AI models."
---
The `Generate Image` module can use any of the state-of-the-art AI models to generate images.
**You can use this module to enhance your creativity and build logos, photos, and article images**
The `Generate Image` module has **one input** and **one output**:
- **Input**: `Prompt` describes the image the model should generate, including artistic references and styles.
- **Output**: `Image`, returns the output from the AI model based on the `Prompt` inputs provided.
- **Configs**: `width` and `height` of the image generated
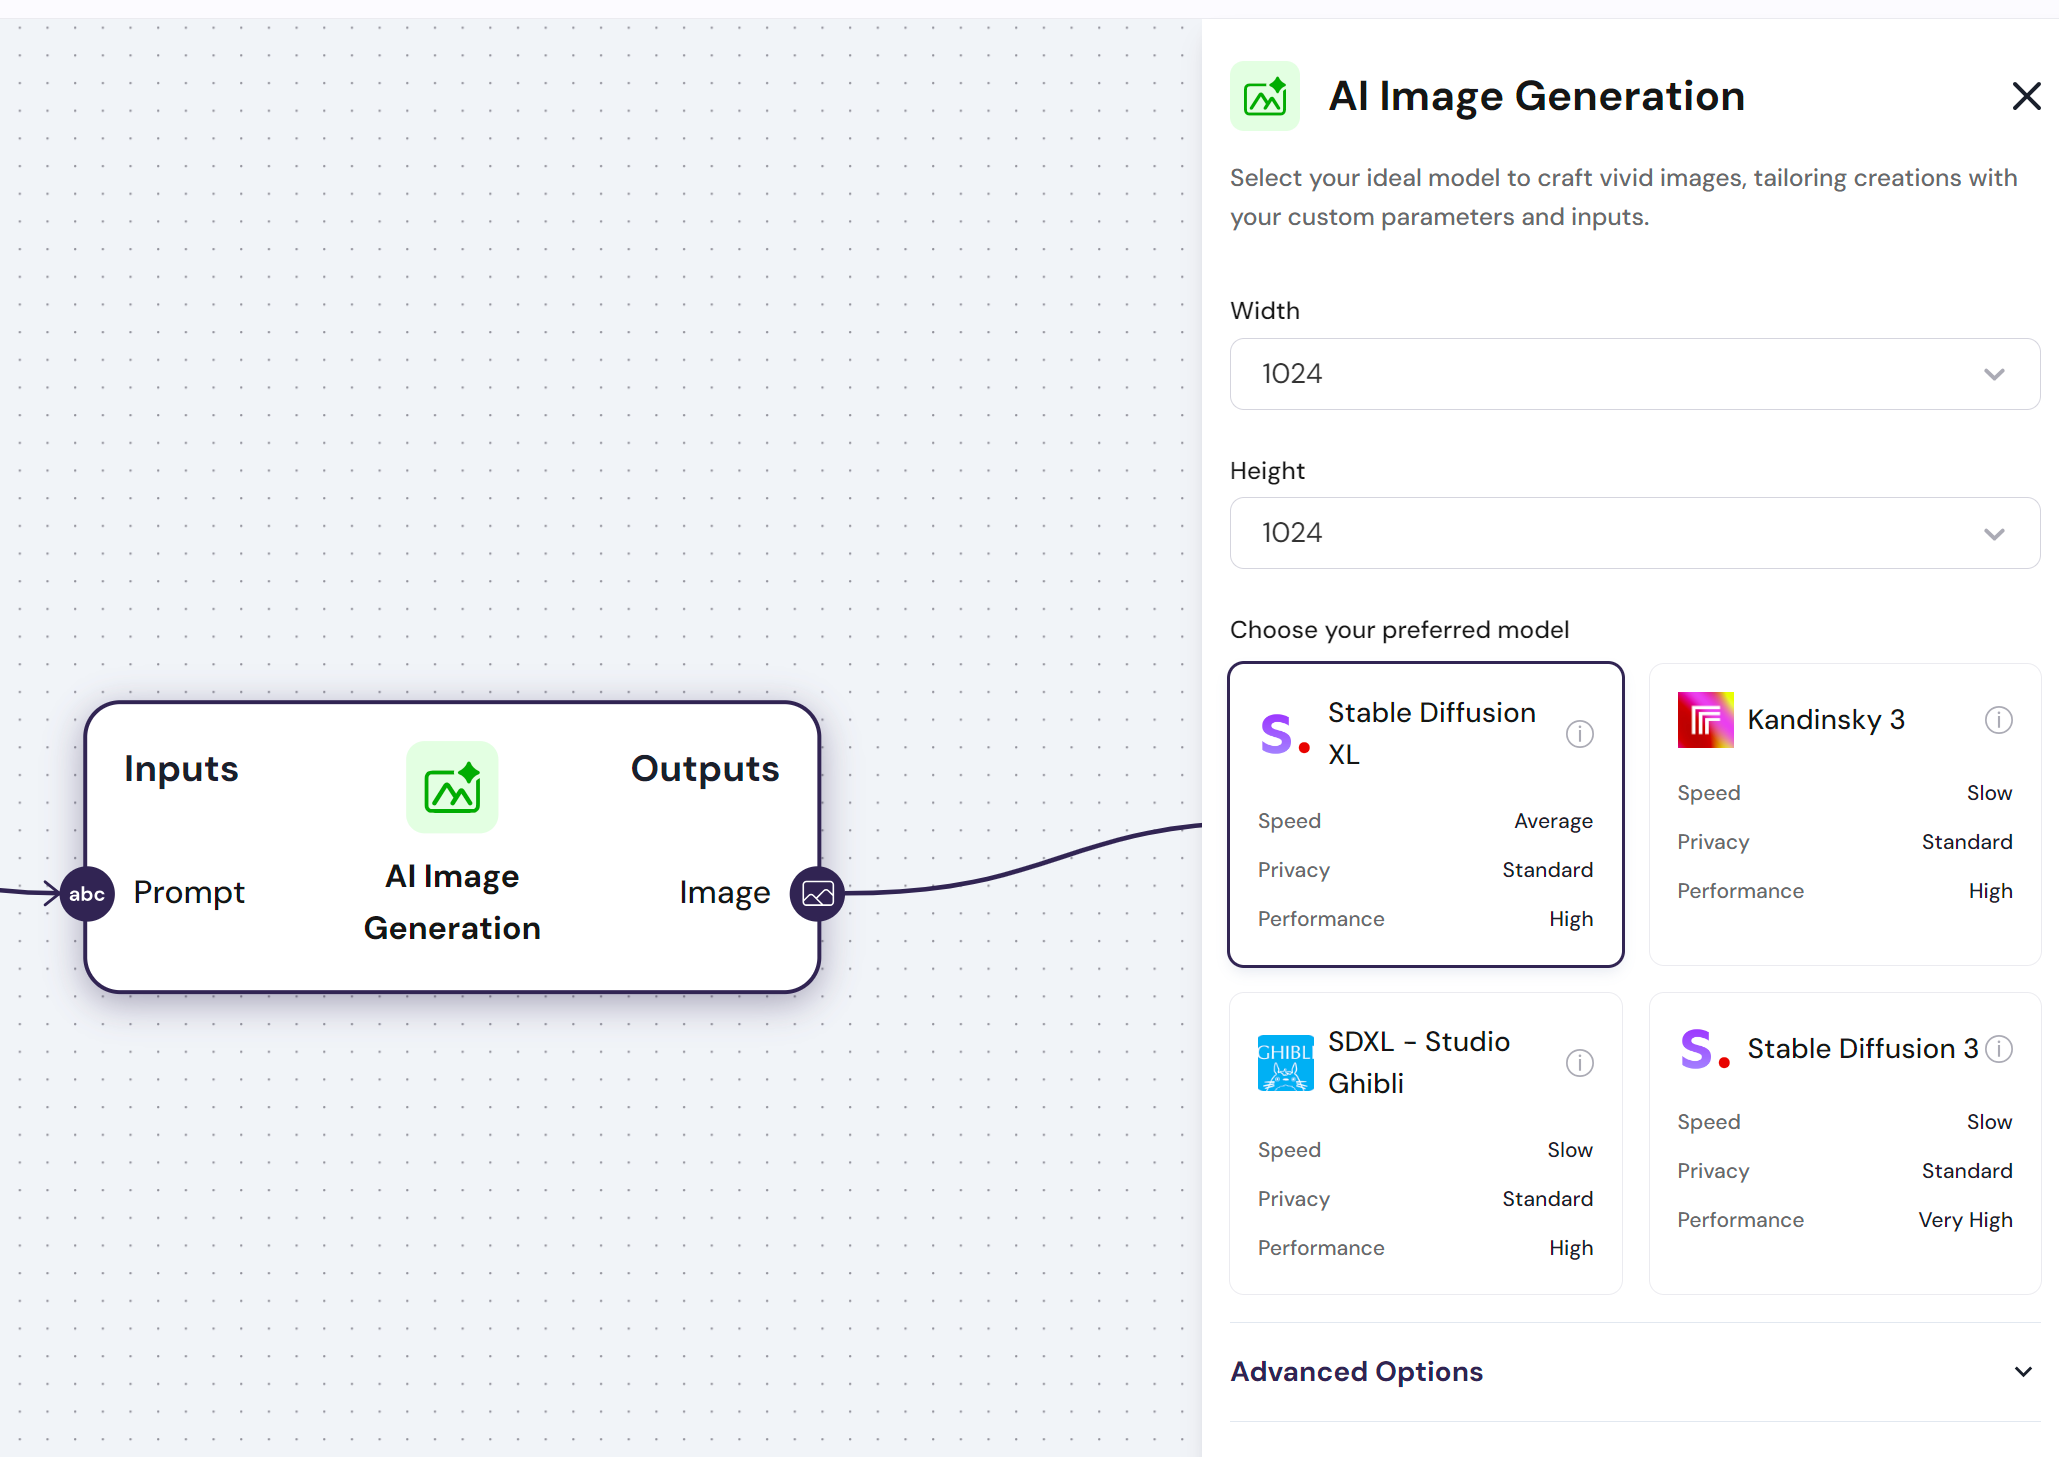 \n=== Documentation/AI/FindDocuments.mdx ===
---
title: "Find Documents"
description: "Locate files within your Knowledge base or your cloud provider"
---
The `Find Documents` module uses AI to quickly locate relevant files in your Knowledge Base, whether stored locally or in your cloud provider.
This node has a configuration called routes. They are composed of:
- **Enable reporting**
- If enabled, allows you to define the guidelines for generating a report on the found documents.
- **Report Format**
- Describe the format of the report you want to produce. Eg. Highlight key skills
- **Knowledge Base**
- Either pick a knowledge base with your uploaded documents, or upload some directly.
\n=== Documentation/AI/FindDocuments.mdx ===
---
title: "Find Documents"
description: "Locate files within your Knowledge base or your cloud provider"
---
The `Find Documents` module uses AI to quickly locate relevant files in your Knowledge Base, whether stored locally or in your cloud provider.
This node has a configuration called routes. They are composed of:
- **Enable reporting**
- If enabled, allows you to define the guidelines for generating a report on the found documents.
- **Report Format**
- Describe the format of the report you want to produce. Eg. Highlight key skills
- **Knowledge Base**
- Either pick a knowledge base with your uploaded documents, or upload some directly.
The `Find Documents` module has **one input** and **two outputs**: - **Inputs**: - `Request`, which is the query for the documents you are looking for - **Output**: - `Documents`, This comes as a list, and it retrives all documents it found. The output comes in a file format, so, to output it, change the output type to `file` - `Report` is the answer to the request that was made, based on the documents it found
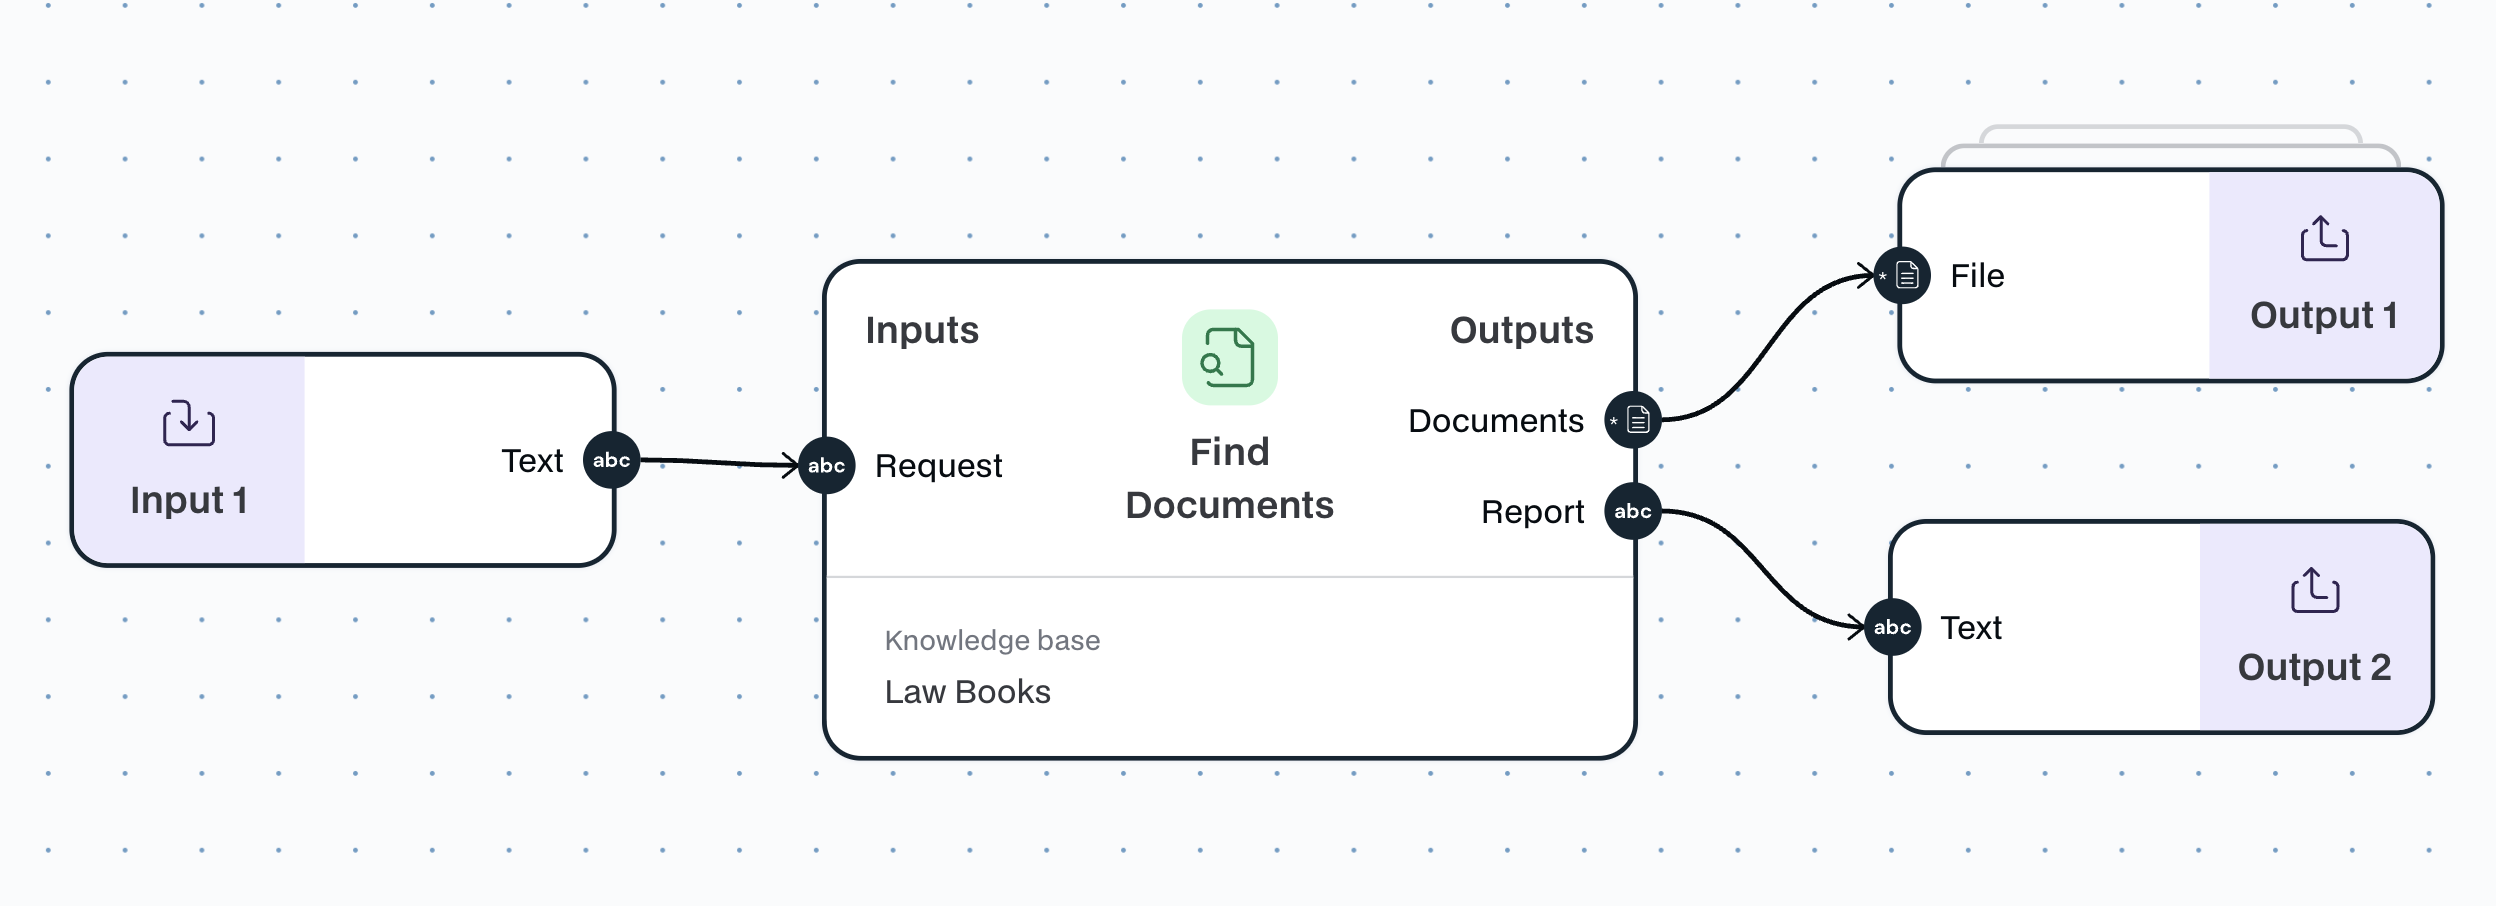 \n=== Documentation/AI/Summarizer.mdx ===
---
title: "Summarizer"
description: "Utilize AI to zummarize text"
---
The `Summarizer` node can, as the name suggests, summarize text of any length, extracting the most critical information.
This node has 2 configurations:
- **Summary Format**
- Choose how the summary should be structed - `Extended`, `Bullet points`, `Concise`
- **Summary Instructions**
- Describe what topics or aspects you want the summary to focus on.
The `Summarizer` module has **one input** and **one output**:
- **Input**:
- `Text` that you want summarized
- **Output**:
- `Summary` from the text you inserted
\n=== Documentation/AI/Summarizer.mdx ===
---
title: "Summarizer"
description: "Utilize AI to zummarize text"
---
The `Summarizer` node can, as the name suggests, summarize text of any length, extracting the most critical information.
This node has 2 configurations:
- **Summary Format**
- Choose how the summary should be structed - `Extended`, `Bullet points`, `Concise`
- **Summary Instructions**
- Describe what topics or aspects you want the summary to focus on.
The `Summarizer` module has **one input** and **one output**:
- **Input**:
- `Text` that you want summarized
- **Output**:
- `Summary` from the text you inserted
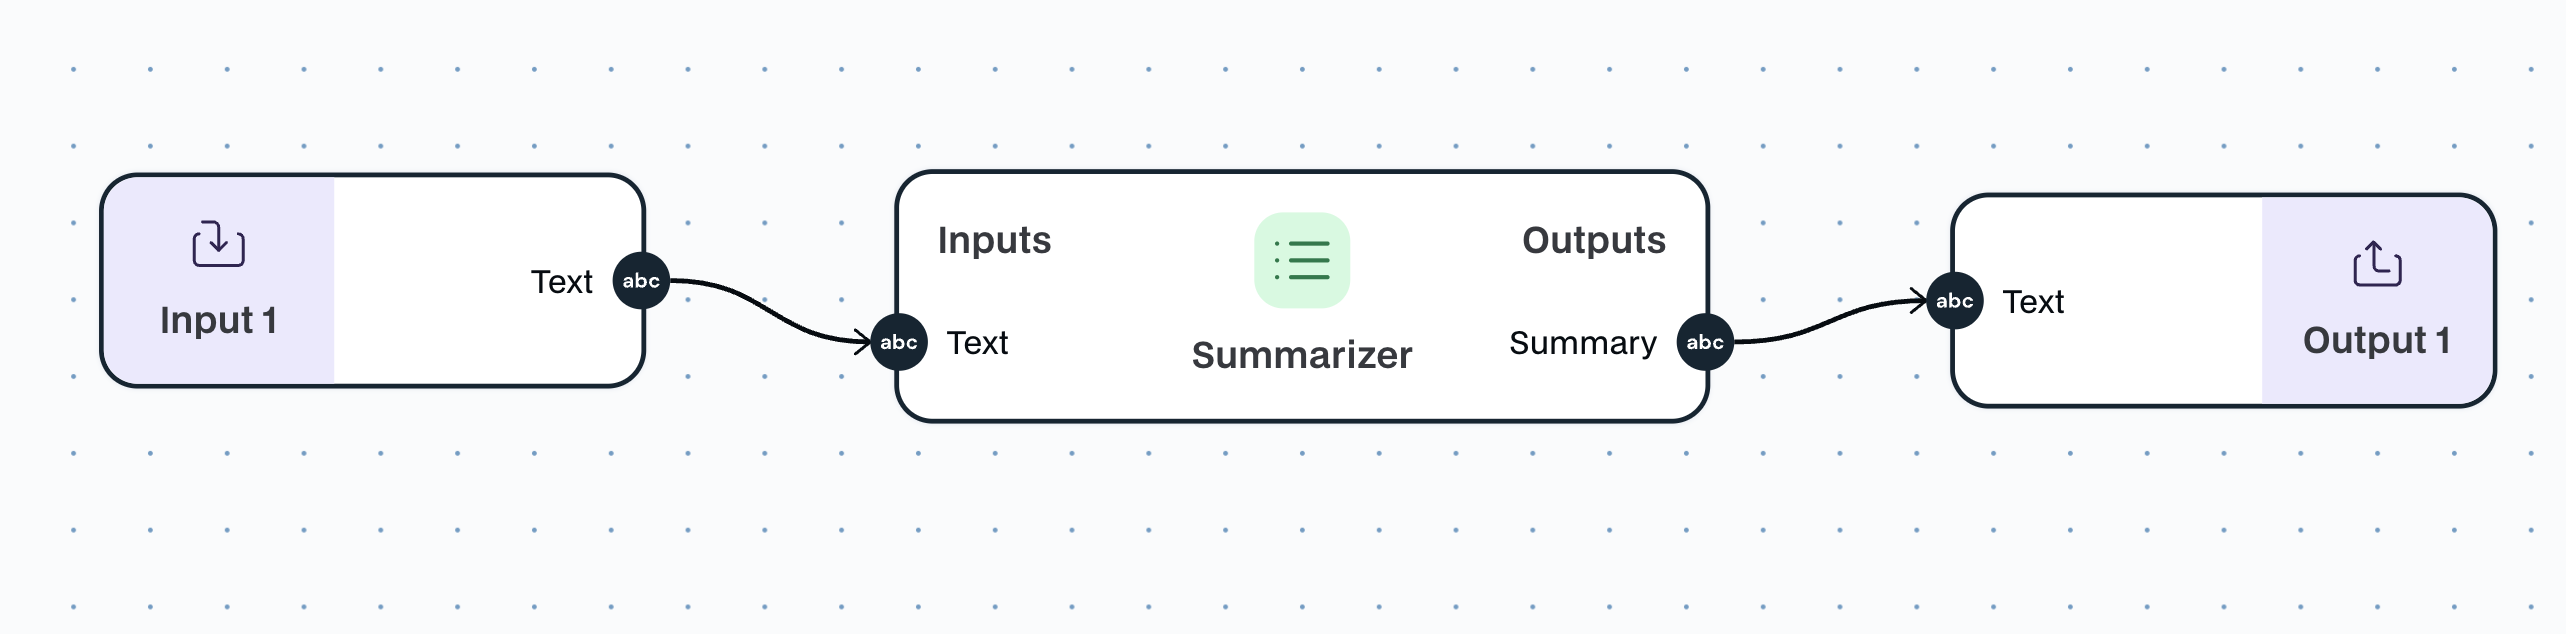 \n=== Documentation/AI/AIVision.mdx ===
---
title: "Interpret Image"
description: "Analyzes images and answers questions using a Vision-capable Language Model model."
---
The `Interpret Image` module leverages advanced Vision-enabled Language Models to interpret images and provide answers to user-submitted questions. Connect an image and a prompt containing your question, and the model will analyze the visual content to deliver accurate responses.
**You can use this module to identify objects, understand contexts, or extract specific details; it offers a powerful way to interact with and gain insights from any image.**
The `Interpret Image` module has **two inputs** and **one output**:
- **Input**: `Prompt` and `Image`, a prompt containing any specific question or insight you want to take from the image.
- **Output**: `Text`, returns an answer to the request specified in the prompt.
\n=== Documentation/AI/Interpret Image.mdx ===
---
title: "Generate Image"
description: "Create images using any state-of-the-art image generation AI models."
---
The `Generate Image` module can use any of the state-of-the-art AI models to generate images.
**You can use this module to enhance your creativity and build logos, photos, and article images**
The `Generate Image` module has **one input** and **one output**:
- **Input**: `Prompt` describes the image the model should generate, including artistic references and styles.
- **Output**: `Image`, returns the output from the AI model based on the `Prompt` inputs provided.
- **Configs**: `width` and `height` of the image generated
\n=== Documentation/AI/Categorizer.mdx ===
---
title: "Categorizer"
description: "AI classifies text into your predefined categories"
---
The AI-powered classification module automatically sorts text into your predefined categories, ensuring your content is organized efficiently.
In the configuration of the node you have:
- **Categories**, which have:
- **Category**
- Insert here a name for the category
- **Description**
- Describe what this category is, and how to categorize it like it. This is the most important part.
As an example of this pair, you could have: Category - Marketing, Description - Anything regarding marketing materials.
The `Categorizer` module has **one input** and **two outputs**:
- **Input**:
- One input of type `Text`
- **Output**:
- `Category`, The selected category determined by the node.
- `Reasoning` - The rationale behind the node’s decision to choose that category.
\n=== Documentation/AI/AIVision.mdx ===
---
title: "Interpret Image"
description: "Analyzes images and answers questions using a Vision-capable Language Model model."
---
The `Interpret Image` module leverages advanced Vision-enabled Language Models to interpret images and provide answers to user-submitted questions. Connect an image and a prompt containing your question, and the model will analyze the visual content to deliver accurate responses.
**You can use this module to identify objects, understand contexts, or extract specific details; it offers a powerful way to interact with and gain insights from any image.**
The `Interpret Image` module has **two inputs** and **one output**:
- **Input**: `Prompt` and `Image`, a prompt containing any specific question or insight you want to take from the image.
- **Output**: `Text`, returns an answer to the request specified in the prompt.
\n=== Documentation/AI/Interpret Image.mdx ===
---
title: "Generate Image"
description: "Create images using any state-of-the-art image generation AI models."
---
The `Generate Image` module can use any of the state-of-the-art AI models to generate images.
**You can use this module to enhance your creativity and build logos, photos, and article images**
The `Generate Image` module has **one input** and **one output**:
- **Input**: `Prompt` describes the image the model should generate, including artistic references and styles.
- **Output**: `Image`, returns the output from the AI model based on the `Prompt` inputs provided.
- **Configs**: `width` and `height` of the image generated
\n=== Documentation/AI/Categorizer.mdx ===
---
title: "Categorizer"
description: "AI classifies text into your predefined categories"
---
The AI-powered classification module automatically sorts text into your predefined categories, ensuring your content is organized efficiently.
In the configuration of the node you have:
- **Categories**, which have:
- **Category**
- Insert here a name for the category
- **Description**
- Describe what this category is, and how to categorize it like it. This is the most important part.
As an example of this pair, you could have: Category - Marketing, Description - Anything regarding marketing materials.
The `Categorizer` module has **one input** and **two outputs**:
- **Input**:
- One input of type `Text`
- **Output**:
- `Category`, The selected category determined by the node.
- `Reasoning` - The rationale behind the node’s decision to choose that category.
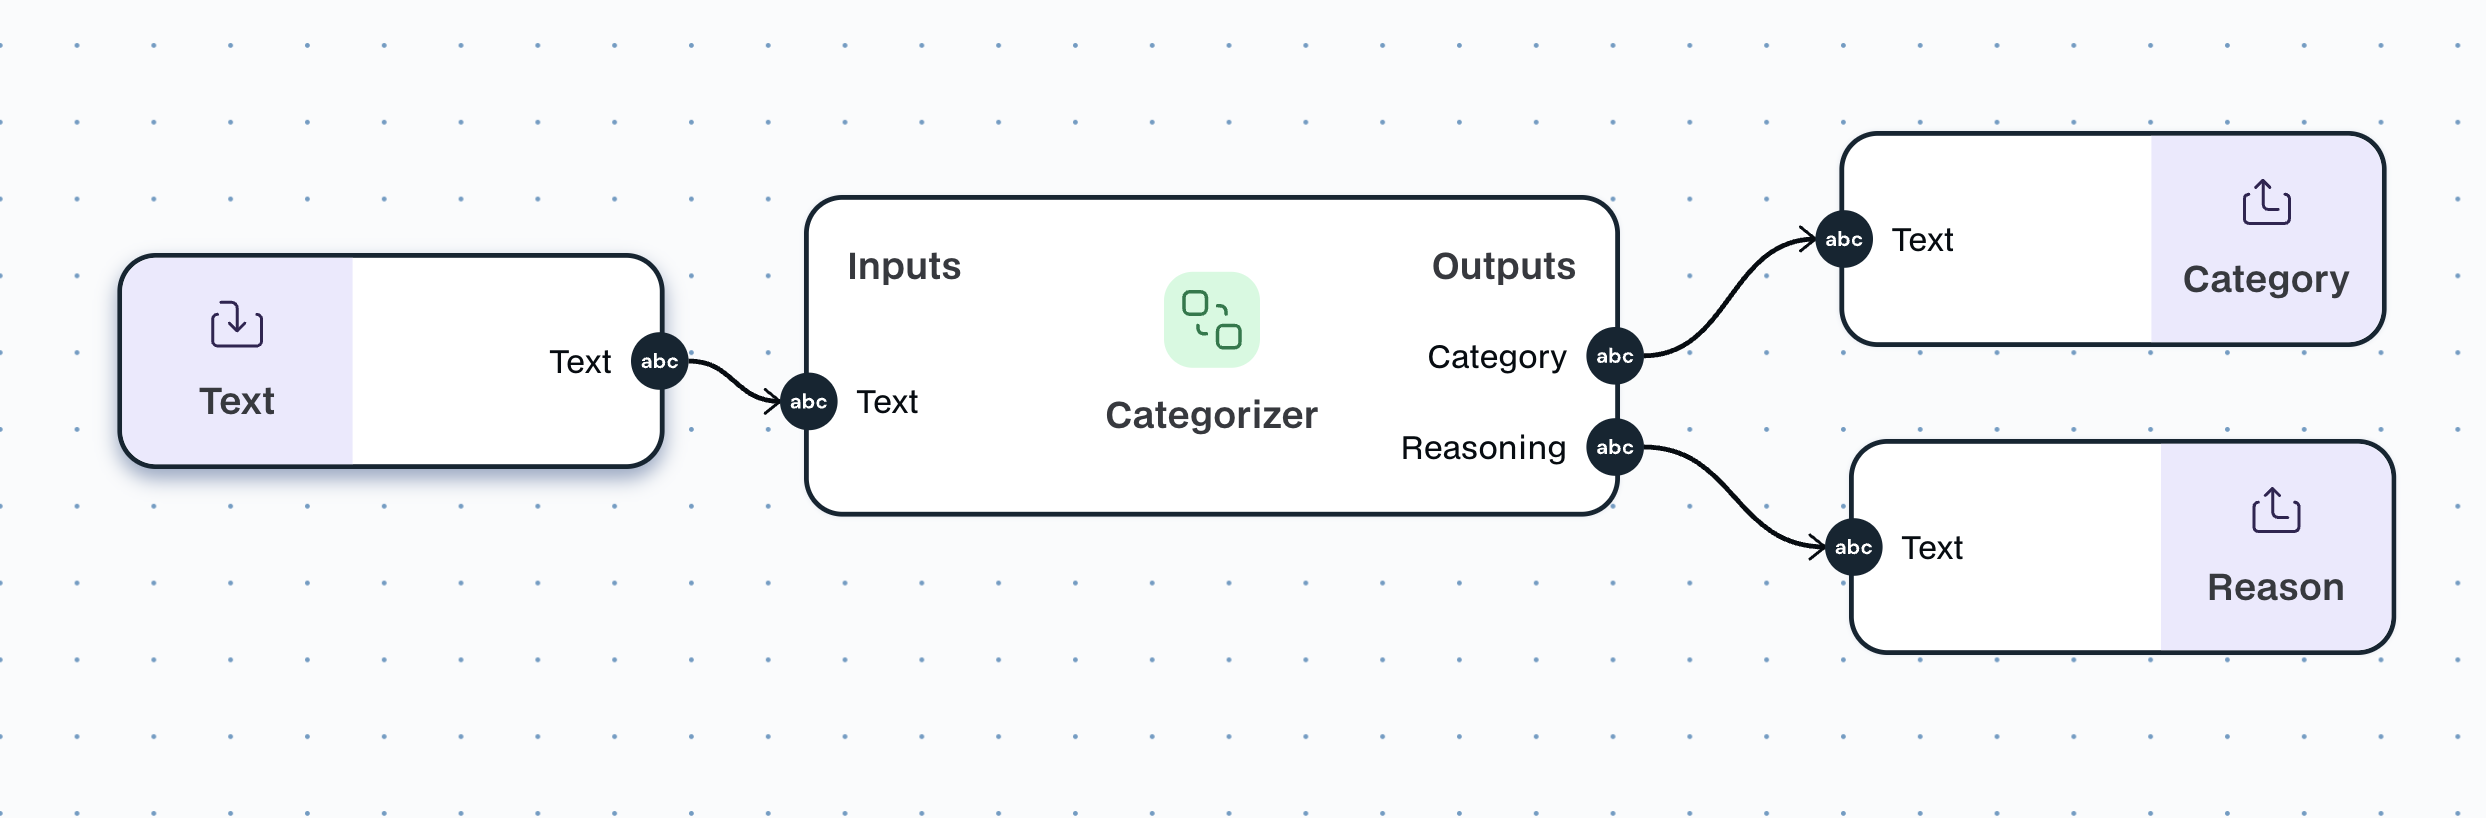 \n=== Documentation/AI/Models.mdx ===
---
title: 'Model Comparison'
Description: 'Compare the AI models we access in Noxus.'
---
The `AI text generation` module can generate text using any of the models below.
| Model | Pricing | Provider | Release Date | Multilingual | Code Capabilities | Best Use Cases |
|-------------------|----------------------------------------------------------|------------|--------------|--------------|-------------------|-------------------------------------------------------------------|
| Claude 3 Opus | \$15/1M input tokens, $75/1M output tokens | Anthropic | 2024 | Yes | Very Strong | Complex tasks, analysis, coding, creative writing, vision |
| Claude 3 Sonnet | \$3/1M input tokens, $15/1M output tokens | Anthropic | 2023 | Yes | Very Strong | General-purpose, summarization, Q&A, vision |
| Claude 3 Haiku | \$0.25/1M input tokens, $1.25/1M output tokens | Anthropic | 2023 | Yes | Very Strong | Quick responses, simple Q&A, short creative snippets, vision |
| Gemini 1.5 | \$7/1M input tokens, $21/1M output tokens | Google | 2022 | Yes | Moderate | General-purpose, creative writing, summarization |
| GPT-4 | \$30/1M input tokens, $60/1M output tokens | OpenAI | 2023 | Yes | Very Strong | Complex tasks, analysis, coding, creative writing, multi-modal |
| GPT-4 Turbo | \$10/1M input tokens, $30/1M output tokens | OpenAI | 2023 | Yes | Very Strong | Faster version of GPT-4, suitable for most tasks |
| GPT-3.5 Turbo | \$0.50-\$1.50/1M input tokens, \$1.50-\$2.00/1M output tokens| OpenAI | 2022 | Yes | Strong | General-purpose, creative writing, analysis, coding |
Please note that the information provided is based on publicly available data and may not be entirely accurate or up-to-date, especially for models with limited public information.
The image AI modules can generate images from any of the models below.
Here's an updated table with pricing information for various AI image models and platforms:
| Model/Platform | Pricing | Provider | Release Date | Best Use Cases |
|--------------------------------|---------------------------------------------------|------------------|--------------|-------------------------------------------------------------------|
| Stable Diffusion 3 | $0.065/per image | Stability AI | 2024 | General-purpose image generation, creative projects |
| Stable Diffusion XL | $0.006/per image | Stability AI | 2023 | High-resolution image generation, complex scenes |
| Kandinsky 3 | $0.006/per image | Open Source | 2023 | Artistic image generation, style transfer |
\n=== Documentation/AI/AI Image Transformation.mdx ===
---
title: "Transform Image"
description: "Generate or transform images using source images and advanced techniques such as style transfer or conditional generation."
---
The `Transform Image` module can use any of the state-of-the-art AI models to generate images from another image and a prompt instruction.
**You can use this module to change the style of your photos, create alternative images of your face, and much more**
The `Transform Image` module has **two inputs** and **one output**:
- **Input**: `Prompt`, describes the image the model should generate, including artistic references and styles.
- **Output**: `Image`, returns the output from the AI model based on the `Prompt` inputs provided.
- **Configs**: `width` and `height` of the image generated
\n=== Documentation/AI/SmartRouter.mdx ===
---
title: "Smart Route"
description: "Generate text using any of the state-of-the-art AI models"
---
The `Smart Route` node is an intelligent decision-making module in your workflow. Simply provide the relevant information, define the routes and their conditions, and it will determine the optimal path for your flow.
This node has a configuration called routes. They are composed of:
- **Action**
- This is the name of the Route taken. Eg. Urgent
- **Condition**
- This is the condition that describes when to take this route. Eg. Message contains urgent requests
- **Output**
- Format the output to your liking.
The `Smart Route` module has **variable inputs** and **variable outputs**:
- **Inputs**:
- The node can receive any number of inputs that can be used for the conditions and the outputs
- **Output**:
- The node can have multiple outputs, which are going to be each route the user has inserted above
As an example, we have a smart router that in one instance, sends an email immediately, and on the other case, it just outputs it.
\n=== Documentation/AI/Models.mdx ===
---
title: 'Model Comparison'
Description: 'Compare the AI models we access in Noxus.'
---
The `AI text generation` module can generate text using any of the models below.
| Model | Pricing | Provider | Release Date | Multilingual | Code Capabilities | Best Use Cases |
|-------------------|----------------------------------------------------------|------------|--------------|--------------|-------------------|-------------------------------------------------------------------|
| Claude 3 Opus | \$15/1M input tokens, $75/1M output tokens | Anthropic | 2024 | Yes | Very Strong | Complex tasks, analysis, coding, creative writing, vision |
| Claude 3 Sonnet | \$3/1M input tokens, $15/1M output tokens | Anthropic | 2023 | Yes | Very Strong | General-purpose, summarization, Q&A, vision |
| Claude 3 Haiku | \$0.25/1M input tokens, $1.25/1M output tokens | Anthropic | 2023 | Yes | Very Strong | Quick responses, simple Q&A, short creative snippets, vision |
| Gemini 1.5 | \$7/1M input tokens, $21/1M output tokens | Google | 2022 | Yes | Moderate | General-purpose, creative writing, summarization |
| GPT-4 | \$30/1M input tokens, $60/1M output tokens | OpenAI | 2023 | Yes | Very Strong | Complex tasks, analysis, coding, creative writing, multi-modal |
| GPT-4 Turbo | \$10/1M input tokens, $30/1M output tokens | OpenAI | 2023 | Yes | Very Strong | Faster version of GPT-4, suitable for most tasks |
| GPT-3.5 Turbo | \$0.50-\$1.50/1M input tokens, \$1.50-\$2.00/1M output tokens| OpenAI | 2022 | Yes | Strong | General-purpose, creative writing, analysis, coding |
Please note that the information provided is based on publicly available data and may not be entirely accurate or up-to-date, especially for models with limited public information.
The image AI modules can generate images from any of the models below.
Here's an updated table with pricing information for various AI image models and platforms:
| Model/Platform | Pricing | Provider | Release Date | Best Use Cases |
|--------------------------------|---------------------------------------------------|------------------|--------------|-------------------------------------------------------------------|
| Stable Diffusion 3 | $0.065/per image | Stability AI | 2024 | General-purpose image generation, creative projects |
| Stable Diffusion XL | $0.006/per image | Stability AI | 2023 | High-resolution image generation, complex scenes |
| Kandinsky 3 | $0.006/per image | Open Source | 2023 | Artistic image generation, style transfer |
\n=== Documentation/AI/AI Image Transformation.mdx ===
---
title: "Transform Image"
description: "Generate or transform images using source images and advanced techniques such as style transfer or conditional generation."
---
The `Transform Image` module can use any of the state-of-the-art AI models to generate images from another image and a prompt instruction.
**You can use this module to change the style of your photos, create alternative images of your face, and much more**
The `Transform Image` module has **two inputs** and **one output**:
- **Input**: `Prompt`, describes the image the model should generate, including artistic references and styles.
- **Output**: `Image`, returns the output from the AI model based on the `Prompt` inputs provided.
- **Configs**: `width` and `height` of the image generated
\n=== Documentation/AI/SmartRouter.mdx ===
---
title: "Smart Route"
description: "Generate text using any of the state-of-the-art AI models"
---
The `Smart Route` node is an intelligent decision-making module in your workflow. Simply provide the relevant information, define the routes and their conditions, and it will determine the optimal path for your flow.
This node has a configuration called routes. They are composed of:
- **Action**
- This is the name of the Route taken. Eg. Urgent
- **Condition**
- This is the condition that describes when to take this route. Eg. Message contains urgent requests
- **Output**
- Format the output to your liking.
The `Smart Route` module has **variable inputs** and **variable outputs**:
- **Inputs**:
- The node can receive any number of inputs that can be used for the conditions and the outputs
- **Output**:
- The node can have multiple outputs, which are going to be each route the user has inserted above
As an example, we have a smart router that in one instance, sends an email immediately, and on the other case, it just outputs it.
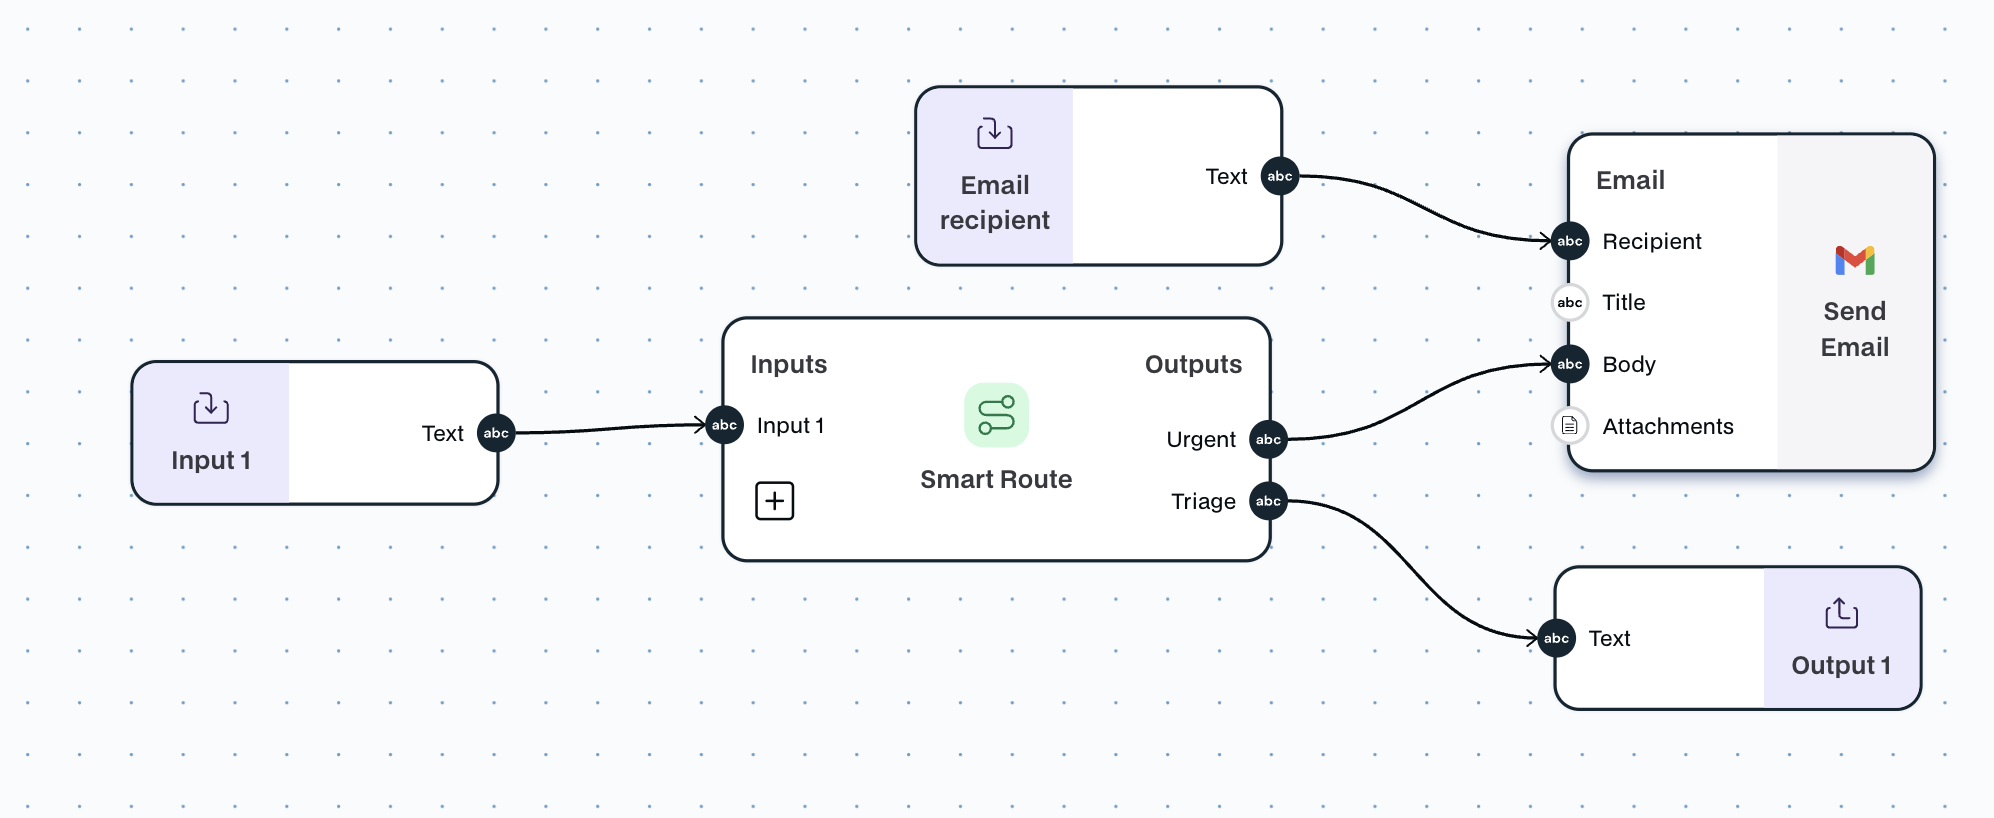 \n=== Documentation/AI/GenerateFields.mdx ===
---
title: "Generate Fields"
description: "Enter a company domain to extract a company summary or raw data"
---
> Suggestion: Try using a simpler node such as Extract Fields before trying this node.
Easily generate specific fields from your chosen AI model by providing tailored prompts and inputs. For example, request a product’s price calculation and return only the ‘Price’ field.
This module has multiple configurations:
- **Prompt**
- Be descriptive about the outputs you want to produce in the prompt.
- **Output**
- Names of the outputs you clarified in the Prompt
\n=== Documentation/AI/GenerateFields.mdx ===
---
title: "Generate Fields"
description: "Enter a company domain to extract a company summary or raw data"
---
> Suggestion: Try using a simpler node such as Extract Fields before trying this node.
Easily generate specific fields from your chosen AI model by providing tailored prompts and inputs. For example, request a product’s price calculation and return only the ‘Price’ field.
This module has multiple configurations:
- **Prompt**
- Be descriptive about the outputs you want to produce in the prompt.
- **Output**
- Names of the outputs you clarified in the Prompt
The `Generate Fields` module has **multiple inputs** and **multiple outputs**: - **Input**: - `Text`, receives any text input - **Output**: - `Text`, can have unlimited text outputs; The output name should be described in the Prompt. Find below an example of how to use this module:
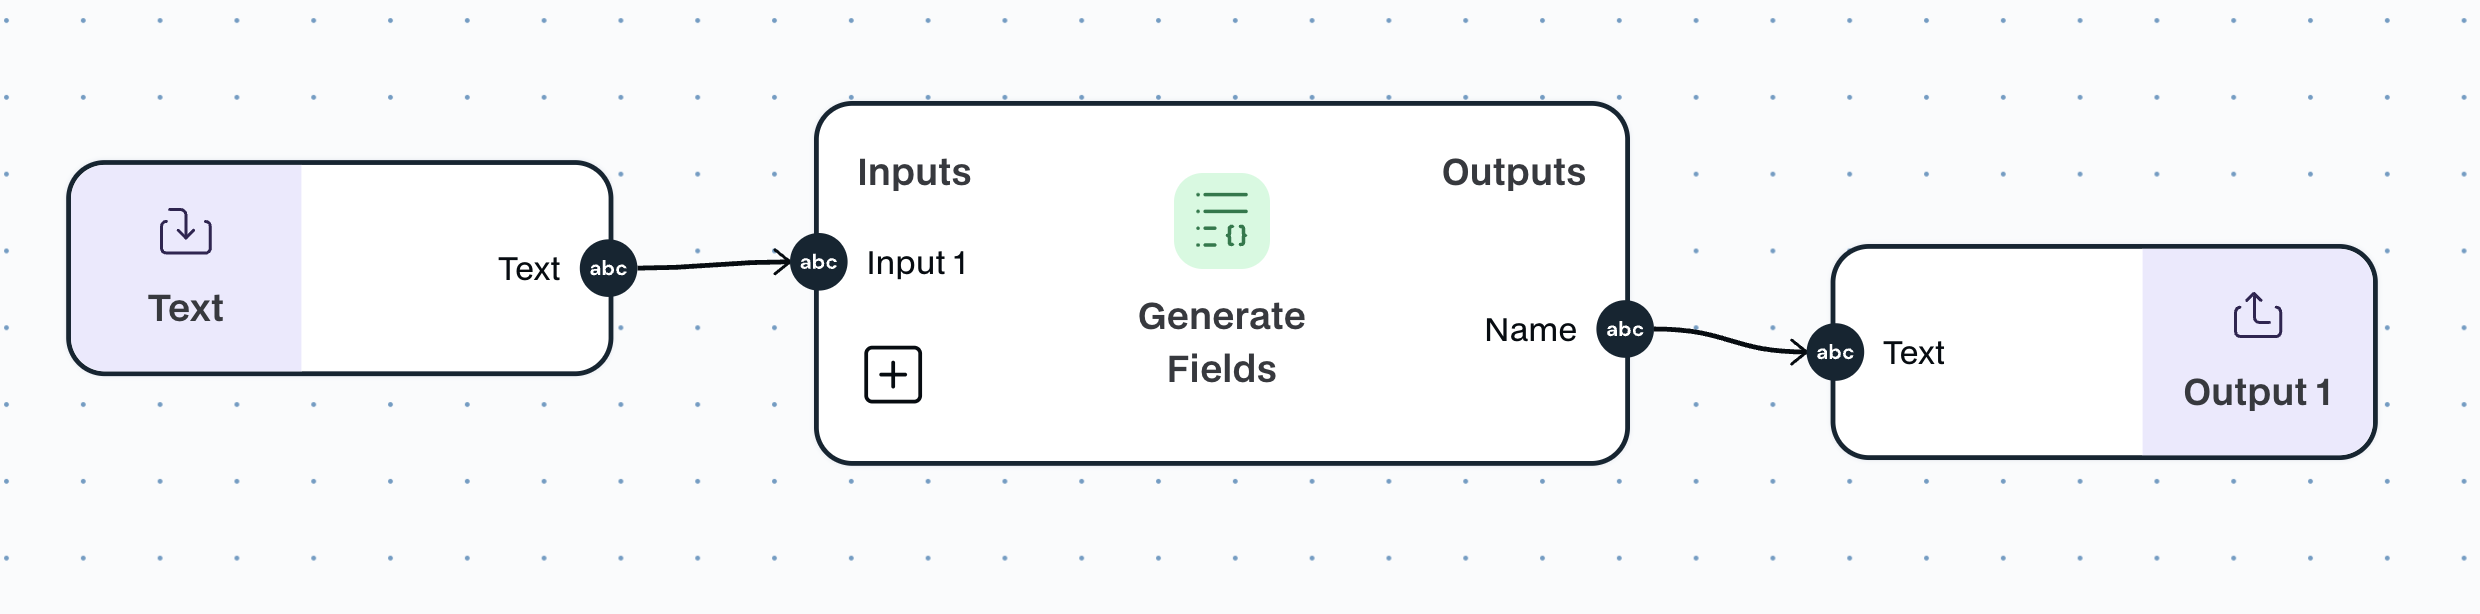 \n=== Documentation/AI/Knowledge Base QA.mdx ===
---
title: "Knowledge Base QA"
description: "Quickly extract answers from processed knowledge"
---
The `Knowledge Q&A` module quickly learns from sources like Google Drive files, PDFs, providing fast answers by extracting spcific information from complex documents.
In the configuration of the node you have:
- **Knowledge base**:
- Pick a knowledge base you have already created or create one
- Upload documents directly here. With a maximum number of 20 files. For more, create a Knowledge base
This is one of the most poweful nodes in Noxus. Upload hundreds of documents to your Knowledge base, and see how quickly Noxus finds the answers to your questions.
\n=== Documentation/AI/Knowledge Base QA.mdx ===
---
title: "Knowledge Base QA"
description: "Quickly extract answers from processed knowledge"
---
The `Knowledge Q&A` module quickly learns from sources like Google Drive files, PDFs, providing fast answers by extracting spcific information from complex documents.
In the configuration of the node you have:
- **Knowledge base**:
- Pick a knowledge base you have already created or create one
- Upload documents directly here. With a maximum number of 20 files. For more, create a Knowledge base
This is one of the most poweful nodes in Noxus. Upload hundreds of documents to your Knowledge base, and see how quickly Noxus finds the answers to your questions.
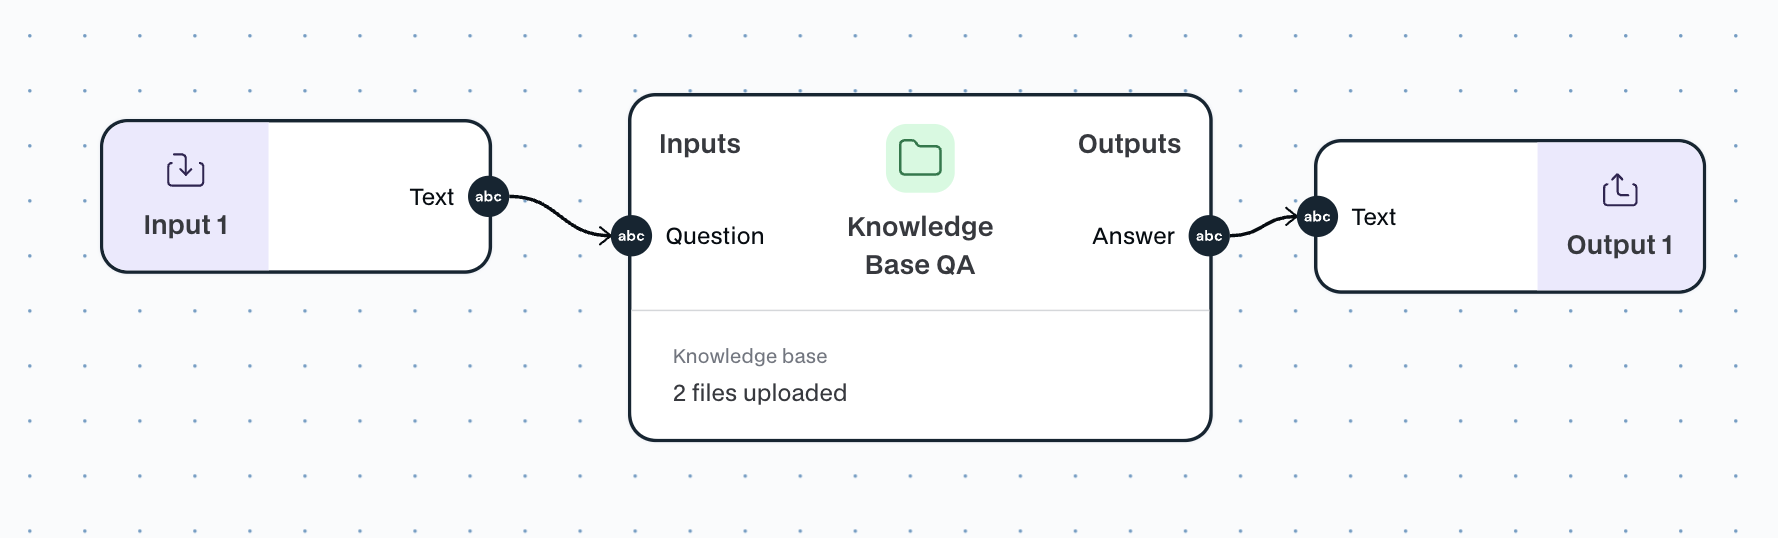 \n=== Documentation/AI/AI Text Creation.mdx ===
---
title: "Generate Text"
description: "Generate text using any of the state-of-the-art AI models"
---
The `Generate Text` module can use any of the state-of-the-art AI models to generate text.
**You can use this module to perform intelligent tasks in your workflow**
The `Generate Text` module has **variable inputs** and **one output**:
- **Inputs**: The module can receive any number of inputs that can be used to create a `Prompt`, The `Prompt` contains the instruction for the AI model. For example, a `Prompt` can be: “Classify these AI models according to pricing criteria and performance,” along with the list of AI models to classify.
- **Output**: `Response`, The `Response` returns the output from the AI model based on the `Context` and `Prompt` inputs provided.
- **Configs**:
- `Read Image URLs`, the LLM will attempt to read the images when presented with an image URL
- `Context`, The `Context` describes the behavioral information in detail. You can reference the profession, personality traits, or behaviors you expect. For example, “you are an AI expert.”
- `AI Models`, This module can be tested with all the best models in the market, or the ones that work best for a specific use case.
\n=== Documentation/AI/Translate Text.mdx ===
---
title: "Translate Text"
description: "Enables content translatation across more than 30 languages."
---
The `Translate Text` leverages advanced AI techniques and modules to provide a reliable translation capability across 30 languages.
The `Translate Text` module has **one input** and **one output**:
- **Input**: `Text` to be translated to any specified language.
- **Output**: `translatation`, translated text.
\n=== Documentation/AI/AI Text Creation.mdx ===
---
title: "Generate Text"
description: "Generate text using any of the state-of-the-art AI models"
---
The `Generate Text` module can use any of the state-of-the-art AI models to generate text.
**You can use this module to perform intelligent tasks in your workflow**
The `Generate Text` module has **variable inputs** and **one output**:
- **Inputs**: The module can receive any number of inputs that can be used to create a `Prompt`, The `Prompt` contains the instruction for the AI model. For example, a `Prompt` can be: “Classify these AI models according to pricing criteria and performance,” along with the list of AI models to classify.
- **Output**: `Response`, The `Response` returns the output from the AI model based on the `Context` and `Prompt` inputs provided.
- **Configs**:
- `Read Image URLs`, the LLM will attempt to read the images when presented with an image URL
- `Context`, The `Context` describes the behavioral information in detail. You can reference the profession, personality traits, or behaviors you expect. For example, “you are an AI expert.”
- `AI Models`, This module can be tested with all the best models in the market, or the ones that work best for a specific use case.
\n=== Documentation/AI/Translate Text.mdx ===
---
title: "Translate Text"
description: "Enables content translatation across more than 30 languages."
---
The `Translate Text` leverages advanced AI techniques and modules to provide a reliable translation capability across 30 languages.
The `Translate Text` module has **one input** and **one output**:
- **Input**: `Text` to be translated to any specified language.
- **Output**: `translatation`, translated text.